

Sunday 30 January 2011
If you like and/or save these templates please click here as a thank you :O)
Very much appreciated and won't cost you a penny

Writing says 'You say bitch like it's a bad thing ?'
Layered psp and psd files included.
If you use this in a tutorial please send me the link.
Friday 28 January 2011
If you like and/or save these templates please click here as a thank you :O)
Very much appreciated and won't cost you a penny

Template zip includes both the psp and psd layered files.
If used in a tutorial please send me the link.
Tuesday 25 January 2011
If you like and/or save these templates please click here as a thank you :O)
Very much appreciated and won't cost you a penny

If you create a tutorial using my template please link back to this blog
and send me a link so I can put it here along with a signature sample ;O)
This file includes both the psp and psd layered files.
Sunday 16 January 2011

Horny Devil
Tutorial written by and © to Bits N Bobs 16th January 2011.
Results are for personal use only.
No monetry gain allowed and that includes placing them behind a paid or donation based membership area.
You are not allowed to share/forward or translate any of my tutorials or place them on any blog, website, DVD or anywhere else without my permission.
These tutorials are written from my own ideas and any similarities to any other tutorial is purely coincidental.
All tutorials are for those with a working knowledge of paintshop pro.
I reserve the right to amend these terms at any time.
Supplies needed.
Font of choice for your name.
I am using GoodVibrationsROB
Tube of choice.
I am using Devil In Red Dress by Amberly Berendson
Tube is not to be used without an MTA license
Horny Devil Template available here
Alien Skin Eye Candy 5 Nature - Fire.
This link is for Eye Candy 6
Note
This tutorial was written in PSP 9
Open all supplies in paintshop except the font.
Double click on your font and minimize.
1. Open the template, shift + D and close the original.
Re-size the template to 550 pixels wide, all layers tabbed.
Image/ canvas size, 600 x 600 center placement.
Close off the copyright layer.
Activate mini text layer, layers/ merge/ merge down.
2. Activate circle layer, selections/ all/ float/ defloat.
Selections/ modify/ expand by 1.
Select a colour from your tube,
I am using #691512, flood fill,.
Add a new raster layer, name the layer flame 1.
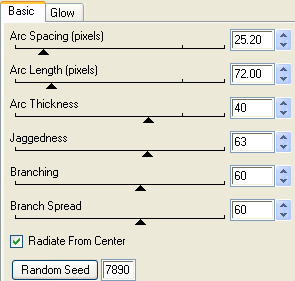
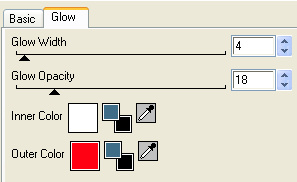
Effects/ Plugins/ Eye Candy/ Fire
Settings as in the screen shot below

Add a new raster layer, name the layer flame 2,
Effects/ Plugins/ Eye Candy/ Fire
Same settings as before but this time hit the
random seed button once.
Add a new raster layer, name the layer flame 3,
Effects/ Plugins/ Eye Candy/ Fire
Same settings as before but this time hit the
random seed button once.
Add a new raster layer, name the layer flame 4
Effects/ Plugins/ Eye Candy/ Fire
Same settings as before but this time hit the random seed button once.
Selections/ invert, hit delete on your keyboard.
Activate flame 3, hit delete, activate flame 2, hit delete, activate flame 1, hit delete,
Selections/ select none.
3. Activate your horns layer.
selections/ all/ float/ defloat.
Selections/ modify/ expand by 1.
Select a darker colour from your tube,
I am using #3c0c0c, flood fill.
Effects/ 3D effects/ Inner Bevel
Settings in screenshot below.

4. Activate your heart layer.
selections/ all/ float/ defloat.
Selections/ modify/ expand by 1.
Select a colour from your tube,
I am using #691512, flood fill.
Effects/ 3D effects/ Inner Bevel.
Same settings as before.
Layers/ merge/ merge down.
5. Activate your text border layer.
selections/ all/ float/ defloat.
Select a colour from your tube,
I am using #691512, flood fill.
Effects/ 3D effects/ Inner Bevel.
Same settings as before.
6. Activate your text layer.
selections/ all/ float/ defloat.
Selections/ modify/ expand by 1.
Select a darker colour from your tube,
I am using #3c0c0c, flood fill.
Effects/ 3D effects/ Inner Bevel
Same settings as before.
Layers/ merge/ merge down.
Move this layer towards the middle of the horns.
7. Activate your heart layer.
Re-size your tube to 450 pixels wide,
copy, paste as a new layer, position towards the bottom.
Add a new raster layer, add all copyright info.
PLEASE NOTE:
If you do not wish to animate Layers/ merge/ merge visible.
Add your name and export as a transparent png file and save.
ANIMATION
8. Close layers flame 4, 3, and 2, Edit/ copy merged.
Open Animation shop, paste as a new animation.
Back to psp, close flame 1 and open flame 2, edit/ copy merged.
Back to Animation shop, edit/ paste after current animation.
Back to psp, close flame 2 and open flame 3, edit/ copy merged.
Back to Animation shop, edit/ paste after current animation.
Back to psp, close flmae 3 and open flame 4, edit/ copy merged.
Back to Animation shop, edit/ paste after current animation.
9. Create your name in paintshop as normal, copy the file and paste
as a new animation into animation shop, edit/ copy.
Activate your animation, edit/ select all, edit/ propogate paste,
edit/ paste into selected frame and then file/save as.
Saturday 15 January 2011

Click on the tag to view the animation.
Electrifying
Tutorial written by and © to Bits N Bobs 15th January 2011
You are not allowed to share/forward or translate this tutorial or place it on any blog or website.
This tutorial is written from my own ideas and any similarities to any other tutorial is purely coincidental.
Tutorial is for those with a working knowledge of paintshop pro.
Supplies needed.
Font of choice for your name.
I am using BeauRivageOne
Tube of choice , I am using Natalie by Bits N Bobs
Artwork is not to be used without using the correct copyright info included with the tube
Alien Skin Xenofex 2 - Electrify
My supplies here
Note
For the animation you will need animation shop.
This tutorial was written in PSP 9
Open all other supplies in paintshop except the font.
Double click on your font and minimize.
1. Open a new file 600 x 250
Re-size your paper to 620 pixels wide copy,
paste as a new layer.
2. Copy element 40, paste as a new layer,
position to the left, duplicate layer.
Image/ mirror, layers/ arrange/ move down.
Duplicate layer,
Layers/ arrange/ move down.
Effects/ texture effects, mosaic antique
using the settings as in the screenshot below.

Duplicate layer, layers/ arrange/ move down.
Layers/ merge/ merge down.
Rename this layer to 1.
Duplicate layer, rename this layer to 2
Duplicate layer, rename this layer to 3
Duplicate layer, rename this layer to 4
3. Activate the layer named 1,
Effects/ Plugins/ Alien Skin Xenofex 2/ Electrify
Adjust the settings as per the 2 screen shots below.
Activate the layer named 2,
Effects/ Plugins/ Alien Skin Xenofex 2/ Electrify
Same settings as before but it the random seed once.
Activate the layer named 3,
Effects/ Plugins/ Alien Skin Xenofex 2/ Electrify
Same settings as before but it the random seed once.
Activate the layer named 4,
Effects/ Plugins/ Alien Skin Xenofex 2/ Electrify
Same settings as before but it the random seed once.
4. Activate top layer
Copy the larger of your tubes,
paste as a new layer, image/ mirror.
Position to your liking.
Add a drop shadow.
I use H3, V3, O100, B9.00, C#000000
Copy your smaller tube,
paste as a new layer, position to your liking.
Change the layer blend mode to Screen.
5. Copy your wordart, paste as a new layer.
Position towards the top so you have room for your name underneath.
Change te colour if you want to.
I am leaving mne as white.
Add your copyrigt info.
PLEASE NOTE:
If you do not wish to animate layers/ merge/ merge visible
Add your name and save.
ANIMATION
6. Close layers 2, 3 and 4, edit/ copy merged.
Open Animation shop, paste as a new animation.
Back to psp, close 1 and open 2, edit/ copy merged.
Back to Animaton shop, edit/ paste after current aimation.
Back to psp, close 2 and open 3, edit/ copy merged.
Back to Animaton shop, edit/ paste after current aimation.
Back to psp, close 3 and open , edit/ copy merged.
Back to Animaton shop, edit/ paste after current aimation.
7. Create your name in paintshop as normal, copy the file and paste as a new animation into animation shop.
Activate your animation, edit/ select all, edit/ propogate paste, edit/ paste into selected frame and then file/save as.
Friday 14 January 2011

Tutorial written by and © to Bits N Bobs 14th anuary 2011.
Results are for personal use only.
No monetry gain allowed and that includes placing them behind a paid or donation based membership area.
You are not allowed to share/forward or translate any of my tutorials or place them on any blog, website, DVD or anywhere else without my permission.
These tutorials are written from my own ideas and any similarities to any other tutorial is purely coincidental.
All tutorials are for those with a working knowledge of paintshop pro.
I reserve the right to amend these terms at any time.
Supplies needed.
Font of choice for your name.
I am using Chicago HoodZZ
Tube of choice.
I am using Sugar Candy by James Jacks
Tube is not to be used without an MTA license
Crime Scene kit available here by Bits N Bobs
I have used the following items from the above kit.
CS 7, CS 11, CS 16, CS 36, CS 41,
Note
This tutorial was written in PSP 9
Open all supplies in paintshop except the font.
Double click on your font and minimize.
Open a new image, 500 w x 650 h at 72 dpi.
1. Re-size CS 16 to 550 pixels high,
copy, paste as a new layer on your working image.
Using your magic wand select the center of each section of the frame.
Selections/ modify/ expand by 5.
Add a new raster layer.
Copy the image from your tube and paste into selection.
Layers/ arrange/ move down.
Change the layer blend mode to Luminance Legacy)
Add a new raster layer, flood fill with white #fffff
Layers/ arrange/ move down
Selections/ select none.
Activate your frame layer and add a drop shadow.
I use V3 , H3 , O100 , B9.00 , C #000000,
My settings will remain the same througout.
2. Copy CS 7, paste as a new layer,
position to your liking, duplicate layer.
Image/ mirror, Image/ flip, position to your liking.
Duplicate layer, Image/ flip.
Layers/ merge/ merge down, merge down again.
Layers/ arrage/ send to bottom.
3. Activate your top layer.
Re-size CS 36 to 520 pixels high.
Copy, paste as a new layer.
Image/ mirror, position to the left of the frame.
If needed use your mesh warp tool to push the
top and bottom edges to wrap around the frame.
Add a drop shadow.
4. Re-size CS 41 to 200 pixels high,
copy, paste as a new layer and position top right.
Duplicate layer, Image/ flip.
Layers/ merge/ merge down.
Layers/ arrange/ send to bottom.
Add drop shadows if you wish.
5. Re-size CS 11 to 400 pixels high,
copy, paste as a new layer and position to your liking.
6. Re-size you tube to 550 pixels high,
copy, paste as a new layer, position to your liking.
Add a drop shadow.
7. Add a new raster layer then add all your copyright info.
Layer/ merge/ merge visible.
File export and save as a transparent png.

Tutorial written by and © to Bits N Bobs 14th January 2011.
Results are for personal use only.
No monetry gain allowed and that includes placing them behind a paid or donation based membership area.
You are not allowed to share/forward or translate any of my tutorials or place them on any blog, website, DVD or anywhere else without my permission.
These tutorials are written from my own ideas and any similarities to any other tutorial is purely coincidental.
All tutorials are for those with a working knowledge of paintshop pro.
I reserve the right to amend these terms at any time.
Supplies needed.
Font of choice for your name and text.
I am using Chartrand
Tube of choice.
I am using a tube called Sexy Trouble from Ismael Rac
Tubes are not to be used without the correct licence
Mask 341 by Vix http://vixpsp.webs.com/
Kit - Red Hot Valentine by Artmama
Items I have used from this kit are...
paper 1, Embellie 38, Embellie 50, Embellie 4, embellie 18
Note
This tutorial was written in PSP 9
Open all the supplies in paintshop except the font.
Double click on your font and minimize.
1. Open a new image 500 wide x 500 high at 72 dpi
Re-size your paper to 450 pixels wide.
Copy and paste as a new layer.
Layers/ load/save mask/ Load mask from disk,
Look for mask Vix_Mask341 and load with the settings in the screen shot below.
Layers/ merge/ merge group

2. Re-size embellie 38 to 350 pixels wide.
Copy and paste as a new layer.
Select the inside using your magic wand.
Selections/ modify/ expand by 5.
Layers/ new raster layer, copy your paper, paste into selection.
Layers /arrange/ move down.
Effects/ texture effect/ Mosaic Antique settings as in screen shot below

3. Activate your top layer.
Sections/ select none.
Add a drop shadow of choice.
My settings will remain the same throughout.
V3, H3, O100, B9.0, C #000000
4. Re-size embellie 50 to 300 pixels high.
Copy, paste as a new layer and position to your liking.
Add drop shadow.
5. Re-size embellie 4 to 65 pixels high.
Copy, paste as a new layer and position to the top
of the previous embellie.
Add drop shadow.
6. Re-size embellie 18 to 200 pixels high.
Copy, paste as a new layer and position to your liking.
Layers/ arrange/ send to bottom.
Layers / duplicate, Image/ mirror.
Position to your liking.
Layers/ merge/ merge down.
Add a drop shadow.
7. Activate your paper layer.
Copy your tube ( I am using the medium sized one),
paste as a new layer, position to your liking.
Change the layers blend mode to Luminance ( Legacy)
then lower the layer opacity to 32%.
8. Activate your top layer.
Re-size your full body tube to 450 pixels high,
copy, paste as a new layer.
Image/ mirror, position to your liking and add a drop shadow.
9. Layers/ merge/ merge visible.
Add all copyright info and your name, export as a transparent png file and save.
Subscribe to:
Posts
(Atom)
Stores


BNB Blinkie


