

Showing posts with label PTE. Show all posts
Showing posts with label PTE. Show all posts
Saturday, 19 November 2011

Tutorial written by and © to Bits N Bobs 19th February 2011.
Results are for personal use only.
No monetry gain allowed and that includes placing them behind a paid or donation based membership area.
You are not allowed to share/forward or translate any of my tutorials or place them on any blog, website, DVD or anywhere else without my permission.
These tutorials are written from my own ideas and any similarities to any other tutorial is purely coincidental.
All tutorials are for those with a working knowledge of paintshop pro.
I reserve the right to amend these terms at any time.
Supplies needed.
Font of choice for your name.
I am using Bickley script plain
Tube of choice.
I am using 3 by Elias Chatzoudis bought from MPT
Mine are Lucela, Adoette and Thanks babe.
Elias is now at Psp Tubes Emporium
Tubes are not to be used without the correct licence
Scrap kit Fall About by Bits N Bobs
Items I am using from this kit are...
FA paper 4, FA 37, 49, 52, 68,
Note
This tutorial was written in PSP 9 and needs animation shop for the animation.
Open all supplies in paintshop except the font.
Double click on your font and minimize.
1.Activate FA68, image/ re-size, re-size to 96%
and 72 pixels per inch, all layers tabbed.
Using your magic wand select the center of
each part of the frame.
Selections/ modify/ expand by 3.
Layers/ new raster layer.
Copy your paper and paste into selection.
Layers/ arrange/ move down.
Copy FA 52, paste as a new layer,
selections/ invert, hit delete on your keyboard.
Selections, select none, layers/ merge/ merge down.
2.Copy FA 52, paste as a new layer,
image/ mirror, position to your liking,
arrange/ send to bottom.
Copy FA37, paste as a new layers.
Arrange/ move to top.
Image/ re-size, re-size 30% all layers un-tabbed.
3.Copy FA 49, paste as a new layer,
Image/ re-size, re-size 45% all layers un-tabbed.
Using your raster deform tool turn the layer so it is straighter.
Position at the bottom below the frame.
Layers/ arrange/ send to bottom.
4.Activate the frame layer.
Copy your first tube, image/ re-size, re-size 85%
Position on the first part of the frame.
Copy the second tube layer, image/ re-size, re-size 65%.
Position on the second part of the frame.
Layers/ merge/ merge down.
Copy the third tube layer, image/ re-size, re-size 75%.
Position on the third part of the frame.
Layers/ merge/ merge down.
Activate the frame layer.
Using your magic wand select the center of
each part of the frame.
Selections/ invert, activate the tubes layer.
Using your eraser tool erase the parts at the bottom that are outside the frame.
5.Add and drop shadows to the layers you require.
Add all copyright info and name.
Export as a transparent png file and save.
Wednesday, 19 October 2011

Tutorial written by and © to Bits N Bobs 19th November 2011.
Results are for personal use only.
No monetry gain allowed and that includes placing them behind a paid or donation based membership area.
You are not allowed to share/forward or translate any of my tutorials or place them on any blog, website, DVD or anywhere else without my permission.
These tutorials are written from my own ideas and any similarities to any other tutorial is purely coincidental.
All tutorials are for those with a working knowledge of paintshop pro.
I reserve the right to amend these terms at any time.
Supplies needed.
Font of choice for your name.
I am using Popular Std
Tube of choice.
I am using PTE-2960 by Arthur Crowe
Mine is pte1891 and from
You can now purchase Arthur's work from here
Tube is not to be used without the correct licence
Scrap kit A Little goes a long way by Bits N Bobs
Items I am using from this kit are...
ALGALW 25, 31, 37, 8
Mask of choice.
I am using Gabeemask60 which you can find here
Note
This tutorial was written in PSP 9 and needs animation shop for the animation.
Open all supplies in paintshop except the font and mask.
Install the mask into your mask folder.
Double click on your font and minimize.
Open a new image, 600 w x 600 h at 72 dpi.
1.Using your selection tool with selection type set at Circle
create a circle in the center of your image.
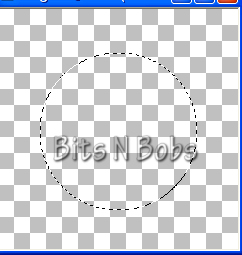
Copy the close up of your tube and paste into selection.
Effects/ reflection effects/ kaleidascope

Effects/ texture / mosaic antique

2.Layers/ duplicate layer, select none.
Adjust/ blur/ guassian blur and blur by 15.00
Lower the layer opacity to 90%
3.Activate the first circle layer,
Image/ re-size, re-size by 125% all layers untabbed.
Layers/ Load-save mask/ load mask from disk.
Layers/ merge/ merge group

4.Activate top layer
Copy ALGALW 25, paste as a new layer.
Position to your liking on the right hand side.
Layers/ duplicate layer, Image/ mirror, Image/flip
Layers/ merge/ merge down.
Layers/ duplicate layer, Image/ mirror,
Position to your liking,
Layers/ merge/ merge down.
Layers/ arrange/ send to bottom.
5.Copy ALGALW 8,
paste as a new layer,
position to your liking on the right hand side.
Layers/ duplicate layer, Image/ mirror, Image/flip
Layers/ merge/ merge down.
Layers/ duplicate layer, Image/ mirror,
Position to your liking,
Layers/ merge/ merge down.
Layers/ arrange/ move up.
6.Activate top layer,
Copy ALGALW 31,
paste as anew layer.
Image/ re-size, re-size 60%
all layers un-tabbed.
7.Copy the close-up tube,
paste as a new layer.
Image/ re-size, re-size 75% all layers un-tabbed.
Position to your liking and add a drop shadow.
I am using V0, H0, O100, B15.00, C #000000
8.Copy ALGALW 37, paste as a new layer.
Position at the bottom of the tube body
Erase any twigs hanging too far down.
9.Activate the top layer,
add a new raster layer.
Add all copyright info, your name.
Export as a transparent png file and save.
Tuesday, 1 March 2011

Click tag to view animation.
Latex Lovely
Tutorial written by and © to Bits N Bobs 15th February 2011.
Results are for personal use only.
No monetry gain allowed and that includes placing them behind a paid or donation based membership area.
You are not allowed to share/forward or translate any of my tutorials or place them on any blog, website, DVD or anywhere else without my permission.
These tutorials are written from my own ideas and any similarities to any other tutorial is purely coincidental.
All tutorials are for those with a working knowledge of paintshop pro.
I reserve the right to amend these terms at any time.
Supplies needed.
Font of choice for your name.
I am using Essentric std
Tube of choice.
I am using Cano-Latex by Jose Cano
Mine is pte1891 and available here
Tube is not to be used without the correct licence
My supplies here
Plug in - AAA Frames - Photo frame
Note
This tutorial was written in PSP 9 and needs animation shop for the animation.
Open all supplies in paintshop except the font.
Double click on your font and minimize.
Open a new image, 550 w x 200 h at 72 dpi.
1.Open the bg, copy, paste as a new layer on your working image.
Layers merge, merge visible.
Effects/ plugins/ AAA frames/ Foto frame settings as in the screen shot below.

Re-name this layer to bg.
2.Open the bling in psp.
Activate Frame 1,
copy and paste as a new layer on your working image.
Position in the left top corner as shown below.
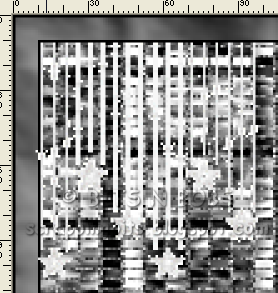
Copy this bling layer.
Paste as a new selection next to your first bling as show below.
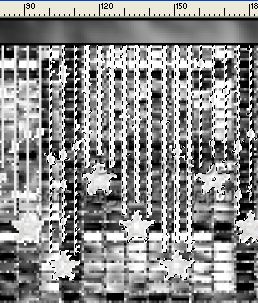
Keep pasting as a new selection positioning next to the previous one
until you reach the end, selections/ select none.
If you have any overlap erase the extra.
Rename this layer to Bling 1
3.Activate Frame 2 of your bling,
copy and paste as a new layer on your working image.
Position in the left top corner as before making sure you align it
with the previous bling.
( It may help to lower the opacity of the previous layer so you can
see where you are putting it. )
Copy this bling layer.
Paste as a new selection next to your first bling as we did before.
Each time you paste as a new selection make sure it lines up with the layer below it.
Keep pasting as a new selection positioning next to the previous one
again until you reach the end, selections/ select none.
If you have any overlap erase the extra.
Rename this layer to Bling 2
4.Activate Frame 3 of your bling,
copy and paste as a new layer on your working image.
Position in the left top corner as before making sure you align it
with the previous bling.
Copy this bling layer.
Paste as a new selection next to your first bling as we did before.
Each time you paste as a new selection make sure it lines up with the layer below it.
Keep pasting as a new selection positioning next to the previous one
again until you reach the end, selections/ select none.
If you have any overlap erase the extra.
Rename this layer to Bling 3
5.Activate Frame 4 of your bling,
copy and paste as a new layer on your working image.
Position in the left top corner as before making sure you align it
with the previous bling.
Copy this bling layer.
Paste as a new selection next to your first bling as we did before.
Each time you paste as a new selection make sure it lines up with the layer below it.
Keep pasting as a new selection positioning next to the previous one
again until you reach the end, selections/ select none.
If you have any overlap erase the extra.
Rename this layer to Bling 4
Remember to turn back up the opacity of all layers if you lowered them.
6.Activate your close up tube.
Copy, go to your working image and activate the bg layer.
Paste as a new layer, image/ mirror, image/ re-size to 300 pixels high,
all layers un-tabbed.
Position towards the bottom left corner.
Add a drop shadow of choice.
I am using V3 - H5 - O60 - B3.00 - C #000000
Adjust the blend mode to Luminance ( Legacy)
Lower the layer opacity to 70.
Re-name this layer to tube 1.
7.Activate your full body tube layer.
Copy, go to your working image.
Paste as a new layer, re-size to 400 pixels high,
all layers un-tabbed.
Position towards the left to your liking.
Add a drop shadow of choice.
I am using V3 - H5 - O60 - B3.00 - C #000000
Adjust/ sharpness/ sharpen.
Open your sparkle png.
Copy and paste onto the tube as a new selection
to areas of your choosing.
Re-name this layer to tube 2.
8.Layers/ new raster layer, name it copyright.
Add all your copyright info.
*** Note:
Save now or continue for the animation steps
*** End note:
9.Close layers bling 4, bling 3, bling 2
Edit/ copy merged.
Open up Animation shop and paste as a new animtion.
Go back to Paintshop, open bling 2, close bling 1.
Edit/ copy merged.
Go back to Animation shop and paste after current frame.
Go back to Paintshop, open bling 3, close bling 2.
Edit/ copy merged.
Go back to Animation shop and paste after current frame.
Go back to Paintshop, open bling 4, close bling 3.
Edit/ copy merged.
Go back to Animation shop and paste after current frame.
10.Create your name in paintshop as normal, copy the file and paste as a new animation into animation shop.
Copy the name in animation shop, activate your animation, edit/ select all, edit/ paste into selected frame and then file/save as.
Subscribe to:
Posts
(Atom)
Stores


BNB Blinkie