
Showing posts with label Amberly Berendson. Show all posts
Showing posts with label Amberly Berendson. Show all posts
Thursday, 9 April 2015

Steampunked
Tutorial written by and © to Bits N Bobs 9th April 2015
Results are for personal use only.
No monetry gain allowed and that includes placing them behind a paid or donation based membership area.
You are not allowed to share/forward or translate any of my tutorials or place them on any blog, website,
DVD or anywhere else without my permission.
You are welcome though to add a link to my tutorial page.
These tutorials are written from my own ideas and any similarities to any other tutorial is purely coincidental.
All tutorials are for those with a working knowledge of paintshop pro.
I reserve the right to amend these terms at any time.
Supplies needed.
Font of choice for your name.
I am using 2 fairytale fancy dna.
Tube of choice.
I am using the tube Steampunk girl by Amberly Berendson
Tube is not to be used without the correct licence.
Steampunk corner Animation by Cat here (if you want to animate)
Mask of choice.
I am using Vix_Mask362 available here
Scrap kit Operation Steampunk available here or here
Items I have used are....
Paper 5, 9,
Elements 16, 38, 39, 62, 71, 73,
Note
This tutorial was written in PSP 9.
Double click on your font and minimize.
Open all other supplies in paintshop.
1. Open a new image, 600 w x 600 h at 72 dpi.
Selections/ select all.
Copy your paper, paste into selection.
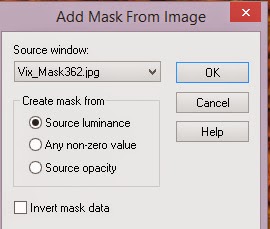
Layers/ new mask layer/ from image.
Look for your mask, source luminance checked
all else unchecked.
Click ok.
Selections/ none.
Layers/ merge/ merge group
Tutorial written by and © to Bits N Bobs 9th April 2015
Results are for personal use only.
No monetry gain allowed and that includes placing them behind a paid or donation based membership area.
You are not allowed to share/forward or translate any of my tutorials or place them on any blog, website,
DVD or anywhere else without my permission.
You are welcome though to add a link to my tutorial page.
These tutorials are written from my own ideas and any similarities to any other tutorial is purely coincidental.
All tutorials are for those with a working knowledge of paintshop pro.
I reserve the right to amend these terms at any time.
Supplies needed.
Font of choice for your name.
I am using 2 fairytale fancy dna.
Tube of choice.
I am using the tube Steampunk girl by Amberly Berendson
Tube is not to be used without the correct licence.
Steampunk corner Animation by Cat here (if you want to animate)
Mask of choice.
I am using Vix_Mask362 available here
Scrap kit Operation Steampunk available here or here
Items I have used are....
Paper 5, 9,
Elements 16, 38, 39, 62, 71, 73,
Note
This tutorial was written in PSP 9.
Double click on your font and minimize.
Open all other supplies in paintshop.
1. Open a new image, 600 w x 600 h at 72 dpi.
Selections/ select all.
Copy your paper, paste into selection.
Layers/ new mask layer/ from image.
Look for your mask, source luminance checked
all else unchecked.
Click ok.
Selections/ none.
Layers/ merge/ merge group
2. Copy your frame, paste as a new layer.
Image/re-size to 450 pixels wide.
Using your magic wand select the center of
one of the frames.
Hold down your shift button and select the center
of the other two frames.
Release your shift button.
Selections/ modify/ expand by 3.
Layers/ new raster layer.
Copy paper 5, paste into selection.
Layers/ arrange/ move down.
Selections/ select none.
3. Copy element 38, paste as a new layer.
Image/ re-size to 300 pixels wide,
all layers un-tabbed.
Position to your liking.
Mine is top left.
Layers/ duplicate layer.
Position to your liking.
Mine is bottom right.
Layers/ merge/ merge down
Add a drop shadow of choice.
For this tutorial I am using...
V3, H3, O70, B7, C#000000
Layers/ arrange/ move down.

4. Copy element 39.
Activate top layer, paste as a new layer.
Image/ re-size to 400 pixels wide,
all layers un-tabbed.
Position to your liking.
Mine is in the top frame.
Add a drop shadow of choice.
5. Copy element 71, paste as a new layer.
Image/ re-size to 300 pixels wide,
all layers un-tabbed.
Position to your liking.
Mine is towards the top.
Add a drop shadow of choice.
Layers/ arrange/ move down, edit/repeat x 2,
It should be below the frame paper
6. Copy element 62, paste as a new layer.
Image/ re-size to 300 pixels wide,
all layers un-tabbed.
Image/ mirror.
Position to your liking.
Mine is top right corner.
Add a drop shadow of choice.
Layers/ arrange/ send to bottom
7. Copy your tube,
activate top layer, paste as a new layer.
Image/ re-size to 500 pixels high,
all layers un-tabbed.
Image/ mirror.
Position to your liking.
Mine is bottom left corner.
Add a drop shadow of choice.
8. Copy element 16, paste as a new layer.
Image/ re-size to 150 pixels wide,
all layers un-tabbed.
Position to your liking and layer duplicate for more.
I have three, one on each frame.
Add a drop shadow of choice to each one.
Note: If you do not wish to animate then add your name, copyright
info and file export as a transparent png and save.
Animation
9. Add your copyright information.
Layers/ merge/ merge visible.
Edit/ Copy.
Open animation shop.
Edit/ paste as a new animation.
Edit/ paste after current frame.
Repeat until you have six frames.
10. Open your mng animation file.
Edit/ select all,
Animation/ resize animation.
Re-size to 50% smart size.

Edit/ copy.
Activate your tag.
Edit/ select all, edit/propogate paste, edit/ paste into selected frames.
Before you release your mouse button move the animation
so it is inside the bottom frame.
11. Create your name in paintshop as normal, copy the file
and paste as a new animation into animation shop.
Edit/ copy your name in animation shop, activate your tag,
Edit/ select all, edit/propogate paste, edit/ paste into selected frames
and then file/save as.
Below are the settings I use for a transparent gif.
12. When your animation window pops up click on customize.
Colours, 255 colours, Tab Optimize Octree and Error diffusion

Click on the Partial transparency tab,
Convert pixels less than 13%,
Yes blend with colour # FFFFFF (white), ok

Then just keep clicking next to save.
Thursday, 8 November 2012

Tutorial written by and © to Bits N Bobs 8th November 2012.
Results are for personal use only.
No monetry gain allowed and that includes placing them behind a paid or donation based membership area.
You are not allowed to share/forward or translate any of my tutorials or place them on any blog, website, DVD or anywhere else without my permission.
These tutorials are written from my own ideas and any similarities to any other tutorial is purely coincidental.
All tutorials are for those with a working knowledge of paintshop pro.
I reserve the right to amend these terms at any time.
Supplies needed.
Font of choice for your name.
I am using Dean Martin
Tube of choice.
I am using Cornucopia by Amberly Berendson
Tube is not to be used without an MTA license
Happy Thanksgiving Template by ButterflyFlutterby here
Plugin required.
Xero Fritilliary under freeware you want the full 40 plugin pack.
Note
This tutorial was written in PSP 9
Open all supplies in paintshop except the font.
Double click on your font and minimize.
1. Open the template, close the following layers.
Copywrite, raster 2, Outer thanksgiving, Both Im stuffed layers.
Open the Black Outer Happy Thanksgiving layer.
Activate the layer ' Group - Copy of Circle Background '
Select a colour from your tube.
I am using #874f4f
Adjust/ Colour balance/ Manual colour correction.

2. Activate the layer ' Circle Background'
Select another colour from your tube.
Adjust/ Colour balance/ Manual colour correction.
I am using #d99354 as the target colour
All other setting other than the target
colour are the same.
3. Activate the layer ' Circle Background'
Select another colour from your tube.
Adjust/ Colour balance/ Manual colour correction.
I am using #d99354 as the target colour
and #e7e5e5 as the source colour.

4. Activate the layer ' Dotted Line Fill '
Adjust/ Colour balance/ Manual colour correction.
Exactly the same settings so no need to change anything.
Activate the layer ' BackRectangle '
Adjust/ Colour balance/ Manual colour correction.
Exactly the same settings so again, no need to change anything.
Continue adjusting the colours on each of the doodles
and the lable.
5. Staring with the Circle background layer,
Effects/ plugins/ Xero/ Fritillary

Repeat this on the Inner BackRectangle and Tag layer.
Starting with the tag layer Add a drop shadow of choice
to any layers you require a drop shadow.
I am using V1 - H1 - O100 - B5.00 - C #000000
6. Activate the top layer.
Copy your tube, paste as a new layer.
Image/ Re-size to 350 pixels high.All layers un-tabbed.
Position to your liking.
Add a drop shadow of choice.
I am using V1 - H1 - O100 - B7.00 - C #000000
7. Layers/ new raster layer,
Add copyright info.
Export as png with a transparent background and save.

Scheduled this for 7th December 2012 instead of 2011 LOL
Hopefully it posts this time :)
Cheeky Christmas
Tutorial written by and © to Bits N Bobs 7th December 2011.
Results are for personal use only.
No monetry gain allowed and that includes placing them behind a paid or donation based membership area.
You are not allowed to share/forward or translate any of my tutorials or place them on any blog, website, DVD or anywhere else without my permission.
These tutorials are written from my own ideas and any similarities to any other tutorial is purely coincidental.
All tutorials are for those with a working knowledge of paintshop pro.
I reserve the right to amend these terms at any time.
Supplies needed.
Font of choice for your name.
I am using Janda Swirlygirl
Tube of choice.
I am using Candy Pixies by Amberly Berendson
Tube is not to be used without an MTA licence
Template here
Plugin required.
Xero Fritillary under freeware you want the full 40 plugin pack.
Note
This tutorial was written in PSP 9
Open all supplies in paintshop except the font.
Double click on your font and minimize.
1.Open the template, close the copyright layer
Activate text 2 layer.
Adjust/ Colour balance/ Manual colour correction.

Effects/ plugins/ Xero/ Fritillary

Activate text 1 layer.
Add a drop shadow of choice.
I am using V1 - H1 - O100 - B5.00 - C #d31400
2.Activate text 2 layer.
Copy thePixie2 tube, paste as a new layer.
Position to your liking.
Add a drop shadow of choice.
I am using V1 - H1 - O100 - B7.00 - C #000000
3.Activate your large circle 1 layer.
Selections/ select all , Selections/ float, Selections/ defloat.
Selections/ invert.
Copy from your tube the main image,
paste as a new layer, position to your liking
and hit delete on your keyboard.
Layers/ merge/ merge down.
Activate your large circle 1b layer.
Add a drop shadow of choice.
I am using V0 - H0 - O100 - B9.00 - C #d31400
4.Activate circle 1 layer.
Copy pixie 3n4 tube layer.
Paste as a new layer,
Image/ mirror, position to your liking.
Add a drop shadow of choice.
I am using V3 - H3 - O100 - B9.00 - C #000000
5.Activate circle 1 layer.
Copy from your tube pixie 1,
paste as a new layer, position to your liking
Add a drop shadow of choice.
I am using V3 - H3 - O100 - B9.00 - C #000000
6.Activate rect 1 layer.
Effects/ plugins/ Xero/ Fritillary

7.Activate circle 1 layer.
Effects/ plugins/ Xero/ Fritillary
Same settings as before.
You can of course use your own settings.
8.Layers/ new raster layer,
Add copyright info.
Export as png with a transparent background and save.
Subscribe to:
Posts
(Atom)
Stores


BNB Blinkie