
Showing posts with label Camilla Drakenborg. Show all posts
Showing posts with label Camilla Drakenborg. Show all posts
Thursday, 29 November 2012


Tutorial written by and © to Bits N Bobs 29th November 2012.
Results are for personal use only.
No monetry gain allowed and that includes placing them behind a paid or donation based membership area.
You are not allowed to share/forward or translate any of my tutorials or place them on any blog, website, DVD or anywhere else without my permission.
These tutorials are written from my own ideas and any similarities to any other tutorial is purely coincidental.
All tutorials are for those with a working knowledge of paintshop pro.
I reserve the right to amend these terms at any time.
Supplies needed.
Font of choice for your name.
I am using WhiteHall
Tube of choice.
I am using one by Camilla Drakenborg
Mine is SB0049 available at UpYourArt
Tube is not to be used without the correct licence.
Plugins needed.
Alien Skin Xenofex2
AAA frames fotoframe
Penta.com dot and cross ( Garbage collection )
Note
This tutorial was written in PSP 9 and needs animation shop for the animation.
Open all supplies in paintshop except the font.
Double click on your font and minimize.
Open a new image, 600 w x 250 h at 72 dpi.
1. Flood fill with a colour from your tube.
I have used #ff5345
Effects/ Plugins/ Penta.com/ Dots and cross.
72 - 10 - 2
2. Copy the rose close up from your tube
and paste as a new layer.
Position to the right hand side.
Layers/ duplicate, Image/ Mirror.
Layers/ Merge/ Merge down.
Effects, Alien Skin Xenofex 2/ Shatter

Layers/ properties change blend mode to Luminance Legacy.
Lower the layer opacity to 50%
3. Copy the humming bird close up from your tube
and paste as a new layer.
Position one of them in the center.
I have used the bottom one.
Select your crop tool and snap crop rectangle to
merged opaque. See screen shot below.

Effects/ reflection effects

Layers/ properties change blend mode to Screen.
Layers/ Merge/ Merge visible
Effects/ plugins/ AAA frames/ foto frame

Effects/ plugins/ AAA frames/ foto frame
Same settings but change the width to 10 and opacity to 56.
4. Copy your tube, paste as a new layer.
Image/ re-size to 400 pixels wide.
Position to your liking on the left.
Layers/ Properties, change the belend mode to Lighten.
5. Copy your tube, paste as a new layer.
Image/ Mirror, Image/ re-size to 500 pixels wide
Position to your liking on the left.
Add a drop shadow.
I am using H3, V3, O100, B7, colour #000000
Layers/ merge/ merge visible.
6. Open a new image 150 x 150 for your avatar.
Copy your merged signature.
Paste as a new layer onto your avatar image.
Position to your liking, Image/ mirror.
Layers/ merge/ merge visible.
Effects/ Plugins/ AAA frames/ foto frame.
Same setting but change width to 5 and stroke to 2.
7. Add your copyright info and name to both and save.
Saturday, 10 November 2012


Tutorial written by and © to Bits N Bobs 10th November 2012.
Results are for personal use only.
No monetry gain allowed and that includes placing them behind a paid or donation based membership area.
You are not allowed to share/forward or translate any of my tutorials or place them on any blog, website, DVD or anywhere else without my permission.
These tutorials are written from my own ideas and any similarities to any other tutorial is purely coincidental.
All tutorials are for those with a working knowledge of paintshop pro.
I reserve the right to amend these terms at any time.
Supplies needed.
Font of choice for your name.
I am using Alex Brush
Tube of choice.
I am using one by Camilla Drakenborg
Mine is CA0053 Missy Ramad and available at UpYourArt
Tube is not to be used without the correct licence.
Plugins needed.
Alienskin xenofex2 - Shatter
AAA frames photoframe
Note
This tutorial was written in PSP 9.
Double click on your font and minimize.
Open a new image, 600 w x 250 h at 72 dpi.
1. Flood fill with white.
Copy the image and paste as a new layer on your working image.
Image/ rotate/ free rotate/ 90 left all layers untabbed.
Move the image to the center.
Effects/ plugins/ Alienskin xenofex2/ Shattered
Lower layer opacity to 50%

2. Copy your tube and paste as a new layer on your working image.
Image/ mirror, position to the right hand side.
Layers/ properties, change blend mode to Overlay.
3. Again copy your tube and paste as a new layer.
Position in the middle, Effects/ distortion effects/ wind
From left to right/ strength 100
Layers/arrange/ move down.
4. Activate top layer.
Again copy your tube and paste as a new layer.
Position on the left hand side.
Add a drop shadow.
I am using H3, V3, O100, B9, colour #000000
5. Layers/ merge/ merge visible.
Effects/ Plugins/ AAA frames/ foto frame

6. Again copy your tube and paste as a new layer.
Position on the left hand side trying to get it in the same position.
Layers/ merge/ merge visible
Add all Copyright info, your name and save.
7. Open a new image 150 x 150 for your avatar.
Copy your merged signature.
Paste as a new layer onto your avatar image.
Image/ re-size, all layers un-tabbed, re-size to 70
Position to your liking,
Image/ Mirror.
Layers/ merge/ merge visible.
Add your copyright info, Initial and save.
Wednesday, 28 April 2010

Tutorial written by and © to Bits N Bobs 28th April 2010.
Results are for personal use only.
No monetry gain allowed and that includes placing them behind a paid or donation based membership area.
You are not allowed to share/forward or translate any of my tutorials or place them on any blog, website, DVD or anywhere else without my permission.
These tutorials are written from my own ideas and any similarities to any other tutorial is purely coincidental.
All tutorials are for those with a working knowledge of paintshop pro.
I reserve the right to amend these terms at any time.
Supplies needed
Font of choice.
I am using Phank
Tube of choice.
I have used Royal hangover by Camilla Drakenborg
Tube not to be used without an AMI license
Scrap kit 'Angels and faeries' by Bits N Bobs
Items used...
frame 2, paper 2, fairydust 3, wing 2
Note
This tutorial was written in PSP 9
Open all supplies in paintshop except the font.
Double click on your font and minimize.
Open a new image, 500 x 500 at 72 dpi.
1.Re-size frame 2 to 375 pixels high,
copy, paste as a new layer on your working image.
Select the center of your frame with your magic wand.
Selections/ modify/ expand by 5 pixels.
2.Re-size paper 2 to 375 pixels wide,
copy/ paste as a new layer.
Selections/ invert, hit delete on your keyboard.
Selections/ select none.
Layers/ arrange/ move down.
3.Activate your top layer.
Re-size your tube to 380 pixels high.
Copy/ paste as a new layer,
position so her head and crown pops out the top of the frame.
4.Activate your frame layer.
Selections/ select all, selections/ float, selections/ defloat.
Activate your tube layer and use your eraser to rub out the
bottom part of your princess.
Selections/ select none.
Rub out the remaining part of your tube hanging out the bottom.
5.Re-size fairydust 3 to 350 pixels wide.
Copy, paste as a new layer.
Position towards the bottom left corner.
Layers/ duplicate, image/ mirror,
Layers/ merge/ merge down.
Layers/ arrange/ send to bottom.
Layers/ duplicate/ image/ flip.
Layers/ merge/ merge down.
Layers/ duplicate, image/ rotate/ free rotate,
90 left( all layers and single canvas untabbed ).
Layers/merge/ merge down.
6.Re-size wing 2 to 200 pixels wide,
copy/ paste as a new layer.
Position to your liking.
Layers/ duplicate, image/ mirror.
Layers/ merge/ merge down.
Layers/ arrange/ send to bottom.
Layers/ arrange/ move up (wings should be above your sparkles layer).
7.Add a drop shadow of choice to any layersyou require to have one.
I am using the following settings on all layers.
V3, H3, O 50, B5.00, Colour: #000000
8.Layers/ merge/ merge visible.
Add a new raster layer.
Add your copyright info and name.
File export as a transparent png or jpg if you prefer a white background and save.

Tutorial written by and © to Bits N Bobs 25th April 2010.
Results are for personal use only.
No monetry gain allowed and that includes placing them behind a paid or donation based membership area.
You are not allowed to share/forward or translate any of my tutorials or place them on any blog, website, DVD or anywhere else without my permission.
These tutorials are written from my own ideas and any similarities to any other tutorial is purely coincidental.
All tutorials are for those with a working knowledge of paintshop pro.
I reserve the right to amend these terms at any time.
Supplies needed.
Font of choice
I am using Phank
Tube of choice.
I have used Maskerade by Camilla Drakenborg
kit used 'Rockstar dreams' by Kimmies Kreations
Items I have used...
Paper 17, glitter star 1, skull ribbon 2,
Vix_Mask363.jpg by Vixpsp
Note
This tutorial was written in PSP 9
Open all supplies in paintshop except the font.
Double click on your font and minimize.
Copy any masks to your masks folder.
Open a new image, 500 x 500 at 72 dpi.
1.Re-size paper 17 to 500 pixels wide,
copy, paste as a new layer on your working image.
Layers/ Load/save mask/ Load mask from disk.
Use the settings as in the screen shot below.

Copy,paste as a new layer.
Positon to your liking.
I have placed mine in the center.
3.Layers/ duplicate, image/ rotate/ free rotate,
Settings as in screen shote below.

4.Re-size your ribbon to 375 pixels wide.
Copy, paste as a new layer,
position to your liking.
Add a drop shadow of choice.
I am using....
V3, H3, O 50, B5.00, Colour: #000000
5.Layers/ merge/ merge visible.
Add a new raster layer.
Add your copyright info and name.
File export as a transparent png or jpg if you prefer a white background and save.

Gothic Bonga
Tutorial written by and © to Bits N Bobs 24th April 2010.
Results are for personal use only.
No monetry gain allowed and that includes placing them behind a paid or donation based membership area.
You are not allowed to share/forward or translate any of my tutorials or place them on any blog, website, DVD or anywhere else without my permission.
These tutorials are written from my own ideas and any similarities to any other tutorial is purely coincidental.
All tutorials are for those with a working knowledge of paintshop pro.
I reserve the right to amend these terms at any time.
Supplies needed.
Font of choice for your name and text.
I am using Viner Hand
Tube of choice.
I am using Gothic bonga angel by Camilla Drakenborg
Tube is not to be used without an AMI license
Scrap kit 'Black Widow' by Katnkda
Items from kit I have used are...
Element 9, Element 3, Element 6, Paper 6
Mask Vix_Mask362 by Vixpsp
Note
This tutorial was written in PSP 9
Open all supplies in paintshop except the font.
Double click on your font and minimize.
Copy any masks to your masks folder.
Open a new image, 500 x 500 at 72 dpi.
1.Re-size element 9 to 400 pixels wide,
copy, paste as a new layer on your working image.
2.Re-size Bonga angel to 400 pixels high,
all layers tabbed.
Copy the main image and paste as a new layer.
Position to your liking.
I have placed mine in the center.
3.Re-size element 3 to 150 pixels wide.
copy, paste as a new layer.
Position towards the top left hand corner.
4.Layers/ duplicate, Image/ mirror, Layers/ merge/ merge down,
Layers/ duplicate, Image/ flip, Layers/ merge/ merge down.
5.Re-size element 6 to 400 pixels high.
copy, paste as a new layer.
Layers, arrange, move down.
Edit, repeat move layer down.
6.Re-size paper 6 to 500 pixels wide.
copy, paste as a new raster layer.
Layers/ arrange/ send to bottom.
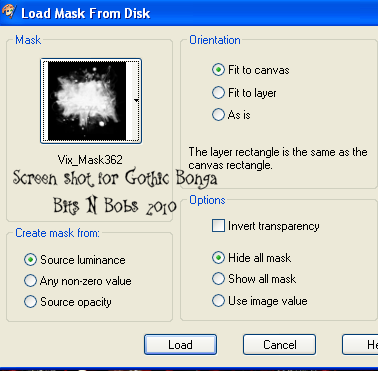
7.Layers/ Load/save mask/ Load mask from disk.
Use the settings as in the screen shot below.
8.Layers/ merge/ merge group.
Add a drop shadow of choice.
I am using....
V5, H5, O 100, B5.00, Colour: #000000
9.Activate your tube layer.
Add a drop shadow with the same settings as before.
10.Activate top layer.
Add a new raster layer.
Add your copyright info and name.
File export as a transparent png or jpg if you prefer a white background and save.
Subscribe to:
Posts
(Atom)
Stores


BNB Blinkie