
Showing posts with label CDO. Show all posts
Showing posts with label CDO. Show all posts
Saturday, 9 March 2013


Mermaid and Goldfish
Tutorial written by and © to Bits N Bobs 9th March 2013.
Results are for personal use only.
No monetry gain allowed and that includes placing them behind a paid or donation based membership area.
You are not allowed to share/forward or translate any of my tutorials or place them on any blog, website, DVD or anywhere else without my permission.
These tutorials are written from my own ideas and any similarities to any other tutorial is purely coincidental.
All tutorials are for those with a working knowledge of paintshop pro.
I reserve the right to amend these terms at any time.
Supplies needed.
Font of choice for your name.
I am using AR Decode
Tube of choice.
I am using Goldfish Mermaid from package 21 by Rachel Anderson available at CreativeDesignOutlet
Tube is not to be used without the correct licence.
Note
This tutorial was written in PSP 9.
Double click on your font and minimize.
Open all other supplies in paintshop.
Open a new image 600 wide X 250 high at 72 dpi
1. Flood fill your image with #ffffff
Copy your close up mermaid,
paste as a new layer on your working image.
Position to the left hand side.
Layers/ Duplicate, Image/ Mirror, image/flip.
Paste again as a new layer and position so
the face is in the middle.
Layers/ merge/ merge visible.
lower layer opacity to 70%
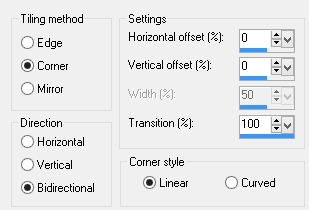
Effects/ image effects/ seamless tiling.
2. Copy the mermaid and fish tube.
Paste as a new layer.
Image/ mirror.
Layers/ merge/ merge down.
Layers/ duplicate, Layers/ merge/ merge down.
Layers/ properties, change blend mode to Lighten.
3. Copy your close up tube.
Paste as a new layer.
Image/ mirror.
Position on the right so the face is showing.
Layers/ properties/ Blend mode change to Luminance Legacy.
4. Copy the mermaid and fish tube.
Paste as a new layer.
Position to your liking.
Add a drops shadow of choice.
I am using...
V 0 - H 0 - O 100% - B 9.00 - Colour #000000
Layers/ duplicate layer.
Add a new raster layer.
Add all copyright info and your name.
File export as a png and save.
5. For a matching AV open a 180 x 180 new file.
Copy your image, paste as a new layer.
Position to your liking.
Layers/ add a new raster layer.
Add your copy right info and name.
File export as a png and save.
Thursday, 7 February 2013


Butterfly Lover
Tutorial written by copyrighted to Bits N Bobs February 7th 2013 Results are for personal use only. No monetry gain allowed and that includes placing them behind a paid or donation based membership area. You are not allowed to share/forward or translate any of my tutorials or place them on any blog, website, DVD or anywhere else without my permission.
These tutorials are written from my own ideas and any similarities to any other tutorial is purely coincidental.
All tutorials are for those with a working knowledge of paintshop pro.
I reserve the right to amend these terms at any time.
Supplies needed.
Font of choice for your name.
I am using Alex Brush
Tube of choice.
I am using Individual Tube 9-2 By Enamorte
Tube is not to be used without the correct licence
Note
This tutorial was written in PSP 9
Open all supplies in paintshop except the font.
Double click on your font and minimize.
Open a new image, 600 w x 250 h at 72 dpi.
1. Select a colour from your tube.
I am using #ed8db8, flood fill your working image.
Copy the complete image of your tube (the one with the background),
paste as a new layer.
Image/ rotate/ free rotate 90 right all layers un-tabbed.
Layers/ merge/ merge visible.
Effects/ image effects/ seamless tiling.

Activate your crop tool and snap crop
rectangle to Layer opaque. ok.
Layers/ duplicate.
Effects/ reflection effects/ kaleidoscope
Settings in screen shot below.
Lower layer opacity to 60%

2. Copy your close up tube, paste as a new layer.
Position on the right hand side and so that her
hand is more or less in the middle of the image.
Change the layer blend mode to Luminance Legacy.
Copy your tube without the wings, paste as a new layer.
Layers/ move/ move down.
Position in the middle so the butterfly on her skirt
looks like it is on the hand of the close up.
Change the layer blend mode to Luminance Legacy.
3. Copy your tube with the wings, paste as a new layer.
Image/ mirror, position on the left hand side with
her hand pointing towards the lady with the butterfly.
Add a drop shadow of choice.
I am using V3 - H5 - O70 - B9.00 - C #000000
Layers/ merge/ merge visible.
Add your copyright info, name and then save.
4. For your avatar open a new image,
180 x 180 at 72 dpi.
Copy your tag, paste as a new layer.
Position to your liking.
Layers/ merge/ merge visible.
Add your copyright info, initial and then save.
Friday, 18 January 2013

Zombie Love
Tutorial written by and © to Bits N Bobs 18th January 2013.
Results are for personal use only.
No monetry gain allowed and that includes placing them behind a paid or donation based membership area.
You are not allowed to share/forward or translate any of my tutorials or place them on any blog, website, DVD or anywhere else without my permission.
These tutorials are written from my own ideas and any similarities to any other tutorial is purely coincidental.
All tutorials are for those with a working knowledge of paintshop pro.
I reserve the right to amend these terms at any time.
Supplies needed.
Font of choice for your name.
I am using Burtons nightmare 2000
Tube of choice.
I am using Zombie by Anna Marine available at CDO Store
Tube is not to be used without the correct licence.
FTU Scrap kit Sampler Be Mine Or Die available here
Items I have used are....
Tag back cluster, Word art 3, Ribbon flower, leaves 1, attachment
Note
This tutorial was written in PSP 9.
Double click on your font and minimize.
Open all other supplies in paintshop.
1. Open the tagback cluster.
Shift+D and close the original.
Resize the tag back to 600 pixels high,
all layers tabbed.
Image re-size to 450 pixels high,
all layers un-tabbed.
2. Copy your leaves, paste as a new layer.
Re-size to 300 pixels high,
all layers un-tabbed.
Position to top right corner.
Layers/ duplicate, image/ mirror, image/ flip.
Position to the left top corner.
Layers/ merge/ merge down.
Add a drop shadow of choice.
I have used...
V 3 - H 3 - O 80 - B 7 - Colour #000000
Layers/ arrange/ move down.
Layers/ duplicate,image/ flip, image/ mirror.
Layers/ merge/ merge down.
3. Activate your top layer.
Copy your ribbon flower.
Paste as a new layer.
Re-size to 450 pixels high.
Position to your liking on the right.
Add a drop shadow.
Layers/ duplicate,image/ flip, image/ mirror.
Layers/ merge/ merge down.
4. Copy your tube, paste as a new layer.
Position to the left hand side.
Add a drop shadow.
5. Copy your word art.
Paste as a new layer.
Re-size to 400 pixels wide.
Position at the top towards the right corner.
Add a drop shadow.
I have used...
V 3 - H 3 - O 100 - B 1 - Colour #000000
Then again using...
V 3 - H 3 - O 100 - B 5 - Colour #ffffff
6. Copy the attachment and position to your liking.
I have put mine on the right hand side and
between the two flowers.
Add a drop shadow of choice.
I have used...
V 3 - H 3 - O 80 - B 7 - Colour #000000
7. Copy the close up of your tube.
Paste as a new layer.
Image/ mirror.
Position so the head is in the center of the tagback.
Activate the tagback layer.
Selections/ select all, Selections/ float, Selections/ defloat,
Selections/ invert.
Activate the close up layer and hit delete
on your keyboard. Selections/ select none.
Layers/ properties, blend mode change to Luminance legcy.
Lower the layer opacity to 30%.
Layers/ arrange, move down,
Layers/ arrange, move down,
Layers/ arrange, move down,
8. Layers/ new raster layer.
Add your copy right info and name.
Layers/ merge / merge visible and save.
Wednesday, 28 November 2012


Kitty Comfort
Tutorial written by and © to Bits N Bobs 28th November 2012.
Results are for personal use only.
No monetry gain allowed and that includes placing them behind a paid or donation based membership area.
You are not allowed to share/forward or translate any of my tutorials or place them on any blog, website, DVD or anywhere else without my permission.
These tutorials are written from my own ideas and any similarities to any other tutorial is purely coincidental.
All tutorials are for those with a working knowledge of paintshop pro.
I reserve the right to amend these terms at any time.
Supplies needed.
Font of choice for your name.
I am using Bella K Hopeless
Tube of choice.
I am using one by Karen Middleton
Mine is Cupcake from CILM (now closed) and available at CDO
Tube is not to be used without the correct licence.
Plugins needed.
I.C.NET FiltersUnlimited 2
Note
This tutorial was written in PSP 9.
Double click on your font and minimize.
Install your plugin.
Open a new image, 600 w x 250 h at 72 dpi.
1. Flood fill with a colour from your tube.
I am using #c5aedf
Copy your tube.
Paste as a new layer.
Position the cat in bra centrally.
Effects/ texture effects/ mosaic glass.

Move to the right hand side so only the
right hand side has the effect.
Layers/ duplicate, image/ mirror, image/flip.
The two sides should now meet in the middle.
Layers/ merge/ merge down.
2. Copy the tube layer again.
Paste as a new layer.
Position centrally.
Effects/ plugins/ ICNet software/ filters unlimited 2/
Lens effect/ fish eye tiler.
Settings in screenshot below.

Add a drop shadow of choice.
I used V3 H3 O80 B9 Colour #000000
Layers/ properties/ blend mode to Overlay.
3. Copy the tube layer again
and paste as a new layer.
Image/ re-size to 400 pixels wide.
Add a drop shadow of choice.
4. Copy and paste your tube as a new layer.
Image/ mirror, position on the right hand side.
Layers/ properties/ blend mode to Lighten.
Layers/ merge/ merge visible.
Add copyright info, name and save.
5. Open a new image 150 x 150 for your avatar.
Edit/ Copy your signature.
Paste as a new layer onto your avatar image.
Position to your liking,
Image/ mirror.
Add your copyright info and initial and save.
Wednesday, 26 May 2010

Mayhem
Tutorial written by and © to Bits N Bobs 26th May 2010.
Results are for personal use only.
No monetry gain allowed and that includes placing them behind a paid or donation based membership area.
You are not allowed to share/forward or translate any of my tutorials or place them on any blog,
website, DVD or anywhere else without my permission.
These tutorials are written from my own ideas and any similarities to any other tutorial is purely coincidental.
All tutorials are for those with a working knowledge of paintshop pro.
I reserve the right to amend these terms at any time.
These tutorials are written from my own ideas and any similarities to any other tutorial is purely coincidental.
All tutorials are for those with a working knowledge of paintshop pro.
I reserve the right to amend these terms at any time.
Supplies needed.
Font of choice for your name.
I am using They're coming to take me away
Tube of choice.
I am using one by Kenny Kiernan called Dolores Dammage
Not to be used without an AMI license
Mayhem add on freebie by Bits N Bobs
I have used the following items from the above kit...
addon 1,
Plug in Penta.com Dot and Cross Garbage collection
Mayhem add on freebie by Bits N Bobs
I have used the following items from the above kit...
addon 1,
Plug in Penta.com Dot and Cross Garbage collection
Note
This tutorial was written in PSP 9
Open all the supplies in paintshop except the font.
Double click on your font and minimize.
Open a new transparent image 500x500 at 72 dpi
1.Re-size frame to 500 pixels wide.
Copy and paste as a new layer onto your new image.
Use your magic wand to select the center of your frame.
Selections/ modify/ expand by 5.
Layers/ new raster layer.
This tutorial was written in PSP 9
Open all the supplies in paintshop except the font.
Double click on your font and minimize.
Open a new transparent image 500x500 at 72 dpi
1.Re-size frame to 500 pixels wide.
Copy and paste as a new layer onto your new image.
Use your magic wand to select the center of your frame.
Selections/ modify/ expand by 5.
Layers/ new raster layer.
2.Select a colour from your tube and flood fill your frame center.
I have used #d560af
Layers/ arrange/ send to bottom.
Effects/ penta.com/ dots and cross, settings as below.

3.Layers/ new raster layer,
Copy your tube and paste into selection.
Effects/ textures effest, mosaic antique with the settings as in screenshot below.
Lower layer opacity to 60%

4.Re-size your tube to 350 pixels wide.
Copy, activate your top layer,
paste as a new layer.
Position and add a drop shadow of choice.
I used ...
Vertical 3
Horizontal 3
Opacity 100
Blur 9.00
Colour black, OK.
5.Add all copyright info and name.
Export and save as png or jpg.
Subscribe to:
Posts
(Atom)
Stores


BNB Blinkie