
Showing posts with label AMI. Show all posts
Showing posts with label AMI. Show all posts
Wednesday, 26 May 2010

Wonderland
Tutorial written by and © to Bits N Bobs 26th May 2010.
Results are for personal use only.
No monetry gain allowed and that includes placing them behind a paid or donation based membership area.
You are not allowed to share/forward or translate any of my tutorials or place them on any blog, website, DVD or anywhere else without my permission.
These tutorials are written from my own ideas and any similarities to any other tutorial is purely coincidental.
All tutorials are for those with a working knowledge of paintshop pro.
I reserve the right to amend these terms at any time.
Supplies needed
Font of choice.
I am using MTF Wulan
Tube of choice.
I am using Pink poppy fairy by Stephanie Fizer
Not to be used without an AMI license
Mask
I am using Vix_Mask363
Kit used is Gothic Wonderland by Monti
Items from the kit are...
Box10, Frame19,
Plugin
Alien skin xenofex2 (free demo available).
I am using Vix_Mask363
Kit used is Gothic Wonderland by Monti
Items from the kit are...
Box10, Frame19,
Plugin
Alien skin xenofex2 (free demo available).
Note
This tutorial was written in PSP 9
Open all supplies in paintshop except the font.
Double click on your font and minimize.
Open a new image, 500 x 500 at 72 dpi.
1.Copy box10, paste as a new layer.
Layers/ Load/save mask/ Load mask from disk.
Settings are in the screenshot below.

2.Layers/ merge/ merge group.
Layers/ Duplicate
Layers/ merge/ merge visible
Position so the top butterfly is towards the top left corner.
3.Layers/ duplicate, image/ mirror, layers/ merge/ merge down.
Layers/ Duplicate, image/ flip, layers/ merge/ merge down.
Re-size frame19 to 400 pixels wide, all layers tabbed.
Copy, paste as a new layer.
4.Copy your tube, paste as a new layer.
Activate your frame layer.
Using your magic wand select the center of your frame.
Selections/ modify/ expand by 1.
Selections/ Invert, activate your tube layer.
Erase any part of the tube you don't require.
We want her to look like she is stepping out of the frame.
I have erased the left tip of her wing and her right leg.
5.Add all copyright info and your name.
If you do not wish to add the sparkle animation then
File export and save as png for transparent background or jpg for white.
Continue to animation.
6.Layers/ merge/ merge all flatten.
Hold down your shift key use your magic wand with settings as below and select several different areas over any part you wish to add sparkle.
I will be adding sparkle to parts of her dress.
Mode: replace,
Match mode:
RGB value,
Tolerance: 0,
Contiguous: checked,
Feather: 0,
Anti-alias: unchecked
7.Press shift and D twice. You will now have 3 files.
On the first one effects/ plugins/ alien skin xenofex 2,
use settings as in screen shot.
Selections/ select none.
File save image as 1

8.On the second one effects/ plugins/ alien skin xenofex 2,
use settings as in screen shot above but hit random seed button.
Selections/ select none.
File save image as 2
On the second one effects/ plugins/ alien skin xenofex 2,
use settings as in screen shot above and hit random seed button.
Selections/ select none.
File save image as 3
9.Open animation shop.
File/ animation wizard then follow the screen shots clicking next after each one.
On the add image part browse to where you saved your files and add them all, click next then finish.
View/ animation then file/save as.
use settings as in screen shot above but hit random seed button.
Selections/ select none.
File save image as 2
On the second one effects/ plugins/ alien skin xenofex 2,
use settings as in screen shot above and hit random seed button.
Selections/ select none.
File save image as 3
9.Open animation shop.
File/ animation wizard then follow the screen shots clicking next after each one.
On the add image part browse to where you saved your files and add them all, click next then finish.
View/ animation then file/save as.


10.Create your name in paintshop as normal, copy the file and paste as a new animation into animation shop.
Copy the name in animation shop, activate your animation, edit/ select all, edit/ paste into selected frame and then file/save as.
Sunday, 23 May 2010

Sun, Moon and Stars
Tutorial written by and © to Bits N Bobs 23rd May 2010.
Results are for personal use only.
No monetry gain allowed and that includes placing them behind a paid or donation based membership area.
You are not allowed to share/forward or translate any of my tutorials or place them on any blog, website, DVD or anywhere else without my permission.
These tutorials are written from my own ideas and any similarities to any other tutorial is purely coincidental.
All tutorials are for those with a working knowledge of paintshop pro.
I reserve the right to amend these terms at any time.
Supplies needed
Font of choice.
I am using Phank
Tube of choice.
I have used I am using Sun Moon and Stars by Lisa Victoria
Not to be used without an AMI license
Mask of choice
I am using Vix_Mask363
Note
This tutorial was written in PSP 9
Open all supplies in paintshop except the font.
Double click on your font and minimize.
Open a new image, 500 x 500 at 72 dpi.
1.Copy your image (not the tube) from your tube.
Paste as a new layer.
Re-size to 400 pixels, all layers untabbed.
Layers/ Duplicate, Image/ rotate/ free rotate/ use settingsas below.
Right, Free, 45.00, all layers and rotate single layer untabbed.
Layers/ Duplicate, Image/ mirror.
Layers/ merge/ merge visible.
2.Effects/ Texture effects/ Mosaic Antique.
My settings are below but you are welcome to use your own.
Colums:50, Rows:50, Tile Diffusion:70, Grout width:2, Grout diffusion:50

3.Copy the image layer from your tube again.
Paste as a new layer.
Layers/ Load/save mask/ Load mask from disk.
Settings are in the screenshot below.
Layers/ merge/ merge group.

4.Add a drop shadow of choice to any required layers.
I am adding the following drop shadow to both layers.
V 3, H 3, O 100, B 5.00, C #000000

5.Layers/ merge/ merge visible.
Add all copyright info and your name.
File export and save as png for transparent background or jpg for white.
Wednesday, 28 April 2010

Tutorial written by and © to Bits N Bobs 28th April 2010.
Results are for personal use only.
No monetry gain allowed and that includes placing them behind a paid or donation based membership area.
You are not allowed to share/forward or translate any of my tutorials or place them on any blog, website, DVD or anywhere else without my permission.
These tutorials are written from my own ideas and any similarities to any other tutorial is purely coincidental.
All tutorials are for those with a working knowledge of paintshop pro.
I reserve the right to amend these terms at any time.
Supplies needed
Font of choice.
I am using Phank
Tube of choice.
I have used Royal hangover by Camilla Drakenborg
Tube not to be used without an AMI license
Scrap kit 'Angels and faeries' by Bits N Bobs
Items used...
frame 2, paper 2, fairydust 3, wing 2
Note
This tutorial was written in PSP 9
Open all supplies in paintshop except the font.
Double click on your font and minimize.
Open a new image, 500 x 500 at 72 dpi.
1.Re-size frame 2 to 375 pixels high,
copy, paste as a new layer on your working image.
Select the center of your frame with your magic wand.
Selections/ modify/ expand by 5 pixels.
2.Re-size paper 2 to 375 pixels wide,
copy/ paste as a new layer.
Selections/ invert, hit delete on your keyboard.
Selections/ select none.
Layers/ arrange/ move down.
3.Activate your top layer.
Re-size your tube to 380 pixels high.
Copy/ paste as a new layer,
position so her head and crown pops out the top of the frame.
4.Activate your frame layer.
Selections/ select all, selections/ float, selections/ defloat.
Activate your tube layer and use your eraser to rub out the
bottom part of your princess.
Selections/ select none.
Rub out the remaining part of your tube hanging out the bottom.
5.Re-size fairydust 3 to 350 pixels wide.
Copy, paste as a new layer.
Position towards the bottom left corner.
Layers/ duplicate, image/ mirror,
Layers/ merge/ merge down.
Layers/ arrange/ send to bottom.
Layers/ duplicate/ image/ flip.
Layers/ merge/ merge down.
Layers/ duplicate, image/ rotate/ free rotate,
90 left( all layers and single canvas untabbed ).
Layers/merge/ merge down.
6.Re-size wing 2 to 200 pixels wide,
copy/ paste as a new layer.
Position to your liking.
Layers/ duplicate, image/ mirror.
Layers/ merge/ merge down.
Layers/ arrange/ send to bottom.
Layers/ arrange/ move up (wings should be above your sparkles layer).
7.Add a drop shadow of choice to any layersyou require to have one.
I am using the following settings on all layers.
V3, H3, O 50, B5.00, Colour: #000000
8.Layers/ merge/ merge visible.
Add a new raster layer.
Add your copyright info and name.
File export as a transparent png or jpg if you prefer a white background and save.

Tutorial written by and © to Bits N Bobs 25th April 2010.
Results are for personal use only.
No monetry gain allowed and that includes placing them behind a paid or donation based membership area.
You are not allowed to share/forward or translate any of my tutorials or place them on any blog, website, DVD or anywhere else without my permission.
These tutorials are written from my own ideas and any similarities to any other tutorial is purely coincidental.
All tutorials are for those with a working knowledge of paintshop pro.
I reserve the right to amend these terms at any time.
Supplies needed.
Font of choice
I am using Phank
Tube of choice.
I have used Maskerade by Camilla Drakenborg
kit used 'Rockstar dreams' by Kimmies Kreations
Items I have used...
Paper 17, glitter star 1, skull ribbon 2,
Vix_Mask363.jpg by Vixpsp
Note
This tutorial was written in PSP 9
Open all supplies in paintshop except the font.
Double click on your font and minimize.
Copy any masks to your masks folder.
Open a new image, 500 x 500 at 72 dpi.
1.Re-size paper 17 to 500 pixels wide,
copy, paste as a new layer on your working image.
Layers/ Load/save mask/ Load mask from disk.
Use the settings as in the screen shot below.

Copy,paste as a new layer.
Positon to your liking.
I have placed mine in the center.
3.Layers/ duplicate, image/ rotate/ free rotate,
Settings as in screen shote below.

4.Re-size your ribbon to 375 pixels wide.
Copy, paste as a new layer,
position to your liking.
Add a drop shadow of choice.
I am using....
V3, H3, O 50, B5.00, Colour: #000000
5.Layers/ merge/ merge visible.
Add a new raster layer.
Add your copyright info and name.
File export as a transparent png or jpg if you prefer a white background and save.

Gothic Bonga
Tutorial written by and © to Bits N Bobs 24th April 2010.
Results are for personal use only.
No monetry gain allowed and that includes placing them behind a paid or donation based membership area.
You are not allowed to share/forward or translate any of my tutorials or place them on any blog, website, DVD or anywhere else without my permission.
These tutorials are written from my own ideas and any similarities to any other tutorial is purely coincidental.
All tutorials are for those with a working knowledge of paintshop pro.
I reserve the right to amend these terms at any time.
Supplies needed.
Font of choice for your name and text.
I am using Viner Hand
Tube of choice.
I am using Gothic bonga angel by Camilla Drakenborg
Tube is not to be used without an AMI license
Scrap kit 'Black Widow' by Katnkda
Items from kit I have used are...
Element 9, Element 3, Element 6, Paper 6
Mask Vix_Mask362 by Vixpsp
Note
This tutorial was written in PSP 9
Open all supplies in paintshop except the font.
Double click on your font and minimize.
Copy any masks to your masks folder.
Open a new image, 500 x 500 at 72 dpi.
1.Re-size element 9 to 400 pixels wide,
copy, paste as a new layer on your working image.
2.Re-size Bonga angel to 400 pixels high,
all layers tabbed.
Copy the main image and paste as a new layer.
Position to your liking.
I have placed mine in the center.
3.Re-size element 3 to 150 pixels wide.
copy, paste as a new layer.
Position towards the top left hand corner.
4.Layers/ duplicate, Image/ mirror, Layers/ merge/ merge down,
Layers/ duplicate, Image/ flip, Layers/ merge/ merge down.
5.Re-size element 6 to 400 pixels high.
copy, paste as a new layer.
Layers, arrange, move down.
Edit, repeat move layer down.
6.Re-size paper 6 to 500 pixels wide.
copy, paste as a new raster layer.
Layers/ arrange/ send to bottom.
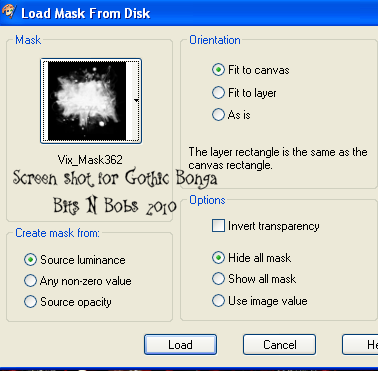
7.Layers/ Load/save mask/ Load mask from disk.
Use the settings as in the screen shot below.
8.Layers/ merge/ merge group.
Add a drop shadow of choice.
I am using....
V5, H5, O 100, B5.00, Colour: #000000
9.Activate your tube layer.
Add a drop shadow with the same settings as before.
10.Activate top layer.
Add a new raster layer.
Add your copyright info and name.
File export as a transparent png or jpg if you prefer a white background and save.
Tuesday, 30 March 2010

Spring fantasy
Tutorial written by and © to Bits N Bobs 30th March 2010
Results are for personal use only.
No monetry gain allowed and that includes placing them behind a paid or donation based membership area.
You are not allowed to share/forward or translate any of my tutorials or place them on any blog, website, DVD or anywhere else without my permission.
These tutorials are written from my own ideas and any similarities to any other tutorial is purely coincidental.
All tutorials are for those with a working knowledge of paintshop pro.
I reserve the right to amend these terms at any time.
Supplies needed.
Font of choice for your name.
I am using Send flowers
Tube or artwork of choice.
I am using the one from the kit.
Scrap kit A Kiwi fantasy from Bits N Bobs
Please use the following copyright info if using the poser tube from the kit © Bits N Bobs http://scrappingbits.blogspot.com/
I am using .......
Fairy tube, element 19, element 53, paper 4,
Note
This tutorial was written in PSP 9
Open all supplies in paintshop except the font.
Double click on your font and minimize.
Open a new image, 500 x 500 at 72 dpi.
1.Re-size element 53 to 450 pixels wide,
copy, paste as a new layer onto your working image.
2.Copy paper 4, paste as a new layer.
Layers/ arrange/ send to bottom.
Position your paper so part of the tree and bench are in the bottom and right of the frame.
3.Activate the frame layer and using your magic wand select all three centers.
Selections/ modify/ expand by 5, Selections/ invert.
Activate your paper layer and hit delete on your keyboard.
Selections/ select none.
Activate the frame layer again and add a drop shadow
I am using ...
V 1, H 1, O 70, B 5, Colour # 000000
4.Re-size element 19 to 450 pixels wide, copy, paste as a new layer.
Layers/ arrange/ send to bottom.
5.Activate your tube and erase the watermark ( only if you are using my poser )
Re-size the tube 350 pixels high.
Copy, paste as a new layer and position to your liking.
Add a drop shadow. I am using ...
V 2, H 2, O 70, B 7, Colour # 000000
6.Add a new raster layer and add your choice of text.
Add a new raster layer and add your copyright info and name.
Export as a png for transparent background or jpg for a white background and save.

Spring
Tutorial written by and © to Bits N Bobs 30th March 2010.
Results are for personal use only.
No monetry gain allowed and that includes placing them behind a paid or donation based membership area.
You are not allowed to share/forward or translate any of my tutorials or place them on any blog, website, DVD or anywhere else without my permission.
These tutorials are written from my own ideas and any similarities to any other tutorial is purely coincidental.
All tutorials are for those with a working knowledge of paintshop pro.
I reserve the right to amend these terms at any time.
Supplies needed.
Font of choice for your name and text.
I am using Send flowers
Tube of choice.
I am using Alice from Angela Newman
Tube is not to be used without the correct licence.
Mine was bought at AMI but Angela Newman
can now be found at MPT
Scrap kit 'Hoppit' by Bits N Bobs
Scraps I am using from this kit are
Element 16, Element 61, Element 66, Paper 2,
Note
This tutorial was written in PSP 9
Open all the supplies in paintshop except the font.
Double click on your font and minimize.
Open a new image 500 x 500 @ 72 dpi.
1.Re-size element 66 to 400 pixels high, copy and paste as a new layer on your new image .
Re-size your paper to 400 pixels high, copy.
Select the center of your frame,
Selections/ modify/ expand by 15,
Layers/ new raster layer, Edit/ paste/ paste into selection.
Layers/ arrange/ send to bottom.
Selections/ select none.
2.Re-size element 16 to 350 pixels wide,
copy, paste as a new layer position it to the bottom right corner.
Layers/ duplicate, image/ mirror, image/ flip.
Layers/ merge/ merge down.
Layers/ arrange/ send to bottom.
3.Re-size your tube to 350 pixels wide, copy.
Activate your top layer, paste tube as a new layer.
Position towards the bottom center of the frame.
4.Activate your frame layer.
Selections/ select all/ selections/ float, selections/ defloat.
Activate your tube layers and erase her two feet and right hand.
Selections/ select none.
Finish erasing any part outside of the frame you don't want.
5.Re-size element 61 to 330 pixels wide,
copy, paste as a new layer and postion to your liking.
6.Add a drop shadow of choice to each of your layers.
I use V 2, H 2, O 70, B 5.00, Colour #000000
Layers/ merge/ merge visible
Add your copyright info and name.
File/ export and save as a transparent png or jpg for a white background.

Thinking of you
Tutorial written by and © to Bits N Bobs 30th March 2010
Results are for personal use only.
No monetry gain allowed and that includes placing them behind a paid or donation based membership area.
You are not allowed to share/forward or translate any of my tutorials or place them on any blog, website,
DVD or anywhere else without my permission.
These tutorials are written from my own ideas and any similarities to any other tutorial is purely coincidental.
All tutorials are for those with a working knowledge of paintshop pro.
I reserve the right to amend these terms at any time.
Supplies needed.
Font of choice for your name and text.
I am using Send flowers
Tube of choice.
I am using AV-84 by AV Phibes
This tube is not to be used without an AMI license
Scrap kit 'Star gazer' by Katnkda
I am using...
Element 04, Element 06, Element 09. Element 40
Note
This tutorial was written in PSP 9
Open all the supplies in paintshop except the font.
Double click on your font and minimize.
Open a new image 500 x 500 at 72 dpi
1.Re-size element 40 to 400 pixels wide, copy, paste onto your new image as a new layer.
Re-size element 04 to 350 pixels wide, copy, paste as a new layer.
Add a drop shadow of choice.
I am using H 3, V 3, O 100, B 9.0, Colour #000000
2.Re-size element 09 to 350 pixels wide, copy, paste as a new layer.
Position towards the top right.
Layers/ arrange/ send to bottom.
Layers/ duplicate, image/ mirror, image/ flip.
Layers/ merge/ merge down.
Layers/ duplicate, image/ mirror.
Layers/ merge/ merge down.
Add a drop shadow of choice.
Layers/ duplicate, image/ free rotate/ 90 left, all layers untabbed, rotate single layer tabbed.
Layers/ merge/ merge down.
Add a dop shadow of choicce.
I am using H 1, V 1, O 70, B 2.0, Colour #000000
3.Re-size your tube to 350 pixels high, copy.
Activate your top layer.
Paste as a new layer, position towards bottom left.
Add a dop shadow of choicce.
I am using H 1, V 1, O 70, B 2.0, Colour #000000
4.Re-size element 06 to 300 pixels wide.
Copy, paste as a new layer.
Activate tube layer.
Selections/ select all/ selections float/ selections defloat.
Activate top layer.
With your eraser tool rub out the element covering her foot and leg.
You want it to look like her leg is over your top element.
Selections/ select none.
Add a dop shadow of choicce.
I am using H 1, V 1, O 70, B 2.0, Colour #000000
5.Activate your background layer.
Add your choice of text.
Add your name and all copyright info.
File export and save as a transparent png or jpg for a white background.
Tuesday, 23 February 2010

Tutorial written by and © to Bits N Bobs 23rd February 2010.
Results are for personal use only.
No monetry gain allowed and that includes placing them behind a paid or donation based membership area.
You are not allowed to share/forward or translate any of my tutorials or place them on any blog, website, DVD or anywhere else without my permission.
These tutorials are written from my own ideas and any similarities to any other tutorial is purely coincidental.
All tutorials are for those with a working knowledge of paintshop pro.
I reserve the right to amend these terms at any time.
Supplies needed.
Font of choice for your name and text.
I am using They're coming to take me away
Tube of choice.
I am using Kiss me i'm Irish from Pack 33 by Ismael Rac
Tubes are not to be used without an AMI license
A day for the green scrap kit by Mystic Creations
Items I am using are...
Signpost, Shamrock frame 2, Banner 4, Flower doodle, Paper 4
Note
Open all the supplies in paintshop except the font.
Double click on your font and minimize.
This tutorial was written in PSP 9
1.Open a new image 500 x 500 at 72 dpi,
Re-size your frame to 400 pixels wide.
Copy, paste as a new layer.
Copy your signpost, paste as a new layer,
position to the left of the frame.
Re-size banner 4 to 400 pixels wide,
copy, paste as a new layer,
position at the bottom of your frame.
2.Activate signpost layer and erase any of the
grass outside of the frame and banner.
Re-size your tube to 400 pixels high,
copy, paste as a new layer and position to the right.
3.Copy and paste flower doodle as a new layer.
Layers/ Duplicate layer, image/mirror.
Layers/ merge/ merge down.
Layers arrange/ send to bottom.
4.Re-size paper 4 to 350 pixels wide.
Copy, paste as a new layer.
Position to the center of your frame so there are no gaps.
5.Activate each layer in turn adding the following drop shadow.
V 3, H 3, O 100, B 9.0, Colour #000000
6.Layers/ merge/ merge visible, add your copyright info, license, and name.
Crop to size if required and export as a jpg for a white bg or png for transparent and save.
Tuesday, 9 February 2010

Tutorial written by and © to Bits N Bobs 9th February 2010.
Results are for personal use only.
No monetry gain allowed and that includes placing them behind a paid or donation based membership area.
You are not allowed to share/forward or translate any of my tutorials or place them on any blog, website, DVD or anywhere else without my permission.
These tutorials are written from my own ideas and any similarities to any other tutorial is purely coincidental.
All tutorials are for those with a working knowledge of paintshop pro.
I reserve the right to amend these terms at any time.
Supplies needed.
Font of choice for your name and text.
I am using They're coming to take me away
Tube of choice.
I am using Feeling lucky by Ismael Rac
Tubes are not to be used without an AMI license
Template #8 by Bits N Bobs ( meeeeee lol )
Penta.com Dot and Cross available here - It's part of the Garbage collection
Note
This tutorial was written in PSP 9
Open all the supplies in paintshop except the font.
Double click on your font and minimize.
1.Open your template,
close background and copyright layers.
Activate Large rectangle inner layer.
Adjust/ Add/remove noise
Guassian, Monochrome tabbed, Noise 34%.
Effects/ Plugins/ penta.com/ Jeans
Amount 57, border width 5
2.Activate large rectangle outer layer.
Activate your colour replacer tool.
Select a colour from your tube for your foreground colour ( I am using #056905 ) ,
add #545854 as your background colour
Double left click on your image to change the colour.
Effects/ Plugins/ penta.com/ Jeans
Amount 57, border width 5
3.Activate your Kiss me layer,
Re-size your tube ( feeling lucky 01) to 400 pixels high,
copy and paste as a new layer,
position towards the right hand side and add a drop shadow.
I am using V 3, H 3, O 100, B 9.0, Colour # 000000
Layers/ duplicate, Image/ mirror
4.Activate shamrock layer,
Adjust/ Add/remove noise
Guassian, Monochrome tabbed, Noise 34%.
Effects/ Plugins/ penta.com/ Jeans
Amount 57, border width 5.
5.Copy tube feeling lucky 02,
paste as a new layer, position to your liking,
add a drop shadow as before.
Activate your shamrock layer,
Selections/ select all, selections/ float, selections/ defloat, Selections/ invert
Activate the large tube layer and hit delete on your keyboard.
Change the layer blend mode to Luminance.
6.Activate the shamrock inner layer ( yeah I know it's the outer lol )
Effects/ Plugins/ penta.com/ Jeans
Amount 57, border width 5.
Layers/ merge/ merge down, layers/ merge/ merge down.
Add a drop shadow. Same settings as before.
Add a drop shadow again using the same settings but change the 3 to -3 on H and V.
7.Layers/ merge/ merge visible, add your copyright info, license, and name.
Crop to size to remove the extra dark shadow at the bottom and export as a jpg for a white bg or png for transparent and save.

Tutorial written by and © to Bits N Bobs 9th February 2010
Results are for personal use only.
No monetry gain allowed and that includes placing them behind a paid or donation based membership area.
You are not allowed to share/forward or translate any of my tutorials or place them on any blog, website,
DVD or anywhere else without my permission.
These tutorials are written from my own ideas and any similarities to any other tutorial is purely coincidental.
All tutorials are for those with a working knowledge of paintshop pro.
I reserve the right to amend these terms at any time.
Supplies needed.
Font of choice for your name and text.
I am using Wedding Script
Tube of choice.
I am using Valentines Angel 03 from pack 31 by Ismael Rac
This tube is not to be used without an AMI license
Frame is BNB-My-Love-Element-69 from Bits N Bobs My Love kit
Note
This tutorial was written in PSP 9
I used my selection tool to re colour the top and heart on my tube.
Open all the supplies in paintshop except the font.
Double click on your font and minimize.
Open a new image 500 x 500 at 72 dpi
1.Re-size the frame to 450 pixels high, copy, paste onto your new image as a new layer.
2.Copy and paste your tube as a new layer.
Re-size your tube to 400 pixels high.
Position towards the bottom of your frame.
Layers/ arrange/ send to bottom.
3.Selections/ select all/ selections/ float, selections/ defloat.
Activate your frame layer and delete the top part of the frame.
You want your tube to pop out the top of your frame.
Selections/ select none.
Erase any other parts of the tube remaining at the bottom so she looks like she is popping out the frame.
4.Add a drop shadow of choice.
I am using H 3, V 3, O 100, B 9.0, Colour #000000
Activate your frame layer and add the drop shadow again.
5.Layers/ merge/ merge visible.
Crop to size.
Add your text and all copyright info.
File export and save as png for a transparent background or jpg for a white one.
Tuesday, 2 February 2010

Tutorial written by and © to Bits N Bobs 2nd February 2010.
Results are for personal use only.
No monetry gain allowed and that includes placing them behind a paid or donation based membership area.
You are not allowed to share/forward or translate any of my tutorials or place them on any blog, website, DVD or anywhere else without my permission.
These tutorials are written from my own ideas and any similarities to any other tutorial is purely coincidental.
All tutorials are for those with a working knowledge of paintshop pro.
I reserve the right to amend these terms at any time.
Supplies needed.
Font of choice for your name and text.
I am using Santa's Sleigh
Tube of choice.
I am using a tube from pack 30 by Ismael Rac http://www.artisticmindsinc.com/IRP.html
Tubes are not to be used without an AMI license http://www.artisticmindsinc.com/
This tut can also be found at DVP
Note
This tutorial was written in PSP 9
Open all the supplies in paintshop except the font.
Double click on your font and minimize.
1.Open a new image 500 wide x 200 high at 72 dpi
Flood fill with a colour from your tube.
I am using a red, #7a0607.
Copy your tube, paste as a new layer and position to your liking towards the left hand side.
Re-size your tube if needed making sure 'all layers' is untabbed.
Add a drop shadow of choice.
My settings will remain the same throughout.
V 3, H 3, O 100, B 9.00, Colour #900000
Effects/ Texture effects/ Mosaic antique with the settings in the screenshot below.

Columns 100, Rows 100, Tile diffusion 100, Grout width 5, Grout diffusion 100
2.Copy your tube, paste as a new layer and position to your liking towards the right hand side.
Re-size your tube if needed making sure 'all layers' is untabbed.
Add a drop shadow of choice.
Copy this tube ready for the next layer.
Effects/ Distortion effects/ wind/ from right, 100
Edit/ repeat wind
3.Paste your tube as a new layer over the wind layer
Adjust the layer settings to multiply then lower the opacity to 17 percent.
4.Paste your tube again as a new layer and position to your liking on the left hand side.
Effects/ texture effects/ mosaic glass with the settings as in the screen shot below.

Columns 50, rows 50, symmetric checked, Glass curvature 50, Edge curvature 0, grout width 2, grout diffusion 50
Lower the opacity to 45 percent
Paste your tube as a new layer and position to your liking on the left hand side.
5.Layers/ merge/ merge visible.
Add all copyright info and your name, export as a transparent png file and save.

Dark Cravings
Tutorial written by and © to Bits N Bobs 2nd February 2010.
Results are for personal use only.
No monetry gain allowed and that includes placing them behind a paid or donation based membership area.
You are not allowed to share/forward or translate any of my tutorials or place them on any blog, website, DVD or anywhere else without my permission.
These tutorials are written from my own ideas and any similarities to any other tutorial is purely coincidental.
All tutorials are for those with a working knowledge of paintshop pro.
I reserve the right to amend these terms at any time.
Supplies needed.
Font of choice for your name and text.
I am using They're coming to take me away
Tube of choice.
I am using muse from Angela Newman
Tube is not to be used without the correct licence.
Mine was bought at AMI but Angela Newman
can now be found at MPT
Scrap kit Dark cravings by Bits N Bobs.
This kit is free to use at the time this tut is written
Scraps I am using from this kit are
paper 8, element 24, element 38, element 39,
This tutorial was written in PSP 9
Note
Open all the supplies in paintshop except the font.
Double click on your font and minimize.
1.Open a new image 500 x 500 @ 72 dpi.
Re-size the frame ( element 38 ) to 450 pixels high, copy and paste as a new layer on your new image .
2.With your magic wand select the center of the frame,
selections/ modify/ expand/ expand by 5.
Copy your paper and paste as a new layer.
Selections/ invert, hit delete on your keyboard.
Selections/ select none.
Layers/ arrange layers/ send to the bottom.
3.Activate your frame layer and add a drop shadow.
I am using V 3, H 3, O 100, B 9.00, Colour #000000.
Add a drop shadow again but changing to
-V 3, -H 3, O 100, B 9.00, Colour #000000.
4.Re-size element 24 to 80 pixels high, copy, paste as a new layer.
Layers/ duplicate, image/ mirror.
Layers/ merge/ merge down.
Layers/ duplicate, image/ flip.
Layers/ merge/ merge down.
5.Activate your paper layer,
Copy element 39, paste as a new layer.
Position towards the bottom right corner of your image.
Layers/ duplicate, image/ mirror, image/ flip.
6.Activate your top layer ( mine is the flowers ).
Re-size your tube to 360 pixels high, copy, paste as a new layer.
Position so your tube looks like it is popping out of the frame.
Add a drop shadow.
I am using V 3, H 3, O 100, B 9.00, Colour #000000.
Erase the bottom part of the tubes dropshadow that is now hanging above the frame.
Remember we want her to be popping out ;O)
7.Layers/ merge/ merge visible
Add your copyright info and name.
File/ export and save as a transparent png.
I always use a transparent png unless animated but you can save as a jpg for a white background.

A Dark Love
Tutorial written by and © to Bits N Bobs 2nd February 2010.
Results are for personal use only.
No monetry gain allowed and that includes placing them behind a paid or donation based membership area.
You are not allowed to share/forward or translate any of my tutorials or place them on any blog, website, DVD or anywhere else without my permission.
These tutorials are written from my own ideas and any similarities to any other tutorial is purely coincidental.
All tutorials are for those with a working knowledge of paintshop pro.
I reserve the right to amend these terms at any time.
Supplies needed.
Font of choice for your name and text.
I am using They're coming to take me away
Tube of choice.
I am using dollhouse from Angela Newman
Tube is not to be used without the correct licence
Tube is not to be used without the correct licence.
Mine was bought at AMI but Angela Newman
can now be found at MPT
Scrap kit 'Dark Love' by Black cat scraps
Scraps I am using from this kit are
Frame 3, paper 22, glittersplat 4, dark, love, Heartborder2
This tutorial was written in PSP 9
This tut can also be found at DVP here
Note
Open all the supplies in paintshop except the font.
Double click on your font and minimize.
1.Open a new image 500 x 500 @ 72 dpi.
Re-size the frame to 400 pixels high, copy and paste as a new layer on your new image .
Re-size your paper to 300 pixels high, copy and paste as a new layer.
Layers/ arrange/ send to bottom.
2.Re-size glittersplat 4 to 350 pixels wide, activate your frame layer,
copy, paste as a new layer position it to the bottom right corner of the frame.
Paste as a new layer and position in the center of the frame.
Paste as a new layer again and position towards the top right of the frame.
3.Activate paper layer.
Re-size Heartborder2 to 400 pixels high.
Image/ rotate/ free rotate/ right all layers checked.
Copy, paste as a new layer position towards the bottom center of the frame.
Erase any part hanging out the sides of the frame.
4.Re-size tube to 330 pixels high, copy, paste as a new layer.
Position so she is sitting on the heart border.
5.Re-size dark to 450 pixels high, copy,
activate frame layer, paste as a new layer.
Position to the left side of the frame.
Erase the bottom part of the strings.
6.Re-size love to 450 pixels high, copy,
activate frame layer, paste as a new layer.
Position to the right side of the frame.
Erase the bottom part of the strings.
7.Activate your paper layer and add a drop shadow to each of your layers.
I use V 3, H 3, O 100, B 9.00, Colour #000000
Layers/ merge/ merge visible
Add your copyright info and name.
File/ export and save as a transparent png.
Saturday, 16 January 2010

Tutorial written by and © to Bits N Bobs 16th January 2010.
Results are for personal use only.
No monetry gain allowed and that includes placing them behind a paid or donation based membership area.
You are not allowed to share/forward or translate any of my tutorials or place them on any blog, website, DVD or anywhere else without my permission.
These tutorials are written from my own ideas and any similarities to any other tutorial is purely coincidental.
All tutorials are for those with a working knowledge of paintshop pro.
I reserve the right to amend these terms at any time.
Supplies needed.
Font of choice for your name.
I am using Impact
Tube of choice.
I am using Bee my Valentine from Pack 31 by Ismael Rac
This tube is not to be used without an AMI license
Template 20 from Paradise psp designs
Plugin Xero set 4 - Fritillary
Note
This tutorial was written in PSP 9
Open all the supplies in paintshop except the font.
Double click on your font and minimize.
More tuts at TUT STOP
1.Open the template.
Press shift + D to duplicate then close the original.
Would hate to save over it now wouldn't we ?.
Close off the copyright, Black rectangle and Red rectangle layers.
Activate the oval layer.
Effects /plug-ins / Xero/ Fritillary with the settings below.
They will remain the same for this tutorial.

2.Selections/ select all, Selections/ float, Selections/ defloat.
Selections/ modify/ expand by 3, Layers/ new raster layer.
Flood fill with white (#FFFFFF), Layers/ arrange/ move down.
Selections/ select none.
Add a drop shadow of choice.
My settings will remain the same throughout.
V 0, H 0, O 100, B 7.00, Colour #900000
3.Activate circle layer use your colour replacer tool and change the colour.
I have #808080 in the foreground and #7c0000 in the background.
Double right click on the circle to change the colour.
Effects /plug-ins / Xero/ Fritillary with the same settings.
Selections/ select all, Selections/ float, Selections/ defloat.
Selections/ modify/ expand by 3, Layers/ new raster layer.
Flood fill with white (#FFFFFF), Layers/ arrange/ move down.
Selections/ select none.
Add a drop shadow of choice.
4.Activate thin rectangle layer.
Effects /plug-ins / Xero/ Fritillary with the same settings.
Add a drop shadow of choice.
5.Activate black heart layer.
Re-size your tube if needed.
Copy and paste as a new layer.
Image/ mirror and add a drop shadow.
Activate white heart layer and add a drop shadow.
Activate word art layer and add a drop shadow.
6.Close of the background layer.
Layers/ merge/ merge visible.
Add all copyright info and your name, export as a transparent png file and save.
Thursday, 14 January 2010

Click tag to view animation
Saint or Sinner
Tutorial written by and © to Bits N Bobs 14th January 2010
Results are for personal use only.
No monetry gain allowed and that includes placing them behind a paid or donation based membership area.
You are not allowed to share/forward or translate any of my tutorials or place them on any blog, website,
DVD or anywhere else without my permission.
These tutorials are written from my own ideas and any similarities to any other tutorial is purely coincidental.
All tutorials are for those with a working knowledge of paintshop pro.
I reserve the right to amend these terms at any time.
Supplies needed.
Font of choice for your name and text.
I am using Learning curves pro and Got Heroin
Tube of choice.
I am using Cherished Angel by Ismael Rac
Saint or Sinner
Tutorial written by and © to Bits N Bobs 14th January 2010
Results are for personal use only.
No monetry gain allowed and that includes placing them behind a paid or donation based membership area.
You are not allowed to share/forward or translate any of my tutorials or place them on any blog, website,
DVD or anywhere else without my permission.
These tutorials are written from my own ideas and any similarities to any other tutorial is purely coincidental.
All tutorials are for those with a working knowledge of paintshop pro.
I reserve the right to amend these terms at any time.
Supplies needed.
Font of choice for your name and text.
I am using Learning curves pro and Got Heroin
Tube of choice.
I am using Cherished Angel by Ismael Rac
This tube is not to be used without an AMI license
Frame is here and is to be used for this tut only.
If you want it for anything else please purchase the script.
Thank you.
If the link is down contact me and I will re-activate it.
Alien skin xenofex2 (free demo available).
If you want it for anything else please purchase the script.
Thank you.
If the link is down contact me and I will re-activate it.
Alien skin xenofex2 (free demo available).
Note
This tutorial was written in PSP 9
Open all the supplies in paintshop except the font.
Double click on your font and minimize.
Open a new image 500 x 500 at 72 dpi
More tuts at TUT STOP
1. Re-size the frame to 450 pixels high, copy, paste onto your new image as a new layer.
2. Select the center with your magic wand,
selections/ modify/ expand by 3, layers/ new raster layer,
layers/ arrange/ move down, flood fill with a colour of your choice,
I am using 7C0000.
Adjust/ add/remove noise/ add noise with settings .....
Gaussian checked, Monochrome checked, Noise 35%
Layers/ new raster layer, Effects/ 3D Effects/ Cut out with settings...
V 0, H -1, O 70, Blur 44.55, Shadow #000000, Selections/ select none.
3. Activate your frame layer.
Copy and paste your tube as a new layer.
Add a drop shadow.
Settings will remain the same through out.
I am using V3, H3, O100, B13.00, C #000000
4. Activate your frame layer again.
Selections/ select all/ selections/ float, selections/ defloat.
Activate your tube layer and delete the bottom part over the frame.
Selections/ select none.
Erase any other parts of the tube remaining at the bottom so she looks like she is popping out the frame.
5. Activate your frame layer again and add a drop shadow.
6. Layers/ merge/ merge visible.
Add your text and all copyright info.
For Saint I used Learning curve pro font and Got Heroin for all other text and my name.
7. Using your magic wand set at 0 tolerance, antialias on,select any spots you want to sparkle on your tube.
I am going to select areas of her Jewellery.
Holding your shift key whilst doing this will allow you to select seperate areas.
When done press shift + D twice so you have 3 images.
8. On your first image Effects/ plugins/ alien skin xenofex 2 ,
use the same settings as in the screen shot below .
File/ save as, save as image 2.

9. On your second image Effects/ plugins/ alien skin xenofex 2 , use the same settings but hit the random seed button .
File/ save as, save as image 2.
10. On your third image Effects/ plugins/ alien skin xenofex 2 , use the same settings but hit the random seed button .
File/ save as, save as image 3.
11. Open animation shop.
File/ animation wizard then follow the screen shots clicking next after each one.
On the add image part browse to where you saved your files and add them all, click next then finish.
View/ animation then file/save as.


12. Create your name in paintshop as normal, copy the file and paste as a new animation into animation shop.
Copy the name in animation shop, activate your animation, edit/ select all, edit/ paste into selected frames and then file/save as.
This tutorial was written in PSP 9
Open all the supplies in paintshop except the font.
Double click on your font and minimize.
Open a new image 500 x 500 at 72 dpi
More tuts at TUT STOP
1. Re-size the frame to 450 pixels high, copy, paste onto your new image as a new layer.
2. Select the center with your magic wand,
selections/ modify/ expand by 3, layers/ new raster layer,
layers/ arrange/ move down, flood fill with a colour of your choice,
I am using 7C0000.
Adjust/ add/remove noise/ add noise with settings .....
Gaussian checked, Monochrome checked, Noise 35%
Layers/ new raster layer, Effects/ 3D Effects/ Cut out with settings...
V 0, H -1, O 70, Blur 44.55, Shadow #000000, Selections/ select none.
3. Activate your frame layer.
Copy and paste your tube as a new layer.
Add a drop shadow.
Settings will remain the same through out.
I am using V3, H3, O100, B13.00, C #000000
4. Activate your frame layer again.
Selections/ select all/ selections/ float, selections/ defloat.
Activate your tube layer and delete the bottom part over the frame.
Selections/ select none.
Erase any other parts of the tube remaining at the bottom so she looks like she is popping out the frame.
5. Activate your frame layer again and add a drop shadow.
6. Layers/ merge/ merge visible.
Add your text and all copyright info.
For Saint I used Learning curve pro font and Got Heroin for all other text and my name.
7. Using your magic wand set at 0 tolerance, antialias on,select any spots you want to sparkle on your tube.
I am going to select areas of her Jewellery.
Holding your shift key whilst doing this will allow you to select seperate areas.
When done press shift + D twice so you have 3 images.
8. On your first image Effects/ plugins/ alien skin xenofex 2 ,
use the same settings as in the screen shot below .
File/ save as, save as image 2.

9. On your second image Effects/ plugins/ alien skin xenofex 2 , use the same settings but hit the random seed button .
File/ save as, save as image 2.
10. On your third image Effects/ plugins/ alien skin xenofex 2 , use the same settings but hit the random seed button .
File/ save as, save as image 3.
11. Open animation shop.
File/ animation wizard then follow the screen shots clicking next after each one.
On the add image part browse to where you saved your files and add them all, click next then finish.
View/ animation then file/save as.


12. Create your name in paintshop as normal, copy the file and paste as a new animation into animation shop.
Copy the name in animation shop, activate your animation, edit/ select all, edit/ paste into selected frames and then file/save as.
Tuesday, 8 December 2009

Tutorial written by and © to Bits N Bobs 8th December 2009.
Results are for personal use only.
No monetry gain allowed and that includes placing them behind a paid or donation based membership area.
You are not allowed to share/forward or translate any of my tutorials or place them on any blog, website,
DVD or anywhere else without my permission.
These tutorials are written from my own ideas and any similarities to any other tutorial is purely coincidental.
All tutorials are for those with a working knowledge of paintshop pro.
I reserve the right to amend these terms at any time.
Supplies needed.
Font of choice for your name.
I am using Kingthings wrote
Tube of choice.
I am using XmasBigBox from Racs Pack 28
This tube is not to be used without an AMI license
Scrap kit by Black cat at AMI - Holly in Snow
Items used from this kit are.
Frame 4, Element 68, Element 14,
Alien skin xenofex2 (free demo available)
Note
This tutorial was written in PSP 9
Open all the supplies in paintshop except the font.
Double click on your font and minimize.
Open a new image 500 x 500 at 72 dpi
1. Re-size frame 4 to 400 pixels wide, copy, paste onto your new image as a new layer.
Add a drop shadow. Settings will remain the same through out.
I am using V3, H3, O100, B9.00, C #000000
2. Re-size element 68 to 400 pixels wide, copy, paste as a new layer.
Position your tube to the bottom left hand corner and add a drop shadow.
3. Re-size element 14 to 300 pixels high, copy, paste as a new layer.
Layers/ arrange/ move up. Place toward the top left corner.
Layers/ duplicate, image/ mirror, place toward the top right corner.
Layers/ merge/ merge down, layers/ duplicate, layers/merge/ merge down, add a drop shadow.
4. Add a new layer and add whatever text you like.
Layers/ merge/ merge visible.
Add your copyright info
5. Use your magic wand set at 0 tolerance, antialias on and select any spots you want to sparkle on your tube.
Press shift and D twice. You will now have 3 files.
On the first one effects/ plugins/ alien skin xenofex 2 , use settings as in screen shot.
Selections/ select none, file/ save as, image 1 to your desktop
On the second one effects/ plugins/ alien skin xenofex 2 , use settings as in screen shot above but hit random seed button.
Selections/ select none, file/ save as, image 2 to your desktop
On the second one effects/ plugins/ alien skin xenofex 2 , use settings as in screen shot above and hit random seed button .
Selections/ select none, file/ save as, image 3 to your desktop

6. Open animation shop.
File/ animation wizard then follow the screen shots clicking next after each one.
On the add image part browse to where you saved your files and add them all, click next then finish.
View/ animation then file/save as.


7. Create your name in paintshop as normal, copy the file and paste as a new animation into animation shop.
Copy the name in animation shop, activate your animation, edit/ select all, edit/ paste into selected frame and then file/save as.
Monday, 7 December 2009

Tutorial written by and © to Bits N Bobs 7th December 2009.
Results are for personal use only.
No monetry gain allowed and that includes placing them behind a paid or donation based membership area.
You are not allowed to share/forward or translate any of my tutorials or place them on any blog,
website, DVD or anywhere else without my permission.
These tutorials are written from my own ideas and any similarities to any other tutorial is purely coincidental.
All tutorials are for those with a working knowledge of paintshop pro.
I reserve the right to amend these terms at any time.
Supplies needed.
Font of choice for your name.
I am using Kingthings Wrote
Tube of choice.
I am using one by KatNKDA called Angel Dust and have chosen the one with the cloud.
Not to be used without an AMI license
White Christmas kit by Bits N Bobs at AMI
I have used the following items from the above kit...
Element 1, Element 6, Element 15, Element 20,
Alien skin xenofex2 (free demo available).
This tutorial was written in PSP 9
Note
Open all the supplies in paintshop except the font.
Double click on your font and minimize.
Open a new transparent image 500x500 at 72 dpi
1. Copy element 1, paste as a new layer onto your new image.
2. Re-size your tube to 250 pixels high.
Copy and paste as a new layer.
3. Copy element 15 and paste as a new layer.
4. Re-size element 20 to 380 pixels high, copy.
Activate layer 2 ( the one below your tube ), paste as a new layer.
5. Re-size element 15 to 300 pixels high, copy, paste as a new layer.
Layers/ arrange/ move down.
6. Add a drop shadow to each layer using the settings below.
V 2, H 2, O 35, Blur 5.00
Colour black, OK.
7. Activate your top layer.
Add a new raster layer and add all copyright info.
Note:
For animation move straight onto step 8.
If you don't wish to animate then layers/ merge visible, export as transparent png and save.
8. Activate your sparkle layer ( Mine is layer 5 )
Press shift and D twice. You will now have 3 files.
On the first one effects/ plugins/ alien skin xenofex 2 , use settings as in screen shot.
On the second one effects/ plugins/ alien skin xenofex 2 , use settings as in screen shot above but hit random seed button .
On the second one effects/ plugins/ alien skin xenofex 2 , use settings as in screen shot above and hit random seed button .

9. Activate your tube layer.
Use your magic wand set at 0 tolerance, antialias off and select any spots you want to sparkle on your tube.
( I have chosen to sparkle her feather halo )
Effects/ plugins/ alien skin xenofex 2 , use settings as in screen shot.
Selections/ none, Layers/ merge/ merge all ( flatten ).
File/ save as, image 1 to your desktop
Repeat this step on your other 2 images saving them as image 2 and image 3.

File/ animation wizard then follow the screen shots clicking next after each one.
On the add image part browse to where you saved your files and add them all, click next then finish.
View/ animation then file/save as.


11. Create your name in paintshop as normal, copy the file and paste as a new animation into animation shop.
Copy the name in animation shop, activate your animation, edit/ select all, edit/ paste into selected frame and then file/save as.
Tuesday, 1 December 2009

Santa baby
Tutorial written by and © to Bits N Bobs 1st December 2009.
Results are for personal use only.
No monetry gain allowed and that includes placing them behind a paid or donation based membership area.
You are not allowed to share/forward or translate any of my tutorials or place them on any blog, website,
DVD or anywhere else without my permission.
These tutorials are written from my own ideas and any similarities to any other tutorial is purely coincidental.
All tutorials are for those with a working knowledge of paintshop pro.
I reserve the right to amend these terms at any time.
Supplies needed.
Font of choice for your name.
I am using Impact
Tube of choice.
I am using XmasPack03 from Racs Tube Pack 28
This tube is not to be used without an AMI license
Scrap kit by Black cat at AMI - Holly in Snow
Items used from this kit are.
Frame 4, Element 14, Element 37,
Note
This tutorial was written in PSP 9
Open all the supplies in paintshop except the font.
Double click on your font and minimize.
Open a new image 500 x 500 at 72 dpi
1. Re-size frame 4 to 450 pixels wide, copy, paste onto your new image as a new layer.
Add a drop shadow. Settings will remain the same through out.
I am using V3, H3, O100, B9.00, C #000000
Re-size element 14 to 200 pixels wide.
Copy, paste as a new layer, position in top left corner of your frame.
Layers/ duplicate, image/ mirror, layers/ merge/ merge down.
Layers/ duplicate, image/ flip, layers/ merge/ merge down.
Add a drop shadow.
Tutorial written by and © to Bits N Bobs 1st December 2009.
Results are for personal use only.
No monetry gain allowed and that includes placing them behind a paid or donation based membership area.
You are not allowed to share/forward or translate any of my tutorials or place them on any blog, website,
DVD or anywhere else without my permission.
These tutorials are written from my own ideas and any similarities to any other tutorial is purely coincidental.
All tutorials are for those with a working knowledge of paintshop pro.
I reserve the right to amend these terms at any time.
Supplies needed.
Font of choice for your name.
I am using Impact
Tube of choice.
I am using XmasPack03 from Racs Tube Pack 28
This tube is not to be used without an AMI license
Scrap kit by Black cat at AMI - Holly in Snow
Items used from this kit are.
Frame 4, Element 14, Element 37,
Note
This tutorial was written in PSP 9
Open all the supplies in paintshop except the font.
Double click on your font and minimize.
Open a new image 500 x 500 at 72 dpi
1. Re-size frame 4 to 450 pixels wide, copy, paste onto your new image as a new layer.
Add a drop shadow. Settings will remain the same through out.
I am using V3, H3, O100, B9.00, C #000000
Re-size element 14 to 200 pixels wide.
Copy, paste as a new layer, position in top left corner of your frame.
Layers/ duplicate, image/ mirror, layers/ merge/ merge down.
Layers/ duplicate, image/ flip, layers/ merge/ merge down.
Add a drop shadow.
2. Re-size element 37 to 500 pixels high.
Copy, paste as a new layer, layers/ arrange/ send to bottom.
Erase any part of the paper outside of your frame.
Add a new layer if you wish to add any text your paper.
Copy, paste as a new layer, layers/ arrange/ send to bottom.
Erase any part of the paper outside of your frame.
Add a new layer if you wish to add any text your paper.
3. Re-size your tube to 450 pixels high
Activate the frame layer, copy your tube, paste as a new layer, add a drop shadow if you wish.
Using your selection tool or eraser cut away the top and right hand side of your tube so that she looks like she is hanging out of your frame.
4. Add your copyright info and name and export as jpg for a white background or png for transparent .
Subscribe to:
Posts
(Atom)
Stores


BNB Blinkie