
Showing posts with label Jamie Kidd. Show all posts
Showing posts with label Jamie Kidd. Show all posts
Tuesday, 15 January 2013

Forever Yours
Tutorial written by and © to Bits N Bobs 13th January 2011
You are not allowed to share/forward or translate this tutorial or place it on any blog or website.
This tutorial is written from my own ideas and any similarities to any other tutorial is purely coincidental.
Tutorial is for those with a working knowledge of paintshop pro.
Supplies needed.
Font of choice for your name.
I am using Island of Misfit Toys.
Font Impact for writing.
Tube of choice , I am using Scarlett by Jamie kidd
Artwork is not to be used without the correct Licence.
Penta.com - Dots and cross - Garbage collection
Mask 341 by vix
Scrap kit All for Love by Bits N Bobs
Items I am using from this scrap kit are
AFL Paper 1, AFL Paper 3, AFL23, AFL13, AFL60,
Note
For the animation you will need animation shop.
This tutorial was written in PSP 9
Copy any masks to your psp masks folder
Open all other supplies in paintshop except the font.
Double click on your font and minimize.
1. Re-size your paper to 500 x 500, copy.
Open a new image 500 x 500 @ 72 pixels/inch
Paste your paper as a new layer.
2. Layers/ load/save mask/ Load mask from disk,
Look for mask Vix_Mask341 and load with the settings in the screen shot below.
Layers/ merge/ merge group

3. Re-size your AFL23 to 450 pixels wide,
copy, paste as a new layer,
position to your liking.
Using your magic wand hold your shift key and
select the centre of both hearts.
Selections/ modify/ expand by 5.
Layers/ new raster layer, Layers/ arrange/ move down.
Re-size AFL paper 3 to 450 pixels wide,
copy, paste into selection, selections/ select none.
Activate your hearts frame, Leyers/ Merge/ merge down.
Add a drop shadow of choice.
My settings remain the same throughout and I use...
V 3, H 3, O 100, B 9.0, Colour #000000
4. Re-size AFL13 to 250 pixels high.
Copy and paste as a new layer.
Position to your liking.
Add a drop shadow.
5. Activate your mask layer.
Re-size AFL60 to 350 pixels high.
Copy and paste as a new layer.
Layers/ Arrange/ Brint to the top.
Position to your liking.
Add a dropshadow.
Layers/ Arrange/ move down.
6. Activate your top layer.
Re-size your tube if needed.
I have re-sized mine to 350 pixels high.
Position to your liking and add a drop shadow.
7. Layers/ new raster layer.
Using the font Impact, Floating, size 48, colour of choice,
type a word of your choosing in capitals.
While still selected go to Effects/ plugins/ penta.com/ Dots and cross
Amount:72, Cross Distance: 10, Cross width: 2.
Selections/ Modify/ Expand by 5.
Layers/ new raster layer, flood fill with #ffffff.
Layers/ arrange/ move down.
Selections/ Modify/ Expand by 2.
Layers/ new raster layer, flood fill with #ac9778
Layers/ arrange/ move down.
8. Layers/ merge/ merge visible.
Add all copy right info.
Add your name,export as png for transparent background
or jpg for a white background and save.
Tuesday, 23 February 2010

Tutorial written by and © to Bits N Bobs 23rd February 2009
You are not allowed to share/forward or translate this tutorial or place it on any blog or website.
This tutorial is written from my own ideas and any similarities to any other tutorial is purely coincidental.
Tutorial is for those with a working knowledge of paintshop pro.
Supplies needed.
Font of choice for your name.
I am using Nueva Std Cond
Tube of choice , I am using Samsara by Jamie kidd
Artwork is not to be used without a C.I.L.M license
Mask 330 by vix
Scrap kit Madamme-Bourdoir by Felice Original
Items I am using from this scrap kit are
Damask flower creme paper, Necklace, Vintage dresser, Corset damask, gloves black,
Note
For the animation you will need animation shop.
This tutorial was written in PSP 9
Copy any masks to your psp masks folder
Open all other supplies in paintshop except the font.
Double click on your font and minimize.
1.Open a new image 500 x 500 @ 72 pixels/inch
Re-size your paper to 400 x 400.
Copy, paste your paper as a new layer.
2.Re-size necklace to 400 pixels high.
Copy, paste as a new layer.
Add drop shadow of choice.
My settings remain the same throughout and I use...
V 3, H 3, O 100, B 9.0, Colour #000000
3.Activate your paper layer and erase anything outside the frame.
Activate Necklace layer.
Re-size Vintage dresser to 300 pixels high.
Copy, paste as a new layer,
position to the left and add a drop shadow.
4.Re-size your tube if needed.
I have re-sized mine to 250 pixels high.
Copy, paste as a new layer,
position in your frame and slightly towards the right.
5.Activate you necklace layer.
Select the center with your magic wand.
Selections/ modify/ expand by 5.
Selections/ invert.
Activate your tube layer and erase the bottom part of her that is outside the frame.
Selections/ select none.
Add a drop shadow.
6.Re-size your gloves black to 150 pixels high.
Copy, paste as a new layer,
Position to your liking and add a drop shadow.
7.Re-size your corset damask to 200 pixels high.
Copy, paste as a new layer,
Position to your liking and add a drop shadow.
I also rotated mine using the raster deform tool.
8.Open a new copy of the damask paper.
Re-size to 500 pixels wide,
copy, paste a new layer.
Layers/ Load/save mask/ load mask from disk,
Look for Vix-mask330 and load, Invert transparency unchecked.
Layers/ merge/ merge group, Layers/ arrange/ send to bottom.
9.Using your selection tool select the bottom half of the masked area

Rectangle, Replace, 0, Anitalias checked
and move up slightly so the bottom corners don't look quite so sharp.
You may also want to erase the top 2 corners.
Add a dropshadow.
Same settings but lower the opacity to around 60%
Layers/ merge/ merge all (flatten)
10.Add all copy right info.
Add your name,export as a jpg and save.
Monday, 26 October 2009

Click tag to view the animation
8.
On your 2nd image, effects/ eye candy 5 nature/ Fire
Same settings as before but click the random seed button
Selections/ invert, delete, sleections/ select none, layers/ mere/ merge visible.
File/ save as, save as image 2 to your desktop.
10.
On your 3rd image, effects/ eye candy 5 nature/ Fire
Same settings as before but click the random seed button
Selections/ invert, delete, sleections/ select none, layers/ mere/ merge visible.
File/ save as, save as image 3 to your desktop.
11.
Open animation shop.
File/ animation wizard then follow the screen shots clicking next after each one.
On the add image part browse to where you saved your files and add them all, click next then finish.
View/ animation then file/save as.


Felling horny
Tutorial written by and © to Bits N Bobs 26th October 2009
You are not allowed to share/forward or translate this tutorial or place it on any blog or website.
This tutorial is written from my own ideas and any similarities to any other tutorial is purely coincidental.
Tutorial is for those with a working knowledge of paintshop pro.
Supplies needed.
Font of choice for your name.
I am using Nightmare hero http://ooo-n3o-ooo.deviantart.com/gallery/#fonts
Tube of choice , I am using Sexy Devil by Jamie kidd http://www.jamiekiddart.com/
Artwork is not to be used with a C.I.L.M license http://www.cilm.com/
Template 6 by Tori http://toristidbits.blogspot.com/2009/04/template-6.html
Alien skin eye candy 5 Nature - Fire Download trial http://www.alienskin.com/downloads/
Note
For the animation you will need animation shop.
This tutorial was written in PSP 9
Open all the supplies in paintshop except the font.
Double click on your font and minimize.
1.
Open template 6, press shift + D to duplicate and close the original.
Close off the Oval frame layer, activate background layer.
Copy your Sexy Devil jpg image file, paste as a new layer and position to your liking.
Erase any part of the image showing outside of the frame.
2.
Activate your circles and using your colour replacer tool select #740605 in the foreground,
#c0c0c0 in the background and double left click on your cirlces to turn them red.
Effects/ 3D effects/ inner bevel with the settings below.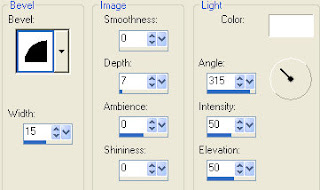
3.
Activate dotted lines layer and using your colour replacer tool select #000000 in the foreground,
#404040 in the background double left click on the dotted lines to turn them black.
4.
Activate gray frame layer and using your colour replacer tool select #ab0807 in the foreground,
#808080 in the background double left click on the gray frame to turn it red.
5.
Close off the background layer, activate your top layer, layers/ new raster layer and add all copyright info.
If you don't wish to animate you can also add your name here and save it as it is.
ANIMATION
6.
Activate your scalloped frame layer.
Selections/ select all, float, defloat.
Shift + D twice to create a total of 3 images.
7.
On your first image, effects/ eye candy 5 nature/ Fire
Settings Medium, weird color, Candy with the basic settings as in screenshot below.
Selections/ invert, delete, sleections/ select none, layers/ mere/ merge visible.
File/ save as, save as image 1 to your desktop.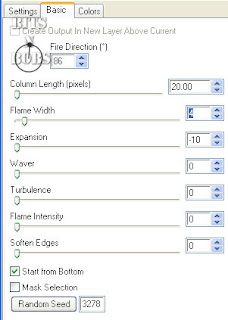
Tutorial written by and © to Bits N Bobs 26th October 2009
You are not allowed to share/forward or translate this tutorial or place it on any blog or website.
This tutorial is written from my own ideas and any similarities to any other tutorial is purely coincidental.
Tutorial is for those with a working knowledge of paintshop pro.
Supplies needed.
Font of choice for your name.
I am using Nightmare hero http://ooo-n3o-ooo.deviantart.com/gallery/#fonts
Tube of choice , I am using Sexy Devil by Jamie kidd http://www.jamiekiddart.com/
Artwork is not to be used with a C.I.L.M license http://www.cilm.com/
Template 6 by Tori http://toristidbits.blogspot.com/2009/04/template-6.html
Alien skin eye candy 5 Nature - Fire Download trial http://www.alienskin.com/downloads/
Note
For the animation you will need animation shop.
This tutorial was written in PSP 9
Open all the supplies in paintshop except the font.
Double click on your font and minimize.
1.
Open template 6, press shift + D to duplicate and close the original.
Close off the Oval frame layer, activate background layer.
Copy your Sexy Devil jpg image file, paste as a new layer and position to your liking.
Erase any part of the image showing outside of the frame.
2.
Activate your circles and using your colour replacer tool select #740605 in the foreground,
#c0c0c0 in the background and double left click on your cirlces to turn them red.
Effects/ 3D effects/ inner bevel with the settings below.

3.
Activate dotted lines layer and using your colour replacer tool select #000000 in the foreground,
#404040 in the background double left click on the dotted lines to turn them black.
4.
Activate gray frame layer and using your colour replacer tool select #ab0807 in the foreground,
#808080 in the background double left click on the gray frame to turn it red.
5.
Close off the background layer, activate your top layer, layers/ new raster layer and add all copyright info.
If you don't wish to animate you can also add your name here and save it as it is.
ANIMATION
6.
Activate your scalloped frame layer.
Selections/ select all, float, defloat.
Shift + D twice to create a total of 3 images.
7.
On your first image, effects/ eye candy 5 nature/ Fire
Settings Medium, weird color, Candy with the basic settings as in screenshot below.
Selections/ invert, delete, sleections/ select none, layers/ mere/ merge visible.
File/ save as, save as image 1 to your desktop.

8.
On your 2nd image, effects/ eye candy 5 nature/ Fire
Same settings as before but click the random seed button
Selections/ invert, delete, sleections/ select none, layers/ mere/ merge visible.
File/ save as, save as image 2 to your desktop.
10.
On your 3rd image, effects/ eye candy 5 nature/ Fire
Same settings as before but click the random seed button
Selections/ invert, delete, sleections/ select none, layers/ mere/ merge visible.
File/ save as, save as image 3 to your desktop.
11.
Open animation shop.
File/ animation wizard then follow the screen shots clicking next after each one.
On the add image part browse to where you saved your files and add them all, click next then finish.
View/ animation then file/save as.

12.
Create your name in paintshop as normal, copy the file and paste as a new animation into animation shop.
Copy the name in animation shop, activate your animation, edit/ select all, edit/ paste into selected frame and then file/save as.
Create your name in paintshop as normal, copy the file and paste as a new animation into animation shop.
Copy the name in animation shop, activate your animation, edit/ select all, edit/ paste into selected frame and then file/save as.
Wednesday, 19 August 2009
 My Immortal Tutorial written by and © to Bits N Bobs 19th August 2009 You are not allowed to share/forward or translate this tutorial or place it on any blog or website. This tutorial is written from my own ideas and any similarities to any other tutorial is purely coincidental. Tutorial is for those with a working knowledge of paintshop pro. Supplies needed. Font of choice for your name. I am using Nightmare hero Tube of choice , I am using art by Jamie kidd Artwork is not to be used without a C.I.L.M license My Immortal kit by Cora I have used the following items from the above kit Frame 04, PP12, Glitter fence, Flower swirl, Ribbon 04, Moon, No outside filters needed. This tutorial was written in PSP 9 Note Open all the supplies in paintshop except the font. Double click on your font and minimize. 1. Open a new transparent file 600 x 600 @ 72 dpi, Re size frame 4 to 300 pixels high copy and paste as a new layer. Image/ rotate/ free rotate 20 left, all layers unchecked. Duplicate layer, image/ mirror, position. Layers/ merge/ merge visible. Using your lassoo tool cut away the bottom frame from inside the top frame as in screenshot below 1.
  2. Select the center of your frame with your magic wand, selections/ modify/ expand by 3. Re size paper 12 to 600 pixels high, copy, paste as a new layer, layers/ arrange/ move down, selections/ invert, delete. Activate frame layer, add drop shadow : H 2, V 2, O 70, B 5.00, C #000000 3. Copy tube, paste as a new layer, layers/ arrange/ send to bottom, position, add drop shadow : H 2, V 2, O 70, B 5.00, C #000000. 4. Re size glitter fence to 500 pixels wide, copy, paste as new layer, position, duplicate layer, image/ flip/ image/ mirror, layers/ arrange/ send to bottom. 5. Re size flower swirl to 250 pixels wide, copy, activate frame layer, paste as a new layer, add drop shadow : H 2, V 2, O 70, B 5.00, C #000000. 6. Copy your larger tube, activate paper layer, paste as a new layer, image/ mirror, position, add drop shadow : H 2, V 2, O 70, B 5.00, C #000000. Activate frame, select the center of the frames with your magic wand, modify/ expand/ expand by 5, selections/ invert, activate large tube layer, delete, selections/ select none. Lower large tube layer opacity to 50%, blend mode set to hard light. 7. Re size ribbon 04 to 500 pixels wide, copy, paste as a new layer, move into position, layers/ arrange/ move up, add drop shadow : H 2, V 2, O 70, B 5.00, C #000000. 8. Re size moon to 200 pixels wide, copy, activate paper layer, paste as a new layer, move into position, add drop shadow : H 2, V 2, O 70, B 5.00, lower moon layer opacity to 50%. 9. Add copyright info, watermark, name and export as a png file for transparent background or jpg for white background.
Subscribe to:
Posts
(Atom)
Stores


BNB Blinkie