
Showing posts with label MTA. Show all posts
Showing posts with label MTA. Show all posts
Thursday, 9 April 2015

Steampunked
Tutorial written by and © to Bits N Bobs 9th April 2015
Results are for personal use only.
No monetry gain allowed and that includes placing them behind a paid or donation based membership area.
You are not allowed to share/forward or translate any of my tutorials or place them on any blog, website,
DVD or anywhere else without my permission.
You are welcome though to add a link to my tutorial page.
These tutorials are written from my own ideas and any similarities to any other tutorial is purely coincidental.
All tutorials are for those with a working knowledge of paintshop pro.
I reserve the right to amend these terms at any time.
Supplies needed.
Font of choice for your name.
I am using 2 fairytale fancy dna.
Tube of choice.
I am using the tube Steampunk girl by Amberly Berendson
Tube is not to be used without the correct licence.
Steampunk corner Animation by Cat here (if you want to animate)
Mask of choice.
I am using Vix_Mask362 available here
Scrap kit Operation Steampunk available here or here
Items I have used are....
Paper 5, 9,
Elements 16, 38, 39, 62, 71, 73,
Note
This tutorial was written in PSP 9.
Double click on your font and minimize.
Open all other supplies in paintshop.
1. Open a new image, 600 w x 600 h at 72 dpi.
Selections/ select all.
Copy your paper, paste into selection.
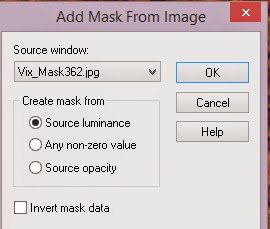
Layers/ new mask layer/ from image.
Look for your mask, source luminance checked
all else unchecked.
Click ok.
Selections/ none.
Layers/ merge/ merge group
Tutorial written by and © to Bits N Bobs 9th April 2015
Results are for personal use only.
No monetry gain allowed and that includes placing them behind a paid or donation based membership area.
You are not allowed to share/forward or translate any of my tutorials or place them on any blog, website,
DVD or anywhere else without my permission.
You are welcome though to add a link to my tutorial page.
These tutorials are written from my own ideas and any similarities to any other tutorial is purely coincidental.
All tutorials are for those with a working knowledge of paintshop pro.
I reserve the right to amend these terms at any time.
Supplies needed.
Font of choice for your name.
I am using 2 fairytale fancy dna.
Tube of choice.
I am using the tube Steampunk girl by Amberly Berendson
Tube is not to be used without the correct licence.
Steampunk corner Animation by Cat here (if you want to animate)
Mask of choice.
I am using Vix_Mask362 available here
Scrap kit Operation Steampunk available here or here
Items I have used are....
Paper 5, 9,
Elements 16, 38, 39, 62, 71, 73,
Note
This tutorial was written in PSP 9.
Double click on your font and minimize.
Open all other supplies in paintshop.
1. Open a new image, 600 w x 600 h at 72 dpi.
Selections/ select all.
Copy your paper, paste into selection.
Layers/ new mask layer/ from image.
Look for your mask, source luminance checked
all else unchecked.
Click ok.
Selections/ none.
Layers/ merge/ merge group
2. Copy your frame, paste as a new layer.
Image/re-size to 450 pixels wide.
Using your magic wand select the center of
one of the frames.
Hold down your shift button and select the center
of the other two frames.
Release your shift button.
Selections/ modify/ expand by 3.
Layers/ new raster layer.
Copy paper 5, paste into selection.
Layers/ arrange/ move down.
Selections/ select none.
3. Copy element 38, paste as a new layer.
Image/ re-size to 300 pixels wide,
all layers un-tabbed.
Position to your liking.
Mine is top left.
Layers/ duplicate layer.
Position to your liking.
Mine is bottom right.
Layers/ merge/ merge down
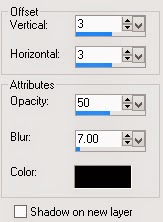
Add a drop shadow of choice.
For this tutorial I am using...
V3, H3, O70, B7, C#000000
Layers/ arrange/ move down.

4. Copy element 39.
Activate top layer, paste as a new layer.
Image/ re-size to 400 pixels wide,
all layers un-tabbed.
Position to your liking.
Mine is in the top frame.
Add a drop shadow of choice.
5. Copy element 71, paste as a new layer.
Image/ re-size to 300 pixels wide,
all layers un-tabbed.
Position to your liking.
Mine is towards the top.
Add a drop shadow of choice.
Layers/ arrange/ move down, edit/repeat x 2,
It should be below the frame paper
6. Copy element 62, paste as a new layer.
Image/ re-size to 300 pixels wide,
all layers un-tabbed.
Image/ mirror.
Position to your liking.
Mine is top right corner.
Add a drop shadow of choice.
Layers/ arrange/ send to bottom
7. Copy your tube,
activate top layer, paste as a new layer.
Image/ re-size to 500 pixels high,
all layers un-tabbed.
Image/ mirror.
Position to your liking.
Mine is bottom left corner.
Add a drop shadow of choice.
8. Copy element 16, paste as a new layer.
Image/ re-size to 150 pixels wide,
all layers un-tabbed.
Position to your liking and layer duplicate for more.
I have three, one on each frame.
Add a drop shadow of choice to each one.
Note: If you do not wish to animate then add your name, copyright
info and file export as a transparent png and save.
Animation
9. Add your copyright information.
Layers/ merge/ merge visible.
Edit/ Copy.
Open animation shop.
Edit/ paste as a new animation.
Edit/ paste after current frame.
Repeat until you have six frames.
10. Open your mng animation file.
Edit/ select all,
Animation/ resize animation.
Re-size to 50% smart size.

Edit/ copy.
Activate your tag.
Edit/ select all, edit/propogate paste, edit/ paste into selected frames.
Before you release your mouse button move the animation
so it is inside the bottom frame.
11. Create your name in paintshop as normal, copy the file
and paste as a new animation into animation shop.
Edit/ copy your name in animation shop, activate your tag,
Edit/ select all, edit/propogate paste, edit/ paste into selected frames
and then file/save as.
Below are the settings I use for a transparent gif.
12. When your animation window pops up click on customize.
Colours, 255 colours, Tab Optimize Octree and Error diffusion

Click on the Partial transparency tab,
Convert pixels less than 13%,
Yes blend with colour # FFFFFF (white), ok

Then just keep clicking next to save.
Thursday, 19 March 2015


Tutorial written by and © to Bits N Bobs 19th March 2015.
Results are for personal use only.
No monetry gain allowed and that includes placing them behind a paid or donation based membership area.
You are not allowed to share/forward or translate any of my tutorials or place them on any blog, website, DVD or anywhere else without my permission.
These tutorials are written from my own ideas and any similarities to any other tutorial is purely coincidental.
All tutorials are for those with a working knowledge of paintshop pro.
I reserve the right to amend these terms at any time.
Supplies needed.
Font of choice for your name.
I am using Roundy
Tube of choice.
You will need one that contains a background
and one floral.
I am using two by Italia Ruotolo
Mine are Pink on pink and Pink study.
Both are available at MyTubedArt
These tubes are not to be used without the correct licence.
Animation of choice.
I am using SimoneAni125 available at Scrappybitoffun
Plugins needed.
I.C.NET FiltersUnlimited 2
Note
This tutorial was written in PSP 9.
Double click on your font and minimize.
Install your plugin.
Open a new image, 600 w x 250 h at 72 dpi.
1. Flood fill with a colour from your tube.
I have used #c16492
Copy the background layer of the tube.
Paste as a new layer.
Effects/ plugins/ ICNet software/ filters unlimited 2/
Distortion filters/ warp jump.
Intensity 200.
Image/ rotate/ free rotate / right, 90, rotate single layer tabbed.
Position to your liking.
I have mine so what's left of her face is at the top.
2. Layers/ merge down.
Edit/ copy.
Now we move over to animation shop.
Edit/ paste as a new animation.
Edit/ paste after current frame.
Repeat until you have 5 frames.
Edit/ select all.
Open your animation.
Edit/ select all, Edit/copy
Activate your tag,
Edit/ paste into selected frames.
Before you press anything move your animation to the right hand side.
If you don't like where it landed just undo and paste again
3. Go back over to paint shop.
Close the merged layer.
Copy your tube.
Paste as a new layer.
Position to the left.
Add a drop shadow of choice.
I have used...
O3, H3, O100, B13, Colour #000000

4. Copy your rose tube.
Paste as a new layer.
Image/ re-size to 420 pixels wide.
Image/ mirror, position to the right bottom corner.
Add a drop shadow of choice.
Layers/ arrange/ move down.
Activate top layer.
Layers/ new raster layer.
Add your text and copyright info.
Edit/ copy merged
Head back over to animation shop.
5. Edit/ paste as a new animation.
Edit/ paste after current frame.
Repeat until you have 5 frames.
Edit/ select all/ edit copy.
Activate your merged tag frames you animated earlier.
Edit/ select all.
Scroll in a little so you can see where you are going to paste.
Edit/ paste into selected frames.
Before you press anything move your image so it lines up correctly.
If you don't like where it landed just undo and paste again
File, Save as.
6. For your avatar crop your animation down to as close to 180 x 180 as you can.
Create your Initial in paintshop as normal, copy the file
and paste as a new animation into animation shop.
Copy the Initial in animation shop, activate your AV,
Edit/ select all, edit/ paste into selected frame and then file/save as.
Tuesday, 17 March 2015

Spring has sprung
Tutorial written by and © to Bits N Bobs 17th March 2015
Results are for personal use only.
No monetry gain allowed and that includes placing them behind a paid or donation based membership area.
You are not allowed to share/forward or translate any of my tutorials or place them on any blog, website,
DVD or anywhere else without my permission.
You are welcome though to add a link to my tutorial page.
These tutorials are written from my own ideas and any similarities to any other tutorial is purely coincidental.
All tutorials are for those with a working knowledge of paintshop pro.
I reserve the right to amend these terms at any time.
IM Stat - IM Tut
Supplies needed.
Font of choice for your name.
I am using Miss Smarty Pants.
Mask of choice.
I am using Vix_Mask363 available here
Kit used is Think Spring by Bits N Bobs
Items I have used are....
Paper 12
Elements 10, 25, 35, 43, 68,
Plugins
None required
Note
This tutorial was written in PSP 9.
Double click on your font and minimize.
Open all other supplies in paintshop.
1. Open a new image, 600 w x 600 h at 72 dpi.
Selections/ select all.
Copy your paper, paste into selection.
Layers/ new mask layer/ from image.
Look for your mask, source luminance checked
all else unchecked.
Click ok.
Selections/ none.
Layers/ merge/ merge group
Tutorial written by and © to Bits N Bobs 17th March 2015
Results are for personal use only.
No monetry gain allowed and that includes placing them behind a paid or donation based membership area.
You are not allowed to share/forward or translate any of my tutorials or place them on any blog, website,
DVD or anywhere else without my permission.
You are welcome though to add a link to my tutorial page.
These tutorials are written from my own ideas and any similarities to any other tutorial is purely coincidental.
All tutorials are for those with a working knowledge of paintshop pro.
I reserve the right to amend these terms at any time.
IM Stat - IM Tut
Supplies needed.
Font of choice for your name.
I am using Miss Smarty Pants.
Mask of choice.
I am using Vix_Mask363 available here
Kit used is Think Spring by Bits N Bobs
Items I have used are....
Paper 12
Elements 10, 25, 35, 43, 68,
Plugins
None required
Note
This tutorial was written in PSP 9.
Double click on your font and minimize.
Open all other supplies in paintshop.
1. Open a new image, 600 w x 600 h at 72 dpi.
Selections/ select all.
Copy your paper, paste into selection.
Layers/ new mask layer/ from image.
Look for your mask, source luminance checked
all else unchecked.
Click ok.
Selections/ none.
Layers/ merge/ merge group

2. Copy your frame , element 68
paste as a new layer.
Image/re-size to 350 pixels wide.
Position to your liking.
Mine is to the bottom left corner slightly.
3. Copy element 43
paste as a new layer.
Image/ re-size to 400 pixels wide,
all layers un-tabbed.
Position to your liking.
Mine is bottom left corner.
Layers/ duplicate, Image/ mirror
Position to your liking.
Mine is top right corner.
Layers/ merge/ merge down
Layers/ arrange/ move down
Erase any part showing on the inside of your frame.
Add a drop shadow of choice.
For this tutorial I am using...
V3, H3, O50, B7, C#000000
4. Copy element 35, activate your top layer
paste as a new layer.
Image/ re-size to 450 pixels wide,
all layers un-tabbed.
Position to your liking.
Mine is bottom right corner.
Add a drop shadow of choice.
5. Copy element 25,
activate your bottom layer, paste as a new layer.
Image/ re-size to 350 pixels wide,
all layers un-tabbed.
Position to your liking.
Mine is top left corner.
Add a dropshadow of choice.
Erase any part showing on the inside of your frame.
6. Copy element 10, activate top layer,
paste as a new layer.
Image/ re-size to 350 pixels wide,
all layers un-tabbed.
Position to your liking.
Mine is bottom middle.
Add a drop shadow of choice.
7. Add any text you want.
Add your copy right info and name.
File/ export/ save as a png transparent bg or jpg if you want a white background.
8. For a forum set arrange the elements to your liking.
Edit/ copy merged.
Open a new image 600w x 250h
Edit/ paste as a new layer.
Position to your liking.
Add your copyright info, Name and then save.
9. For your avatar open a new image,
180 x 180 at 72 dpi.
Re-arrange your elements on your tag to your liking.
Edit/Copy merged , paste as a new layer.
Add your copyright info, initial and then save.
Sunday, 15 March 2015

Easter Treats
Tutorial written by and © to Bits N Bobs 15th March 2015
Results are for personal use only.
No monetry gain allowed and that includes placing them behind a paid or donation based membership area.
You are not allowed to share/forward or translate any of my tutorials or place them on any blog, website,
DVD or anywhere else without my permission.
You are welcome though to add a link to my tutorial page.
These tutorials are written from my own ideas and any similarities to any other tutorial is purely coincidental.
All tutorials are for those with a working knowledge of paintshop pro.
I reserve the right to amend these terms at any time.
Tutorial written by and © to Bits N Bobs 15th March 2015
Results are for personal use only.
No monetry gain allowed and that includes placing them behind a paid or donation based membership area.
You are not allowed to share/forward or translate any of my tutorials or place them on any blog, website,
DVD or anywhere else without my permission.
You are welcome though to add a link to my tutorial page.
These tutorials are written from my own ideas and any similarities to any other tutorial is purely coincidental.
All tutorials are for those with a working knowledge of paintshop pro.
I reserve the right to amend these terms at any time.
Supplies needed.
Font of choice for your name.
I am using Daddys Girl
Tube of choice.
I am using the tube Bunnella by Bits N Bobs
Tube is not to be used without the correct licence.
Easter Treats Add On freebie by Bits N Bobs
Mask of choice.
I am using Vix_Mask431 available here
Items I have used are....
Paper 2
Elements 2, 3, 4, 8, 9, 13, 15,
Plugins
None required
Note
This tutorial was written in PSP 9.
Double click on your font and minimize.
Open all other supplies in paintshop.
1. Open a new image, 600 w x 600 h at 72 dpi.
Selections/ select all.
Copy your paper, paste into selection.
Layers/ new mask layer/ from image.
Look for your mask, source luminance checked
all else unchecked.
Click ok.
Selections/ none.
Layers/ merge/ merge group

2. Copy your frame , element 15
paste as a new layer.
Image/re-size to 350 pixels wide.
3. Copy element 10
paste as a new layer.
Image/ re-size to 300 pixels wide,
all layers un-tabbed.
Position to your liking.
Mine is bottom middle.
Layers/ arrange/ move down
Erase any part showing on the inside of your frame.
Add a drop shadow of choice.
For this tutorial I am using...
V3, H3, O50, B7, C#000000

4. Copy element 13,
paste as a new layer.
Image/ re-size to 300 pixels wide,
all layers un-tabbed.
Position to your liking.
Mine is bottom right.
Add a drop shadow of choice.
5. Copy element 3,
activate your bottom layer, paste as a new layer.
Image/ re-size to 400 pixels wide,
all layers un-tabbed.
Image/ flip
Position to your liking.
Mine is top right corner.
Layers/ duplicate, image/ mirror, image/ flip
Layers/ merge/ merge down
Add a drop shadow of choice.
Erase any part showing on the inside of your frame.
Adjust/ Colour Balance/ Manual colour correction,
Manual target colour tabbed,
Target: #80c6d8 Source: #c87a90

6. Copy element 4, paste as a new layer.
Image/ re-size to 400 pixels wide,
all layers un-tabbed.
Position to your liking.
Mine is top right corner.
Layers/ duplicate, image/ mirror, image/ flip
Layers/ merge/ merge down
Add a drop shadow of choice.
Erase any part showing on the inside of your frame.
7. Activate your top layer.
Copy element 8, paste as a new layer.
Image/ re-size to 200 pixels wide,
all layers un-tabbed.
Image/ mirror
Position to your liking.
Mine is bottom right corner.
Add a drop shadow of choice.
8. Copy element 9, paste as a new layer.
Image/ re-size to 200 pixels wide,
all layers un-tabbed.
Image/ mirror
Position to your liking.
Mine is bottom right corner.
Add a drop shadow of choice.
9. Copy your full body tube, paste as a new layer.
Image/ re-size to 350 pixels wide,
(this will be different if you use a different tube)
all layers un-tabbed.
Position to your liking.
Mine is on the left.
Add a drop shadow of choice.
10. Copy element 20, paste as a new layer.
Image/ re-size to 100 pixels wide,
all layers un-tabbed.
Position to your liking.
Mine is bottom left corner.
Add a dropshadow of choice.
11. Copy your tube close up.
Activate top layer.
Paste as a new layer.
Image/ mirror.
Image/ re-size to 400 pixels wide,
(this will be different if you use a different tube)
Add a drop shadow of choice.
Position to your liking.
Erase anything outside of the frame.
12. Add any text you want.
Add your copy right info and name.
File/ export/ save as a png transparent bg or jpg if you want a white background.
13. For a forum set arrange the elements to your liking.
Edit/ copy merged.
Open a new image 600w x 250h
Edit/ paste as a new layer.
Position to your liking.
Add your copyright info, Name and then save.
14. For your avatar open a new image,
180 x 180 at 72 dpi.
Re-arrange your elements on your tag to your liking.
Edit/Copy merged , paste as a new layer.
Add your copyright info, initial and then save.
Tuesday, 26 August 2014

Anarchy
Tutorial written by and © to Bits N Bobs 26th August 2014.Results are for personal use only.
No monetry gain allowed and that includes placing them behind a paid or donation based membership area.
You are not allowed to share/forward or translate any of my tutorials or place them on any blog, website,
DVD or anywhere else without my permission.
These tutorials are written from my own ideas and any similarities to any other tutorial is purely coincidental.
All tutorials are for those with a working knowledge of paintshop pro.
I reserve the right to amend these terms at any time.
Supplies needed.
Font of choice for your name.
I am using Kraash Black.
Tube of choice.
I am using Anarchy available at Picsfordesign
Tube is not to be used without the correct licence.
Scrap kit Gothic Fantasy also available at MyTubedArt
Items I have used are....
Papers 1, 6 and 14
Elements 5, 7, 21, 36, 43, 46, 47
Template #18 available here
Plugins
None required
Note
This tutorial was written in PSP 9.
Double click on your font and minimize.
Open all other supplies in paintshop.
1. Re-size your template to your desired size.
All layers tabbed.
I have re-sized mine to 600 x 600
Turn off the copyright layer.
2. Copy element 5, paste as a new layer.
Image/ mirror, free rotate, 45 degrees left,
all layers un-tabbed.
Position towards the left side to your liking.
Layers/ Duplicate layer, Image/ mirror, Image/ flip.
Position to your liking on the right side.
Layers/ merge, merge down.
Move this layer down to below the cog 3 outline layer.
3. Activate your top layer.
Copy element 7, paste as a new layer.
Position towards the bottom to your liking.
Layers/ Duplicate layer, Image/ mirror.
Position to your liking towards the left side.
Layers/ merge, merge down.
4. Copy element 21, paste as a new layer.
Position towards the bottom right corner.
5. Copy element 46, paste as a new layer.
Image/ re-size to 240 pixels wide.
Position to the bottom left corner.
Move this layer to below the Anarchy outline layer.
6. Activate your top layer.
Copy element 36, paste as a new layer.
Image/ re-size to 240 pixels wide.
Position over the top of Cog 3 (top left corner).
Move this layer to below the Cog outline layer.
7. Activate your top layer.
Copy element 47, paste as a new layer.
Position in the top right corner.
Layers/ arrange/ send to bottom.
8. Activate the cog 1 layer.
Selections/ Select all, Selections/ float, Selections/ defloat.
Copy paper 14, Edit/ Paste into selection
Selections/ select none.
9. Copy element 43, paste as a new layer.
Image/ rotate / free rotate 45 left,
all layers un-tabbed.
Re-size to 400 pixels wide,
all layers un-tabbed.
Position over the top left corner cog.
Move this layer down to below the cog 3 outline layer.
10. Activate the A SIGN layer.
Selections/ Select all, Selections/ float, Selections/ defloat.
Copy paper 1, Edit/ Paste into selection
Selections/ select none.
11. Activate the A SIGN 2 layer.
Selections/ Select all, Selections/ float, Selections/ defloat.
Copy paper 6, Edit/ Paste into selection
Selections/ select none.
12. Copy your tube, paste as a new image.
Image/ re-size to 500 pixels high.
Copy your re-sized tube.
Paste as a new layer on your working image.
Adjust/ Sharpness/ Sharpen.
Position towards the left side of the large cog.
Move this layer to below the Anarchy Outline layer.
13. On your original tube select the top half.
Copy this half and paste as a new layer onto your working image.
Image/ mirror, Image/ re-size to 500 pixels all layers untabbed.
Position in the large cog slightly to the right.
Move this layer to below your Cog 1 Outline layer.
Erase any part of the tube showing outside the cog.
Adjust/ Sharpness/ Sharpen.
14. Add a drop shadow to the layers of choice.
I have added one to all but the text and mask layers...
V 2, H 2, O 68, B 9, C #000000
15. Add any text you want.
Add your copy right info and name.
Layers/ merge / merge visible.
File/ export/ save as a transparent png.
Sunday, 5 January 2014


Tutorial written by and © to Bits N Bobs 5th January 2014.
Results are for personal use only.
No monetry gain allowed and that includes placing them behind a paid or
donation based membership area.
You may add a link for this tutorial on your forum etc.
You are not allowed to share/forward or translate any of my tutorials or
place them on any blog, website, DVD or anywhere else without my
permission.
These tutorials are written from my own ideas and any similarities to any
other tutorial is purely coincidental.
All tutorials are for those with a working knowledge of paintshop pro.
I reserve the right to amend these terms at any time.
Supplies needed.
Font of choice for your name.
I am using MV Boli
Tube of choice.
I am using Rebellicious by Bits N Bobs
available here at MTA
Tube is not to be used without the correct licence.
Rebel wordart available here
I have used rebel without a cause circle by Melissas Creationz
and rebel worart 5 by Alisha
Masks of choice.
I am using Vix_Mask363 by Vix
and Sg_double-stencilled eclipse1 by Essex Girl
both available here
Scrap kit of choice.
I have used Rock Princess by Bits N Bobs
I am using Papers 4, 10 and Elements 1, 13, 33, 34, 45, 52, 65,
Note
This tutorial was written in PSP 9.
Double click on your font and minimize.
Install your masks.
Open a new image, 600 w x 600 h at 72 dpi.
1. Copy paper 4.
Activate your working image.
Selections/ select all, paste into selction.
Layers/ Load/Save mask, Load mask from Disk,
scroll through and select your mask.
Tab Source Luminance, Fit to canvas, Invert transparency.

Layers/ merge/ merge group.
Selections/ select none.
2. Copy paper 10.
Activate your working image.
Selections/ select all, Layers/ new raster layer,
paste into selction.
Layers/ Load/Save mask, Load mask from Disk,
scroll through and select your mask.
Tab Source Luminance, Fit to canvas.

Selections/ select none.
Image/ Canvas size/ Width 800, height 800,
center placement.

3. Copy element 33.
Paste as a new layer.
Position to the left hand side and up slightly.
Layers/ Duplicate layer.
Image/ mirror, image/ flip.
Layers/ merge/ merge down.
Layers/ arrange/ send to bottom.
4. Activate your top layer.
Copy element 34.
Paste as a new layer.
Position to the right hand side and up slightly.
Layers/ Duplicate layer.
Image/ mirror, image/ flip.
Layers/ merge/ merge down.
Layers/ arrange/ send to bottom.
5. Activate your top layer.
Copy element 52.
Paste as a new layer.
Image/ re-size to 600 pixels wide,
all layers un-tabbed.
Position to the right hand side.
Layers/ Duplicate layer.
Image/ mirror, move up slightly.
Layers/ merge/ merge down.
Layers/ arrange/ move down.
6. Activate your top layer.
Copy element 13.
Paste as a new layer.
Image/ re-size to 600 pixels wide,
all layers un-tabbed.
Position to the right hand side,
move up slightly.
7. Copy element 65.
Paste as a new layer.
Using your raster deform tool turn
the element to a slight angle upwards.
Position towards the bottom center.
Layers/ Duplicate layer.
Image/ flip
8. Activate the bottom ric rac.
Copy element 1,
paste as a new layer.
Position towards the bottom
in the middle of the two black ric racs.
9. Copy element 45,
paste as a new layer.
Position so the skull is on top of the
white skull in the top left corner.
10. Activate the layer with the ribbon.
Copy your tube, paste as a new layer.
Erase your tubes legs from mid thigh down.
Position to the right so her thighs are
just below the ric racs but not hanging
out from the bottom.
Erase more from her legs if needed.
11. Copy your rebel without a cause circle word art.
Activate the circle mask layer.
Paste as a new selection and position over the top
of the top left corner circle.
Selections/ select none.
Copy the same word art again.
Paste as a new selection and position over the top
of the top left corner circle.
Selections/ select none.
12. Activate the top layer.
Copy the rebel worart 5,
paste as a new layer.
Using your magic wand select all of the
black rebel word.
Copy your paper 10, paste into selection.
Effects/ 3D effects/ inner bevel.
Bevel 2, Width 20, Smoothness 25, Depth 9,
Ambience 0, Shininess 0, Colour #ffffff, angle 315,
Intensity 50, elevation 30.
Selections/ select none.

13. Image/ re-size to 600 pixels wide,
all layers un-tabbed.
Position to the bottom in the center.
Selections/ select all, Selections/ float,
Selections/ defloat.
Selections/ modify/ expand by 3.
Layers/ new raster layer.
Flood fill with white #ffffff
Layers/ arrange/ move down.
Activate the rebel word art layer.
Layers/ merge/ merge down.
Selections/ select none.
14. Add a drop shadow to any layer you require.
I have used ...
O 3, V 3, O 100, B 7, Colour #000000
on all but the mask layers.
15. Layers/ merge/ merge visible.
Image/ re-size to 600 pixels high.
All layers tabbed.
Adjust/ sharpness/ sharpen.
Add all copyright info.
Export and save as a transparent png.
Matching AV
16. For a matching AV open a new image
180 x 180 and 72 dpi.
Copy your tag and paste as a new layer.
Position to your liking.
Mine has the top left corner showing.
Paste your tag again.
This time position so the skull of the dangly
is in the top left corner.
Layers/ arrange/ send to bottom.
Layers/ properties/ layer opacity to 50%.
Activate your top layer.
Copy your tube, paste as a new layer.
Image/ re-size to 130 pixels high.
All layers un-tabbed.
Adjust/ sharpness/ sharpen.
Add a dropshadow of choice.
I have used the same settings as before.
Layers/ merge/ merge flatten.
Add copyright info and name,
export as before and save.
Thursday, 1 August 2013

Rock Star Heidi
Tutorial written by and © to Bits N Bobs 1st August 2013.
Results are for personal use only.
No monetry gain allowed and that includes placing them behind a paid or donation based membership area.
You are not allowed to share/forward or translate any of my tutorials or place them on any blog, website, DVD or anywhere else without my permission.
These tutorials are written from my own ideas and any similarities to any other tutorial is purely coincidental.
All tutorials are for those with a working knowledge of paintshop pro.
I reserve the right to amend these terms at any time.
Supplies needed.
Font of choice for your name.
I am using SlayTanic.
Tube of choice.
I am using Heidi by Bits N Bobs available at MyTubedArt
Tube is not to be used without the correct licence.
Plugins - None needed
Mask of choice.
I am using Star fade border by Essex Girl
Scrap kit of choice
I am using FTU Rock Star by Kittz Kreationz
Items from this kit I am using are...
RSP4, RS15, RS21, RS24, RS37, RS54,
Note
This tutorial was written in PSP 9.
Double click on your font and minimize.
Open all other supplies in paintshop.
1. Re-size P4 to 600 x 600 at 72 dpi.
Press Shift+D on your keyboard and close
the original P4 DO NOT SAVE.
2. Layers/ New mask layer/ from image.
Look for your mask, source luminance tabbed
all else un-tabbed and press ok.
Layers/ merge/ merge group

3. Open RS15, copy and paste as a new layer
onto your working image.
Image/ resize to 400 pixels high all layers un-tabbed.
Position towards the bottom right corner.
4. Copy your tube, paste as a new layer.
Image/ resize to 300 pixels high all layers un-tabbed.
Position to the left hand side.
Add a drop shadow of choice.
I have used...
V 3, H 3, O 100, B 5, C #000000
5. Copy RS21, paste as a new layer.
Position just below your tubes shoulder
Layers/ arrange/ move down.
Layers/ duplicate, Image/ mirror.
Position to the left hand side.
Layers/ merge/ merge down.
Add a drop shadow of choice.
I have used the same settings as before.

6. Copy RS37, paste as a new layer.
Image/ resize to 400 pixels wide.
Add a drop shadow of choice.
I have used the same settings as before
but change the opacity to 60%.
7. Copy RS54, paste as a new layer.
Image/ resize to 300 pixels high.
Position towards the top right corner.
I have used...
V 3, H 3, O 100, B 5, C #000000
8. Activate your tube layer.
Copy RS24, paste as a new layer.
Position in the bottom left corner
so the tubes legs are covered.
Add a drop shadow of choice.
I have used the same settings as before.
9. Layers/ new raster layer.
Add any text you want.
Add your copy right info and name.
Layers/ merge / merge visible and save.
I use file export as transparent png.
Saturday, 23 March 2013

Burlesquish
Tutorial written by and © to Bits N Bobs 23rd March 2013.
Results are for personal use only.
No monetry gain allowed and that includes placing them behind a paid or donation based membership area.
You are not allowed to share/forward or translate any of my tutorials or place them on any blog, website, DVD or anywhere else without my permission.
These tutorials are written from my own ideas and any similarities to any other tutorial is purely coincidental.
All tutorials are for those with a working knowledge of paintshop pro.
I reserve the right to amend these terms at any time.
Supplies needed.
Font of choice for your name.
I am using Sans Logique
Tube of choice.
I am using Danielle by Bits N Bobs
Tube is not to be used without the correct licence.
Scrap kit Pink and Polka by Bits N Bobs here
Items I have used are....
Paper 5 and 7 , PAP7, PAP8, PAP13, PAP18, PAP35, PAP42, PAP60, PAP70, PAP72, PAP73,
Mask of choice.
I am using Lace Doily available by essexgirl here
Note
This tutorial was written in PSP 9.
Double click on your font and minimize.
Open all other supplies in paintshop.
Open a new image 600 wide X 600 high at 72 dpi
1. Open your paper 7,
Image/ re-size to 600 x 600.
Copy, paste as a new layer.
Layers/ Load-save mask/ Load mask from disk
Scroll and find your mask.
Source luminance, fit to canvas and hide all mask tabbed.
Layers/ merge/ merge group

2. Copy PAP73, paste as a new layer.
Re-size to 510 pixels wide,
all layers un-tabbed.
Position to the right.
Layers/ duplicate, image/ mirror.
Layers/ merge/ merge down.
3. Copy PAP70, paste as a new layer.
Re-size to 450 pixels wide,
all layers un-tabbed.
Using you magic wand select the center of all frames.
Selections/ modify/ expand by 5.
Layers/ new raster layer.
Copy PAPP5, paste into selection.
Selections/ none,
Layers/ arrange/ move down.
4. Copy PAP18, paste as a new layer.
Re-size to 450 pixels high.
All layers un-tabbed.
Position to the right hand side.
Position so the flower is outside the top
of the top right corner frame.
Layers/ duplicate, image/ mirror,
image/ flip.
Layers/ merge/ merge down.
Copy PAP72, paste as a new layer.
Re-siz to 450 pixels high.
All layers un-tabbed.
Position to the right hand side.
Layers/ duplicate, image/ mirror,
image/ flip.
Layers/ merge/ merge down.
Layers/ arrange/ move down.
5. Activate your top layer.
Copy your tube, paste as a new layer.
re-size to 300 pixels high.
All layers un-tabbed.
Cut her legs away below her stocking tops.
Position on the right hand side.
Add a drop shadow of choice.
I have used...
V 3 - H 3 - O 80 - B 7 - Colour #000000
Copy PAP35, paste as a new layer.
re-size to 300 pixels high all
layers un-tabbed.
Layers/ arrange/ move down.
Position behind your tubes bottom.
6. Activate your top layer.
Copy PAP13, paste as a new layer.
Re-size to 200 pixels wide.
All layers un-tabbed.
Position in the bottom left corner.
Add drop shadow.
7. Copy PAP8, paste as a new layer.
Re-size to 250 pixels wide.
All layers un-tabbed.
Position in the bottom right corner.
Add drop shadow.
8. Copy PAP60, paste as a new layer.
Re-size to 200 pixels high.
All layers un-tabbed.
Image/ flip, image/ mirror.
Position over the bottom right corner
of the corset.
Add drop shadow.
9. Copy PAP42, paste as a new layer.
Re-size to 300 pixels wide.
All layers un-tabbed.
Position at the bottom in the center.
Add drop shadow.
10. Activate your tube layer.
Copy PAP7, paste as a new layer.
Re-size to 300 pixels high.
All layers un-tabbed.
Position behind the corset and glove.
Add drop shadow.
Layers/ duplicate.
Re-size to 450 pixels high,
all layers un-tabbed.
Position behind the bag.
11. Copy PAP6, paste as a new layer.
Re-size to 250 pixels wide.
All layers un-tabbed.
Position behind the bag.
Add drop shadow.
12. Activate your top layer.
Layers/ new raster layer.
Add your copyright info and name.
File export as a png file with
a transparent background.
Sunday, 17 March 2013


Polka Danielle
Tutorial written by and © to Bits N Bobs 17th March 2013.
Results are for personal use only.
No monetry gain allowed and that includes placing them behind a paid or donation based membership area.
You are not allowed to share/forward or translate any of my tutorials or place them on any blog, website, DVD or anywhere else without my permission.
These tutorials are written from my own ideas and any similarities to any other tutorial is purely coincidental.
All tutorials are for those with a working knowledge of paintshop pro.
I reserve the right to amend these terms at any time.
Supplies needed.
Font of choice for your name.
I am using Springtime Flourish.
Tube of choice.
I am using Danielle by Bits N Bobs available at Picsfordesign
Tube is not to be used without the correct licence.
Plugins
AAA frames fotoframe
Mura's Seamless - Polka dot you can now download this file here on my account
Note
This tutorial was written in PSP 9.
Double click on your font and minimize.
Open all other supplies in paintshop.
Open a new image 600 wide X 250 high at 72 dpi
1. Flood fill with a colour from your tube.
I am using #e77c8f
Adjust/ add-remove noise,
Guassian and Monochrome checked, 60%

Effects/ Plugins/ Mura's Seamless/ Polkadot
0,0,0,255,65,11,6,24
Lower layer opacity to 50%

2. Copy your tube, paste as a new layer on your working image.
Image/rotate/ free rotate/ right 90 all layers untabbed.
Position in the center.
Effects/ Distortion effect/ Wave


Add a drops shadow of choice.
I have used...
V -5, H 2, O 68, B 15, C #000000

3. Copy your tube, paste as a new layer on your working image.
(if not using for easter do not incude her ears)
Image re-size to 80% all layers un-tabbed.
Position her face on the right hand side.
Layers/ properties/ blend mode to Lighten.
4. Copy your tube, paste as a new layer on your working image.
Position on the left hand side so her ruffles and bows are the main view.
Add a drop shadow of choice.
I have used the same settings as in step 2.
Layers/ properties/ blend mode to Lighten.
5. Copy your tube, paste as a new layer on your working image.
Position on the left hand side so her top part is the main view.
Add a drop shadow of choice.
I have used the same settings as in step 2.
6. Layers/ Duplicate, position next to the first one.
Layers/ Duplicate, position next to the second one.
Layers/ merge/ merge down.
Layers/ Duplicate, position next to the third one.
You should have 4 and a half images.
Activate the layer with the 2nd and 3rd tube.
Layers/ properties/ blend mode to Luminance Legacy.
Lower layer opacity to 45%.
Activate the layer with the 4th and half tube.
Layers/ properties/ blend mode to Multiply.
Lower layer opacity to 45%.
7. Close the layer with the 1st tube image.
Activate any other layer.
Layers/ merge/ merge visible.
Effects/ plug ins/ AAA Frames/ Foto frame.
10, 0, 5, 3, 0, ,0 ,0 100

8. Layers/ new raster layer.
Effects/ Plugins/ Mura's Seamless/ Polkadot
Same settings as step 1.
Adjust/ Colour Balance/ Manual colour correction.
Hue 245, Saturation 183, Lightness 167,
Colour # 000000 Target #e66886

9. Copy your tube, paste as a new layer.
Image/ re-size to 60%, position on the left
with her face in view.
Add a drop shadow.
Layers/ properties/ blend mode to Luminance Legacy.
Un tab your 1st tube image.
10. Layers/ new raster layer.
Add any text you want.
Add your copy right info and name.
Layers/ merge / merge visible and save.
11. For a matching AV open a 180 x 180 new file.
Copy your tag image, paste as a new layer.
Position to your liking.
Layers/ merge/ merge visible.
Effects/ plug ins/ AAA Frames/ Foto frame.
5, 0, 2, 1, 0, ,0 ,0 100

Layers/ add a new raster layer.
Add your copy right info and initial.
Layers/ merge / merge visible and save.
Sunday, 24 February 2013

Go Paddy
Tutorial written by and © to Bits N Bobs 24th February 2013.
Results are for personal use only.
No monetry gain allowed and that includes placing them behind a paid or donation based membership area.
You are not allowed to share/forward or translate any of my tutorials or place them on any blog, website, DVD or anywhere else without my permission.
These tutorials are written from my own ideas and any similarities to any other tutorial is purely coincidental.
All tutorials are for those with a working knowledge of paintshop pro.
I reserve the right to amend these terms at any time.
Supplies needed.
Font of choice for your name.
I am using Hawn Wedding
Tube of choice.
I am using Heidi by Bits N Bobs
Tube is not to be used without the correct licence.
Scrap kit Go Paddy by Bits N Bobs
Items I have used are....
Paper 12, GP9, GP15, GP17, GP27, GP36, GP43, GP66, GP68, GP74,
Mask of choice.
I am using CMPattysMask1ByElla available here
Note
This tutorial was written in PSP 9.
Double click on your font and minimize.
Open all other supplies in paintshop.
Open a new image 600 wide X 600 high at 72 dpi
1. Open your paper,
Image/ re-size to 600 x 600.
Copy, paste as a new layer.
Layers/ new mask layer/ from image
Scroll and find your mask.
Source luminance tabbed,
all others un-tabbed.
Layers/ merge/ merge group

2. Copy GP74, paste as a new layer.
Re-size to 500 pixels wide,
all layers un-tabbed.
Position in the center.
3. Copy GP9, paste as a new layer.
Re-size to 300 pixels wide,
all layers un-tabbed.
Position to the right of the frame.
Layers/ duplicate, image/ mirror.
Layers/ merge/ merge down.
Layers/ arrange/ move down.
Lower the layer opacity to 50%
Activate your top layer.
4. Copy GP66, paste as a new layer.
Re-size to 400 pixels wide,
all layers un-tabbed.
Image/ mirror.
Position to the left of the frame,
cover the bottom of the rainbow
with the cupcake but leave
a small side space for the drop shadow.
Add a drop shadow of choice.
I have used...
V 3 - H 3 - O 80 - B 7 - Colour #000000
5. Copy GP68, paste as a new layer.
Re-size to 400 pixels wide,
all layers un-tabbed.
Position to the right of the frame,
cover the bottom of the rainbow
with the brim of the hat but leave
a small side space for the drop shadow.
Add a drop shadow of choice.
6. Copy GP27, activate your mask layer,
paste as a new layer.
Re-size to 500 pixels wide,
all layers un-tabbed.
Add a drop shadow of choice.
7. Activate your frame layer.
Use your magic wand to select the center of the frames.
Selections / modify/ expand by 5.
Activate you rainbow layer and hit delete.
Activate the bead layer and hit delete.
Layers/ new raster layer, flood fill with #6f9b0c.
Layers/ properties/ blend mode to Burn.
8. Activate your frame layer.
Add a drop shadow of choice.
Choose the green layers for your tube.
Adjust/ colour balance/ manual colour correction
I have then manually adjusted the colours
of each green layer including the hair.
I am using source #20bb99 and target #149214

Edit/ Copy merged, paste as a new layer.
Lower the layer opacity slightly so you can
see your frame through her.
Using your freehand selection tool
cut away the part below the bottom of the frame.
9. Copy GP15, paste as a new layer.
Image/ re-size to 200,
add a drop shadow.
Layers/ move/ move down.
Position over the bottom of your tube.
10. Copy GP43, paste as a new layer.
Image/ re-size to 500 pixels high.
Add a drop shadow.
Layers/ move/ move down.
Position over the bottom right of your tube.
Layers/ dupicate layer.
Image/ mirror.
Position in the middle of the right frame.
Layers/ arrange/ move down.
Repeat until it is below the frame layer.
Use your freehand selection tool to
cut away any part below the bottom of the frame.
Layers/ dupicate layer.
Image/ mirror.
Layers/ merge/ merge down.
Add a drop shadow.
Move your tube to the center.
11. Copy GP36, paste as a new layer.
Image/ re-size to 400.
Using your raster deform tool rotate slightly.
Position between the two hats but closer
to the left hat than the right.
Add a drop shadow.
12. Copy GP17, paste as a new layer.
Image/ re-size to 200.
Position between the bow and right hat.
Add a drop shadow.
13. Layers/ new raster layer.
Add your copy right info and name.
Layers/ merge / merge visible.
File export as a png file with
a transparent background.
Thursday, 7 February 2013

Full Of Love
Tutorial written by copyrighted to Bits N Bobs February 7th 2013
Results are for personal use only.
No monetry gain allowed and that includes placing them behind a paid or donation based membership area.
You are not allowed to share/forward or translate any of my tutorials or place them on any blog, website, DVD or anywhere else without my permission.
These tutorials are written from my own ideas and any similarities to any other tutorial is purely coincidental.
All tutorials are for those with a working knowledge of paintshop pro.
I reserve the right to amend these terms at any time.
Supplies needed.
Font of choice for your name.
I am using Dragonwick
Tube of choice.
I am using Katherine By Bits N Bobs
Tube is not to be used without the correct licence
Scraps of choice I am using Full Of Love by Bits N Bobs
Scraps I am using are .....
Paper1, FOL12, FOL20, FOL22, FOL39, FOL42, FOL51, FOL55, FOL70
1st Mask image available here
Note
This tutorial was written in PSP 9
Open all supplies in paintshop except the font.
Double click on your font and minimize.
Open a new image, 600 w x 600 h at 72 dpi.
1. Copy your paper and paste as a new layer.
Image/ re-size 60% all layers un-tabbed.
Layers/ new mask layer/ from image.
Select your mask image,
source luminance tabbed,
invert mask data un-tabbed.
Layers/ merge/ merge group,
layers/ merge/ merge visible.
2. Copy FOL50, paste as a new layer.
Image/ re-size 80% all layers un-tabbed.
Image/ rotate/ free rotate left 90,
all layers un-tabbed.
Copy FOL55, paste as a new layer.
Image/ re-size 70% all layers un-tabbed.
3. Copy your half close uptube, paste as a new layer.
Image/ re-size 80% all layers un-tabbed.
Adjust/ image/ sharpen.
Move up slightly, add drop shadow of choice.
I am using V3 - H5 - O70 - B9.00 - C #000000
4. Now to add your elements.
For exact placement please see
my tag at the start of the post.
I have added mine,
each one copied and pasted on
a new layer as follows....
FOL20 image/ re-size 40%,
add a drop shadow, position bottom right.
FOL70 image/ re-size 50%,
add a drop shadow, position just to
the left of the cupcake.
FOL42 image/ re-size 40%,
add a drop shadow, position bottom right.
FOL39 image/ re-size 40%,
add a drop shadow, position bottom center.
FOL12 image/ mirror/ image/ re-size 40%,
add a drop shadow, position bottom left.
FOL22 image/ mirror/ image/ re-size 40%,
add a drop shadow, position top center.
5. Layers/ new raster layers.
Add your copyright info,
name and then export as
a transparent png and save.


A darker love
Tutorial written by copyrighted to Bits N Bobs February 7th 2013
Results are for personal use only.
No monetry gain allowed and that includes placing them behind a paid or donation based membership area.
You are not allowed to share/forward or translate any of my tutorials or place them on any blog, website, DVD or anywhere else without my permission.
These tutorials are written from my own ideas and any similarities to any other tutorial is purely coincidental.
All tutorials are for those with a working knowledge of paintshop pro.
I reserve the right to amend these terms at any time.
Supplies needed.
Font of choice for your name.
I am using Alice in wonderland
Tube of choice.
I am using Temptress By Bits N Bobs
Tube is not to be used without the correct licence
Scraps of choice I am using Gothic Fantasy by Bits N Bobs
Scraps I am using are .....
Paper3, GF35, GF64, GF70
Plugins
Alienskin xenofex2 - Shatter
Note
This tutorial was written in PSP 9
Open all supplies in paintshop except the font.
Double click on your font and minimize.
Open a new image, 600 w x 250 h at 72 dpi.
1. Copy your paper and paste as a new layer.
Layers/ merge/ merge visible.
Copy your main tube.
Paste as a new layer.
Image/ re-size 70%
Position on the far right.
Change the layer blend mode to Luminance Legacy.
2. Copy GF64, paste as a new layer.
Re-size 60% all layers un-tabbed.
Place on the far right hand side.
Add a drop shadow of choice.
I am using V3 - H5 - O70 - B9.00 - C #000000
3. Copy GF70, paste as a new layer.
Re-size 70% all layers un-tabbed.
Place in the bottom right corner.
Add a drop shadow of choice.
4. Copy GF35, paste as a new layer.
Image/ rotate/ free rotate 90 left all layers un-tabbed.
Re-size 50% all layers un-tabbed.
Position towards the right hand side.
5. Copy your main tube.
Paste as a new layer.
Position so it's only her bottom half in view.
Place in the center on the left.
Effects/ plugins/ Alienskin xenofex2/ Shattered
See screenshot below for settings.
Layers/ arrange/ move down

6. Copy your main tube.
Paste as a new layer.
Image/ re-size 60%
Position on the left to your liking.
Add a drop shadow of choice.
Add a new raster layer.
Add your copyright info and name.
File export and save.
7. For your avatar open a new image,
180 x 180 at 72 dpi.
Copy your tag, paste as a new layer.
Position to your liking.
Layers/ new raster layers.
Add your copyright info, initial and then save.
Monday, 14 January 2013


Katherine
Tutorial written by and © to Bits N Bobs 14th January 2013.
Results are for personal use only.
No monetry gain allowed and that includes placing them behind a paid or donation based membership area.
You are not allowed to share/forward or translate any of my tutorials or place them on any blog, website, DVD or anywhere else without my permission.
These tutorials are written from my own ideas and any similarities to any other tutorial is purely coincidental.
All tutorials are for those with a working knowledge of paintshop pro.
I reserve the right to amend these terms at any time.
Supplies needed.
Font of choice for your name.
I am using Three dates one night
Tube of choice.
I am using Katherine available at MyTubedArt
Tube is not to be used without the correct licence.
Note
This tutorial was written in PSP 9.
Double click on your font and minimize.
Open all other supplies in paintshop.
Open a new image 600 wide X 250 high at 72 dpi
1. Open the preview 3 image from your tube folder.
Copy, paste as a new layer on your working image.
Position to the left hand side.
Layers/ Duplicate, Image/ Mirror.
Position to the right hand side so there is
no join seam in the striped wall paper.
Layers/ merge/ merge visible.
2. Using your rectangle selection tool with a feather
of 8 antialias checked select part of the striped wall paper
where you joined them.
Edit/ paste as a new layer.
Selections/ select none.
Move the pasted piece over the chair on the right
hand side.
Layers/ duplicate layer, move the pasted piece over the chair
again on the right so none of it is showing.
3. Open the close up of your tube.
Close the bg layer of the close up.
Edit/ copy merged.
Activate your working image.
Edit/ paste as a new layer.
Image/ mirror.
Position to your liking on the right.
Layers/ properties/ Blend mode change to Screen.
4. Layers/ new raster layer.
Selections/ select all.
Select a colour from your tube and flood fill.
I have used #b13d40
Selections/ modify/ contract by 5,
hit delete on your keyboard.
Selections/ select none.
Add a drop shadow of choice.
I have used...
V 0 - H 0 - O 0 - B 13 - Colour #000000
5. Layers/ new raster layer.
Add your copy right info and name.
Layers/ merge / merge visible and save.
6. For a matching AV open a 180 x 180 new file.
Copy your image, paste as a new layer.
Position to your liking.
Layers/ add a new raster layer.
Selections/ select all.
Select a colour from your tube and flood fill.
I have used #b13d40
Selections/ modify/ contract by 3,
hit delete on your keyboard.
Selections/ select none.
Add a drop shadow of choice.
I have used...
V 0 - H 0 - O 0 - B 13 - Colour #000000
Layers/ new raster layer.
Add your copy right info and name.
Layers/ merge / merge visible and save.
Subscribe to:
Posts
(Atom)
Stores


BNB Blinkie