Search This Blog
Followers
Tut writers
If you are using any of my kits in your tutorials please email me your blinkie and link so we can add you here.
scrappingbits AT googlemail.com
Thank you
scrappingbits AT googlemail.com
Thank you
TUT TOU
You are welcome to link to my tuts :O) All tutorials are written by and © to Bits N Bobs Results are for personal use only. No monetry gain allowed and that includes placing them behind a paid or donation based membership area. Supplies are to be used for the tutorial they are supplied with and NOT to be shared. You are not allowed to share/forward or translate any of my tutorials or place them on any blog, website, CD, DVD or anywhere else without my permission. These tutorials are written from my own ideas and any similarities to any other tutorial is purely coincidental. All tutorials are for those with a working knowledge of paintshop pro. I reserve the right to amend these terms at any time.
Friday 31 July 2009
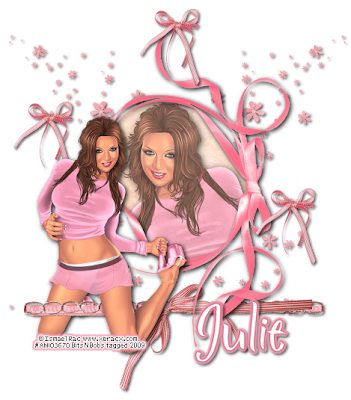
In the pink
Tutorial written by and © to Bits N Bobs 31st July 2009.
Results are for personal use only.
No monetry gain allowed and that includes placing them behind a paid or donation based membership area.
You are not allowed to share/forward or translate any of my tutorials or place them on any blog, website, DVD or anywhere else without my permission.
These tutorials are written from my own ideas and any similarities to any other tutorial is purely coincidental.
All tutorials are for those with a working knowledge of paintshop pro.
I reserve the right to amend these terms at any time.
Supplies needed.
Font of choice for your name.
I am using Persimmon
Tube of choice.
I am using one by Ismael Rac
This tube is not to be used without an AMI license
Scrap kit 'Pink world' by Seachell scraps
Scraps I am using from this kit are
Element 22, paper 8, element 10, element 12, element 12,
This tutorial was written in PSP 9
Note
Open all the supplies in paintshop except the font.
Double click on your font and minimize.
1. Open a new image 600 x 600 at 72 dpi, resize element 22 to 300 pixels wide, copy, paste as a new layer on your new image.
Select center of the frame with your magic wand, selections/ modify/ expand by 2, layers/ new raster layer, copy paper8 and paste into selection, layers/ arrange/ move down.
2. Shift+D to duplicate your tube ( you need 2 ), resize 1 of your tubes to 300 pixels wid, copy, paste as a new layer, position with your mover tool, selections/ invert, hit delete on your keyboard. Add a dropshadow:~ V-2, H-2, O-100, B-9.00, selections/ select all, selections/ float, selections/ defloat, selections/ invert, erase any part of the dropshadow that is outside of the ribbon frame., selections/ select none. Lower layer opacity to 75%
3. Resize your other tube to 200 pixels wide, image/ mirror, copy, activate frame layer, add dropshadow:~ V-2, H-2, O-100, B-9.00, Colour # 000000, paste tube as a new layer, add dropshadow:~ V-2, H-2, O-100, B-9.00, Colour # 000000
4. Resize element 10 to 450 pixels wide, copy, past as a new layer, layers/ arrange/ send to bottom, layers/ duplicate, image/ mirror, layers/ merge down, add dropshadow:~ V-2, H-2, O-70, B-5.00, Colour # 000000
5. Resize element 13 to 400 pixels high, copy, paste as a new layer, selections/ select all, selections/ float, selections/ defloat, activate your main tube layer and erase part of her leg so the ribbon is threaded through. Selections/ select none, activate ribbon, add dropshadow:~ V-2, H-2, O-70, B-5.00, Colour # 000000. Activate the flowers layer and erase any flowers underneath the ribbon. Activate frame layer.
6. Resize element 12 to 80 pixels wide, copy, paste as new layer, position, add dropshadow:~ V-2, H-2, O-70, B-5.00, Colour # 000000, duplicate ribbon twice and position to your liking.
7. Layers/ merge/ merge visible, add your copyright info and name. Export as a png for transparent background or jpg for a white background .
Labels:AMI,Ismael Rac,PTU Tutorials
Saturday 25 July 2009
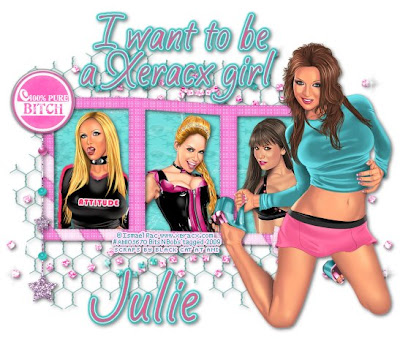
Xeracx girl
Tutorial written by and © to Bits N Bobs 25th July 2009.
Results are for personal use only.
No monetry gain allowed and that includes placing them behind a paid or donation based membership area.
You are not allowed to share/forward or translate any of my tutorials or place them on any blog, website, DVD or anywhere else without my permission.
These tutorials are written from my own ideas and any similarities to any other tutorial is purely coincidental.
All tutorials are for those with a working knowledge of paintshop pro.
I reserve the right to amend these terms at any time.
Supplies needed.
Font of choice for your name and text.
I am using Silver Script
Tube of choice.
I am using tubes by Ismael Rac
Tubes are not to be used without an AMI license
Scrap kit 'Good girl gone bad' by Black cat scraps
Scraps I am using from this kit are wrapped frame, paper 17, glitters, flair 4, star bling,
Plugins
Penta.com Dot and Cross available here - Garbage collection
Alienskin eye candy 5 - impact
This tutorial was written in PSP 9
Note
Open all the supplies in paintshop except the font.
Double click on your font and minimize.
1. Open a new image 500h x 600w at 72 dpi, resize frame to to 390 pixels wide, copy, paste as a new layer on your new image.
Effects/ plugins/ penta.com/ dot and cross with settings 72, 10, 2.
2. Select the center of the frames, selections/ modify/ expand by 3, add a new raster layer, flood fill with white ( #ffffff ), add a new raster layer, copy your paper and paste into selection. Lower opacity to 70%, selections/ select none. Activate frame layer, layers/ arrange/ brint to top and add a dropshadow.
V - 2, H - 2, O - 60, B - 7.00, C - #000000
Note :
I have matched the colour for the top and shoes to the kit used.
3. Resize your main tube to 391 pixels high, copy, paste as a new layer and add dropshadow with the same settings.
4. Activate paper layer, add a new raster layer, resize 3 other tubes, copy, paste each one as a new selection in the position you want. Add dropshadow with the same settings as before and cut away any part of your tube that is outside of the frame.
5. Open your glitters file, delete the purple layer, layers/ merge/ merge visible. Resize to 350 pixels wide, copy, paste as a new layer, duplicate glitters, image/ mirror, layers/ merge/ merge down, Add dropshadow with the same settings as before. Layers/ arrange/ send to bottom.
6. Resize wire mesh 2 to 400 pixels wide, copy, paste as new layer, add dropshadow as before, layers/ arrange/ send to bottom, lower opacity to 70%.
7. Activate top layer, resize flair 4 to 100 pixels wide, copy, paste as a new layer,
Open star bling, using your selection tool copy a piece of the bling, paste as a new layer on top of the flair, add dropshadow as before, layers/ arrange/ move down.
8. Layers/ new raster layer, flodd fill with white ( # ffffff ), layers/ arrange/ send to bottom, layers/ merge/ merge visible. Add your copyright info.
9. Add a new raster layer, add your text, font size 48, foreground # 47a6ac, background # f0598b, effects/ plugins/ eye candy 5/ impact/ gradient glow with the following settings, add dropshadow with the same settings as before.
Add your name using the same settings as you did for the text.
Layers/ merge/ merge visible, export as a jpg and save.
Labels:AMI,Ismael Rac,PTU Tutorials
OMG I just had to post this.
Ismael Rac has his very own forum *hyperventilates*
If you haven't done so already get your butts over and join or you will miss out of FREE Xeracx tubes.
Ismael Racs forum

Labels:Ismael Rac
Thursday 23 July 2009
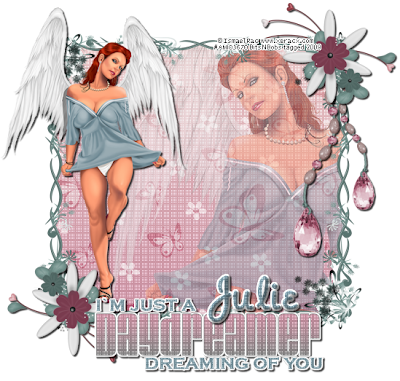
Just a dreamer
Tutorial written by and © to Bits N Bobs 23rd July 2009.
Results are for personal use only.
No monetry gain allowed and that includes placing them behind a paid or donation based membership area.
You are not allowed to share/forward or translate any of my tutorials or place them on any blog, website, DVD or anywhere else without my permission.
These tutorials are written from my own ideas and any similarities to any other tutorial is purely coincidental.
All tutorials are for those with a working knowledge of paintshop pro.
I reserve the right to amend these terms at any time.
Supplies needed.
Font of choice for your name.
I am using Noodle script by Dave Bastian http://www.davebastian.com/
Tube of choice.
I am using Rac73 Cherished angel from package 8 by Ismael Rac
This tube is not to be used without an AMI license
Scrap kit Daydreamer by Kittz
Scraps I am using from this kit are Double flower, gem, Corner 2, Daydreamer wordart and paper 2
Penta.com, Dot and cross available here - Garbage collection
This tutorial was written in PSP 9
Note
Open all the supplies in paintshop except the font.
Double click on your font and minimize.
1. Open a new image 550 x 550 at 72 dpi, resize corner 2 to pixels wide, copy, paste as a new layer on your new image and position in one corner. Duplicate corner layer, Image/ mirror, layers/ merge/ merge down.
Duplicate, image/ mirror, move up slightly so frame look symetrical.
Layers/ merge/ merge down.
2. Select center of the frame with your magic wand, selections/ modify/ expand by 4, layers/ new raster layer, copy paper2 and paste into selection, layers/ arrange/ move down.
Effects/ plugins/ penta.com/ dot and cross with the settings 72, 10, 2.
3. Copy your large tube paste as a new image, image/mirror, copy and paste as a new layer onto your working image, lower opacity to 45%, selections/ invert, delete, selections/ select none, layers/ merge/ merge visible.
4. Copy your smaller tube, paste as a new layer, resize your smaller tube to 450 pixels high ( all layers untabbed ).
Add dropshadow:~ V-1, H-2, O-80, B-2.00, Colour # 000000
5. Copy your gem, paste as a new layer, resize gem to 320 pixels high ( all layers untabbed ). Add dropshadow:~ V-1, H-2, O-80, B-2.00, Colour # 000000
Copy your original gem again, paste as a new layer, image/ mirror, resize gem to 250 pixels high ( all layers untabbed ). Add dropshadow:~ V-1, H-2, O-80, B-2.00, Colour # 000000
6. Resize double flower to 200 pixels wide, image/ mirror, copy, paste as a new layer, position onto top right corner, duplicate flower layer, image/ mirror, image/ flip, position onto bottom left corner, add dropshadow:~ V-1, H-2, O-80, B-2.00, Colour # 000000, activate top right flower and add dropshadow:~ V-1, H-2, O-80, B-2.00, Colour # 000000.
7. Resize wordart to 310 pixels wide, copy, paste as a new layer.
Using your colour replacer tool, foreground # ffffff, background # 728c96 double right click on the wordart. Effects/ plugins/ penta.com/ dot and cross with the settings 72, 10, 2.
Selections/ select all, Selections/ float, Selections/ defloat, Selections/ modify/ expand by 2, layers/ new raster layer, flood fill with #ffffff, layers/ arrange/ move down, selections/ select none, add dropshadow:~ V-1, H-2, O-80, B-2.00, Colour # 000000
8. Layers/ merge/ merge visible, add your copyright info and name. Export as a png for transparent background or jpg for a white background .
Labels:AMI,FTU Tutorials,Ismael Rac
Saturday 18 July 2009
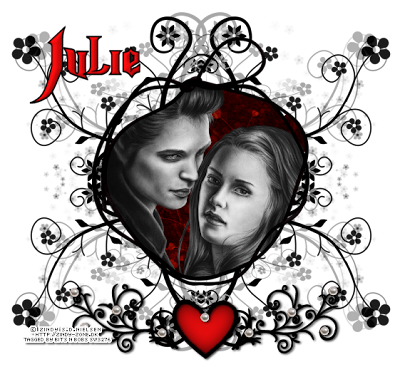 Twilight love
Tutorial written by and © to Bits N Bobs 18th July 2009.
Results are for personal use only.
No monetry gain allowed and that includes placing them behind a paid or donation based membership area.
You are not allowed to share/forward or translate any of my tutorials or place them on any blog, website, DVD or anywhere else without my permission.
These tutorials are written from my own ideas and any similarities to any other tutorial is purely coincidental.
All tutorials are for those with a working knowledge of paintshop pro.
I reserve the right to amend these terms at any time.
If linking to any of my tutorials in a closed group please send me an invite.
Supplies needed.
Font of choice for your name.
I am using Nightmare hero
Tube of choice.
I am using Twilight by Zindy S.D.Nielsen
This tube is a FTU tube at the time of writing this tutorial.
Scrap kit Inked by KatNKDA
Scraps I am using from this kit are .......
Element 23, Paper 11, Element 27, Element 03
No plug ins needed.
This tutorial was written in PSP 9
Note
Open all the supplies in paintshop except the font.
Double click on your font and minimize.
1. Open a new image 600 x 600 at 72 dpi, , Resize element 23 to 360 pixels high, copy and paste as a new layer. Use your magic wand to select the center, selections/ modify/ expand by 2, add a new raster layer. Copy paper 11, paste into selection, layers/ arrange/ move down. Resize tube to 350 pixels high, copy, paste as a new layer. Using your mover tool position the tube, selections/ invert, hit delete. Selections/ select none.
2. Copy element 27, paste as a new layer, position, duplicate layer, image/ mirror, layers/ merge down. Duplicate layer, image/ flip, move this layer down slightly, layers/ merge down.
3. Copy element03, activate top layer, paste as a new layer and position down at the bottom.
4. Layers/ merge/ merge visible, crop to size, add your copyright info, name and export as a png for transparent background or jpg for a white background.
Labels:FTU Tutorials
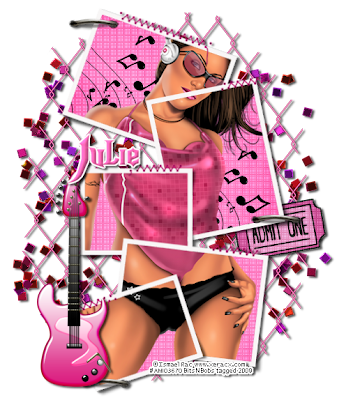 Rock it baby
Tutorial written by and © to Bits N Bobs 18th July 2009.
Results are for personal use only.
No monetry gain allowed and that includes placing them behind a paid or donation based membership area.
You are not allowed to share/forward or translate any of my tutorials or place them on any blog, website, DVD or anywhere else without my permission.
These tutorials are written from my own ideas and any similarities to any other tutorial is purely coincidental.
All tutorials are for those with a working knowledge of paintshop pro.
I reserve the right to amend these terms at any time.
Supplies needed.
Font of choice for your name.
I am using Nightmare hero
Tube of choice.
I am using Groovy gal PG by Ismael Rac
This tube is not to be used without an AMI license
Scrap kit Misfits rock by Bel Vidotti
Scraps I am using from this kit are .......
Wire, Frame06, Note05, PP02, Ticket, Glitter01, Guitar01
Plugin, Penta.com Dot and cross available here - Garbage collection
This tutorial was written in PSP 9
Note
Open all the supplies in paintshop except the font.
Double click on your font and minimize.
1. Open a new image 600h x 500w at 72 dpi, , copy wire, paste as a new layer on your blank image and image/ rotate/ free rotate by 90 ( doesn't matter which way ) , all layers untabbed.
2. Resize frame 6 to 570 pixels high, copy and paste as a new layer. Select the inside of each frame section, selections/ modify/ expand by 3, layers/ new raster layer.
Copy your large tube, paste into selection, selections/ select none, layers/ arrange/ move down.
With your push brush set at size 3, hardness 100, step 1, density 100, thickness 100, rotation 0, opacity 100, sample merged unchecked carefully push any tube edge under the frame to get rid of see through parts.
3. Activate Note05, image/ rotate/ free rotate 90 right all layers tabbed, copy, paste as a new layer, layers/ arrange/ move down.
Erase any part you don't want showing. Copy paste as a new selection and again erase any part you don't want.
4. Activate the frame and select all the centers, selections/ modify/ expand by 3, layers/ new raster layer, copy your paper and paste into selections, layers/ arrange/ move down, hold down Ctrl and hit Y twice.
Plugins/ Penta.com/ Dot and cross with settings: amount 72, cross distance 10, cross width 2. Selections/ select none.
5. Close off your bottom and wire layers, layers/ merge/ merge visible. Copy staple, paste as a new layer, position to your liking, duplicate staple, position to your liking, duplicate and position once more. Layers/ merge/ merge visible.
6. Resize ticket to 100 pixels high, copy, paste as a new layer, move into position, layers/ merge/ move down, add plugin effect penta.com, dots and crosses with the same settings.
7. Copy Glitter01, paste as a new layer, layers/ arrange/ send to bottom.
8. Activate top layer, resize guitar01 to 312 pixels high, copy and paste as a new layer.
9. Activate top layer, add dropshadow with the following settings.
Vertical 2, Horizontal 2, opacity 70, Blur 4.00, colour #000000.
Activate each layer in turn holding Ctrl and hitting Y on each one to add the dropshadow to each layer.
10. Layers/ merge/ merge visible, add your copyright info, name and export as a png for transparent background or jpg for a white background .
Labels:FTU Tutorials
Thursday 16 July 2009
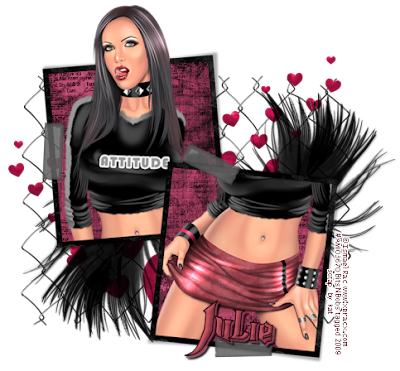 Attitude
Tutorial written by and © to Bits N Bobs 16th July 2009.
Results are for personal use only.
No monetry gain allowed and that includes placing them behind a paid or donation based membership area.
You are not allowed to share/forward or translate any of my tutorials or place them on any blog, website, DVD or anywhere else without my permission.
These tutorials are written from my own ideas and any similarities to any other tutorial is purely coincidental.
All tutorials are for those with a working knowledge of paintshop pro.
I reserve the right to amend these terms at any time.
Supplies needed.
Font of choice for your name.
I am using Nightmare hero
Tube of choice.
I am using IRPG09 Fleshy PG by Ismael Rac
This tube is not to be used without an AMI license
Scrap kit La Parisienne by Kat NKDA
Scraps I am using from this kit are Element01, element03, element24, element32 and paper 2
No plugins needed
This tutorial was written in PSP 9
Note
Open all the supplies in paintshop except the font.
Double click on your font and minimize.
1. Open a new image 500 x 500 at 72 dpi, resize element24 to 400 pixels high, copy, paste as a new later on your new image.
2. Select center of the 2 frames with your magic wand, selections/ modify/ expand by 5, layers/ new raster layer, copy paper2 and paste into selection, selections/ select none, layers/ arrange/ send to bottom
3. Resize element03 to 400 pixels wide, copy, paste as a new layer, layers/ arrange/ send to bottom and position to your liking. I have moved mine up very slightly.
4. Resize element32 to 250 pixels wide, copy, activate paper layer, paste as a new layer, position, layers/ arrange/ move down.
Duplicate heart layer, image/ mirror, move up slightly.
5. Resize element01 to 270 pixels wide, copy, paste as a new layer, position to your liking.
Duplicate feather layer, image/ mirror, image/ flip and position again to your liking.
6. Resize your tube to 420 pixels high, activate paper layer, copy, paste as a new layer, position over first frame, use your lassoo tool to delete any parts you don't require. Activate the frame layer and again using your freehand selection tool ( lassoo )cut away the top part of the frame that is covering your tubes face.
7. Copy your resized tube again, activate paper layer, paste as a new layer, image/ mirror, position to your liking in the bottom frame.
Using your freehand selection tool ( lassoo ) cut away any part of your tube that is outside of the frame.
8. Layers/ merge/ merge visible and add your copyright info and name and export as a png for transparent background or jpg for a white background .
Labels:PTU Tutorials
Subscribe to:
Posts
(Atom)
BNB Blinkie

Tuts Of The Week
Labels
- ! missing kits
- Alex Prihodko
- Amberly Berendson
- AMI
- Angela Newman
- Animated
- Arthur Crowe
- Autumn
- Babe-a-licious
- Bits N Bobs
- C.I.L.M
- Camilla Drakenborg
- CDO
- Christmas
- Competitions
- Cris Ortega
- Danielle Pioli
- Double Impact
- Easter
- Elegance Fly
- Elias Chatzoudis
- Elizabeth Austin
- Enamorte
- Exquisite Scraps
- Fantasia
- Forum sets
- Free Fonts
- FTU Tubes
- FTU Tutorials
- Gorjuss
- Gothic
- Incredimal Stationary
- Ismael Rac
- Italia Ruotolo
- James Jacks
- Jamie Kidd
- Jose Cano
- Karen Middleton
- KatNKDA
- KennyK
- Masks
- Maxine Gadd
- MPT
- MTA
- Mystical Scraps
- New Year
- Nice N Easy
- Nicholas Garton
- No scraps
- Orkus Art
- PFD
- PMTWS
- PTE
- PTU Tutorials
- Rachael Anderson
- Rachael Huntington
- Rachel Tallamy
- SATC
- Selena Fenech
- Shawn Palek
- Spring
- St.Patricks
- Steampunk
- Susan Mckirvergan
- Tag templates
- Thanksgiving
- UpYourArt
- Valentines
- Very Many
- Wilma4Ever
- ZlataM

