
Showing posts with label Arthur Crowe. Show all posts
Showing posts with label Arthur Crowe. Show all posts
Saturday, 1 December 2012

Peace On Earth
Tutorial written by and © to Bits N Bobs 30th November 2012.
Results are for personal use only.
No monetry gain allowed and that includes placing them behind a paid or donation based membership area.
You are not allowed to share/forward or translate any of my tutorials or place them on any blog, website, DVD or anywhere else without my permission.
These tutorials are written from my own ideas and any similarities to any other tutorial is purely coincidental.
All tutorials are for those with a working knowledge of paintshop pro.
I reserve the right to amend these terms at any time.
Supplies needed.
Font of choice for your name.
I am using Alex brush.
Tube of choice.
I am using Liittle Wish by Arthur Crowe
Tube is not to be used without the correct licence
POE Cluster by Bits N Bobs from here
Plugins needed but not essential..
Penta.com dot and cross ( Garbage collection )
Note
This tutorial was written in PSP 9.
Open all supplies in paintshop except the font.
Double click on your font and minimize.
Install your plugins.
Open a new image, 600 w x 600 h at 72 dpi.
1. Copy your frame.
Paste as a new layer.
Select the center of both frames.
Flood fill with a colour of choice
I am using #cb832e
Effects/ Plugins/ Penta.com Dots and Cross
72 - 10 - 2
2. Copy your middle close up tube.
Paste as a new layer.
Image/ re-size to 400 pixels wide.
All layers un tabbed.
Place to your liking.
Erase any part that is outside the frame.
Add a drop shadow.
I used H3 V3 O80 B9 Colour #000000
Image/ mirror.
Layers/ properties/ blend mode to Luminance.
3. Copy your full tube.
Paste as a new layer.
Layers/ arrange/ move up.
Image/ re-size to 350 pixels wide.
Position to your liking.
Add a drop shadow.
I used H3 V3 O80 B9 Colour #000000
4. Layers/ Merge/ Merge Visible.
Add all copyright info, name and save as
a transparent png file.
Monday, 26 November 2012

Tutorial written by and © to Bits N Bobs 26th November 2012.
Results are for personal use only.
No monetry gain allowed and that includes placing them behind a paid or donation based membership area.
You are not allowed to share/forward or translate any of my tutorials or place them on any blog, website, DVD or anywhere else without my permission.
These tutorials are written from my own ideas and any similarities to any other tutorial is purely coincidental.
All tutorials are for those with a working knowledge of paintshop pro.
I reserve the right to amend these terms at any time.
Supplies needed.
Font of choice for your name.
I am using Alex brush.
Tube of choice.
I am using Kandy Kane by Arthur Crowe
Although mine is from PTE (now closed) you can purchase
Arthur's work here
Tube is not to be used without the correct licence
Frame 1 cluster from here
Christmas mask 5 by Vix available here
Plugins needed but not essential..
Penta.com dot and cross ( Garbage collection )
Note
This tutorial was written in PSP 9.
Open all supplies in paintshop except the font.
Double click on your font and minimize.
Install your plugins.
Open a new image, 600 w x 600 h at 72 dpi.
1. Flood fill your working image with a colour of choice
I am using #c90927
Effects/ Plugins/ Penta.com Dots and Cross
72 - 10 - 2
Layers/ new mask layer/ from image.
Scroll to the name of your mask and click ok.
Layers/ merge/ merge group.

2. Copy your cluster frame.
Paste as a new layer.
Image/ re-size to 450 pixels wide.
All layers un tabbed.
3. Copy your middle tube.
Paste as a new layer.
Layers/ arrange/ move down.
Position to your liking.
Add a drop shadow.
I used H3 V3 O80 B9 Colour #000000
Lower layer opacity to 85%
Using your eraser rub away any part
outside of the frame.
4. Copy your main tube.
Paste as a new layer.
Image/ mirror.
Add a drop shadow.
Layers/ Arrange/ Move up.
Position to your liking on the right hand side.
5. Layers/ Merge/ Merge Visible.
Add all copyright info, name and save as
a transparent png file.

Tutorial written by and © to Bits N Bobs 26th November 2012.
Results are for personal use only.
No monetry gain allowed and that includes placing them behind a paid or donation based membership area.
You are not allowed to share/forward or translate any of my tutorials or place them on any blog, website, DVD or anywhere else without my permission.
These tutorials are written from my own ideas and any similarities to any other tutorial is purely coincidental.
All tutorials are for those with a working knowledge of paintshop pro.
I reserve the right to amend these terms at any time.
Supplies needed.
Font of choice for your name.
I am using Alex brush.
Tube of choice.
I am using Miss Santa by Arthur Crowe
Although mine is from MPT (now closed) you can purchase
Arthurs work here
Tube is not to be used without the correct licence
Christmas Cluster frame #3 from here
MondayMask2 by Vix available here
Plugin needed but not essential.
Penta.com dot and cross ( Garbage collection )
Note
This tutorial was written in PSP 9.
Open all supplies in paintshop except the font.
Double click on your font and minimize.
Install your plugins.
Open a new image, 600 w x 600 h at 72 dpi.
1. Flood fill your working image with a colour of choice
I am using #23a323
Effects/ Plugins/ Penta.com Dots and Cross
72 - 10 - 2
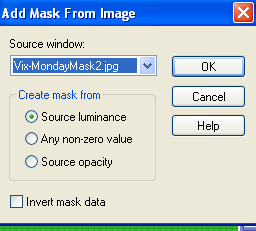
Layers/ new mask layer/ from image.
Scroll to the name of your mask and click ok.
Layers/ merge/ merge group.
2. Copy your cluster frame.
Paste as a new layer.
Image/ re-size to 450 pixels wide.
All layers un tabbed.
3. Copy close up of your tube.
Paste as a new layer.
Image/ Mirror.
Image/ re-size to 450 pixels wide.
All layers un tabbed.
Add a drop shadow of choice.
I am using H3, V3, O80, B9, colour #000000
Layers/ Arrange/ Move down.
Erase any part outside of the frame.
Lower layer opacity to 60%
4. Copy your main tube.
Paste as a new layer.
Add a drop shadow.
Layers/ Arrange/ Move up.
Position to your liking on the left hand side.
5. Layers/ Merge/ Merge Visible.
Add all copyright info, name and save as
a transparent png file.
Sunday, 25 November 2012


Tutorial written by and © to Bits N Bobs 25th November 2012.
Results are for personal use only.
No monetry gain allowed and that includes placing them behind a paid or donation based membership area.
You are not allowed to share/forward or translate any of my tutorials or place them on any blog, website, DVD or anywhere else without my permission.
These tutorials are written from my own ideas and any similarities to any other tutorial is purely coincidental.
All tutorials are for those with a working knowledge of paintshop pro.
I reserve the right to amend these terms at any time.
Supplies needed.
Font of choice for your name.
I am using KG Behind these hazel eyes.
Tube of choice.
I am using Rock Princess by Arthur Crowe
Although mine is from PTE (now closed) you can purchase
Arthurs work here
Tube is not to be used without the correct licence
Plugins needed.
Penta.com dot and cross ( Garbage collection )
VM Toolbox - Zoom Blur
Kai's Power tools (KPT5 FraxFlame) Used to be sold by Meta Creations.
Has now been bought out by CorelAAA frames fotoframe
Note
This tutorial was written in PSP 9
and uses animation shop 3.
Open all supplies in paintshop
Double click on your font and minimize.
Install your plugins.
Open a new image, 600 w x 250 h at 72 dpi.
1. Flood fill your working image with a colour from your tube.
I am using #fd95cb
Effects/ Plugins/ Penta.com Dots and Cross
72 - 10 - 2
Copy your close up tube.
Paste as a new layer.
Effects/ Plugins/ VM Toolbox/ Zoom blur
72 - 23
Effects/ edge effects/ enhance more.
Rename this layer to sparkle.
Layers/ Duplicate layer, rename to sparkle 2
Layers/ Duplicate layer, rename to sparkle 3
Close layers sparkle 2 and 3.
2. Copy your middle size tube
Paste as a new layer.
Position to your liking on the left hand side.
Effects/ plugins/ KPT5 Fraxflame
Choose the setting you are happy with.
Mine are in the screenshot below.
Effects/ Edge effects/ Enhance More.

3. Copy your middle size tube again.
Paste as a new layer.
Position so it is in exactly the same position
the previous middle tube.
Add a drop shadow.
I am using H3, V3, O80, B9, colour #000000
4. Copy your smaller tube.
Paste as a new layer.
Image/ Mirror.
Position to your liking on the right hand side.
Add a drop shadow.
I am using H3, V3, O80, B9, colour #000000
*** Note:
Save now or continue for the animation steps
*** End note:
5. Close sparkle 2 and sparkle 3.
Activate the sparkle layer.
Effects/ Alienskin Xenofex 2/ Constellation

Layers/ Merge/ Merge Visible.
Effects/ plugins/ AAA frames/ Foto frame.

Edit/ Copy.
Open animation shop,
Edit/ Paste as a new animation.
6. Back in paintshop edit undo twice.
Close sparkle layer and open sparkle 2 layer.
Activate the sparkle 2 layer.
Effects/ Alienskin Xenofex 2/ Constellation
Same settings but hit the random button once.
Layers/ Merge/ Merge Visible.
Effects/ plugins/ AAA frames/ Foto frame.
Same settings.
Edit/ Copy.
Open animation shop,
Edit/ Paste after current animation.
7. Back in paintshop edit undo twice.
Close sparkle 2 layer and open sparkle 3 layer.
Activate the sparkle 3 layer.
Effects/ Alienskin Xenofex 2/ Constellation
Same settings but hit the random button once.
Layers/ Merge/ Merge Visible.
Effects/ plugins/ AAA frames/ Foto frame.
Same settings.
Edit/ Copy.
Open animation shop,
Edit/ Paste after current animation.
8. Create your name in paintshop as normal, copy the file
and paste as a new animation into animation shop.
Copy the name in animation shop, activate your sig
Edit/ select all, edit/ propogate paste, edit/ paste into selected frame.
9. For your avatar crop your animation down to as close to 150 x 150 as you can.
Edit/ Select all, File/ export to paintshop.
Activate bottom layer,
Effects/ plugins/ AAA frames/ Foto frame.
Change the width to 2 everything else is the same.
Activate middle layer,
Effects/ plugins/ AAA frames/ Foto frame.
Same settings.
Activate top layer,
Effects/ plugins/ AAA frames/ Foto frame.
Same settings.
Select the red cross to close.
NO you don't want to save it but YES
you do want to update the changes back to animation shop.
Create your Initial in paintshop as normal, copy the file
and paste as a new animation into animation shop.
Copy the Initial in animation shop, activate your AV,
Edit/ select all, edit/ propogate paste, edit/ paste into selected frame and then file/save as.
Saturday, 24 November 2012


Tutorial written by and © to Bits N Bobs 24th November 2012.
Results are for personal use only.
No monetry gain allowed and that includes placing them behind a paid or donation based membership area.
You are not allowed to share/forward or translate any of my tutorials or place them on any blog, website, DVD or anywhere else without my permission.
These tutorials are written from my own ideas and any similarities to any other tutorial is purely coincidental.
All tutorials are for those with a working knowledge of paintshop pro.
I reserve the right to amend these terms at any time.
Supplies needed.
Font of choice for your name.
I am using KG Behind these hazel eyes.
Tube of choice.
I am using x77 Talk With Me by Arthur Crowe
Tube is not to be used without the correct licence
Star spinner animation by Lovey
Plugins needed.
Penta.com dot and cross ( Garbage collection )
AAA frames fotoframe
Note
This tutorial was written in PSP 9
and uses animation shop 3.
Open all supplies in paintshop
Double click on your font and minimize.
Install your plugin.
Open a new image, 600 w x 250 h at 72 dpi.
1. Flood fill your working image with a colour from your tube.
I am using #75a3d7
Effects/ Plugins/ Penta.com Dots and Cross
72 - 10 - 2

Copy your tube.
Paste as a new layer.
Adjust/ Blur/ Radial Blur

Effects/ edge effects/ enhance more.
Effects/ edge effects/ enhance more.
Position to your liking on the left hand side.
Layers/ Duplicate, Image/ Mirror, Image/ Flip
2. Copy your tube.
Paste as a new layer.
Image/ Mirror.
Position to your liking on the left hand side.
Layers/ properties, blend mode to Luminance.
3. Layers/ merge/ merge visible.
Effects/ plugins/ AAA frames/ Foto frame.

4. Copy your tube.
Paste as a new layer.
Image/ re-size, re-size to 315 pixels wide.
Position to your liking on the right hand side.
Add a drop shadow.
I am using H3, V3, O100, B9, colour #000000
Layers/ new raster layer.
Add all copyright info.
*** Note:
Save now or continue for the animation steps
*** End note:
5. Close your top tube layer.
Edit/ Copy merged,
Open animation shop,
Edit/ Paste as a new animation.
Edit/ paste after current frame.
Continue pasting after current frame until you
have a total of 30 frames.
Open your animation.
Edit/ delete the first frame.
Edit/ Select all.
Edit/ Animation re-size to 300 pixels high.
Activate your 30 frames again.
Edit/ Select all, Edit/ paste into selected frame.
Position to your liking.
6. Now go back to paintshop.
Copy your top tube layer.
Back to paintshop.
Edit paste as a new animation.
Edit/ copy, activate your signature.
Edit/ select all.
Edit/ Paste into selected frame.
Position it to your liking.
If you don't like where you put it simply
edit/ undo and then try again.
Once it's to your liking you need to crop the
image to as close to the size you want as posible.
7. File/ export frames to paintshop pro.
Activate your top layer.
Effects/ plugins/ AAA frames/ Foto frame.
Change the width to 5 and matte to 1,
all other settings remain the same.
Repeat the foto frame on each layer.
Activate each layer in turn adding the foto frame.
Once you have added the frame to all 30 layers,
click on the X to close it.
NO you do not want to save it but YES you want
to update the changes back to animation shop.
8. Create your name in paintshop as normal, copy the file
and paste as a new animation into animation shop.
Copy the name in animation shop, activate your sig
Edit/ select all, edit/ propogate paste, edit/ paste into selected frame.
9. For your avatar crop your animation down to as close to 150 x 150 as you can.
Create your Initial in paintshop as normal, copy the file
and paste as a new animation into animation shop.
Copy the Initial in animation shop, activate your AV,
Edit/ select all, edit/ propogate paste, edit/ paste into selected frame and then file/save as.
Wednesday, 19 October 2011

Tutorial written by and © to Bits N Bobs 19th November 2011.
Results are for personal use only.
No monetry gain allowed and that includes placing them behind a paid or donation based membership area.
You are not allowed to share/forward or translate any of my tutorials or place them on any blog, website, DVD or anywhere else without my permission.
These tutorials are written from my own ideas and any similarities to any other tutorial is purely coincidental.
All tutorials are for those with a working knowledge of paintshop pro.
I reserve the right to amend these terms at any time.
Supplies needed.
Font of choice for your name.
I am using Popular Std
Tube of choice.
I am using PTE-2960 by Arthur Crowe
Mine is pte1891 and from
You can now purchase Arthur's work from here
Tube is not to be used without the correct licence
Scrap kit A Little goes a long way by Bits N Bobs
Items I am using from this kit are...
ALGALW 25, 31, 37, 8
Mask of choice.
I am using Gabeemask60 which you can find here
Note
This tutorial was written in PSP 9 and needs animation shop for the animation.
Open all supplies in paintshop except the font and mask.
Install the mask into your mask folder.
Double click on your font and minimize.
Open a new image, 600 w x 600 h at 72 dpi.
1.Using your selection tool with selection type set at Circle
create a circle in the center of your image.
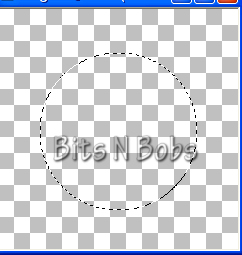
Copy the close up of your tube and paste into selection.
Effects/ reflection effects/ kaleidascope

Effects/ texture / mosaic antique

2.Layers/ duplicate layer, select none.
Adjust/ blur/ guassian blur and blur by 15.00
Lower the layer opacity to 90%
3.Activate the first circle layer,
Image/ re-size, re-size by 125% all layers untabbed.
Layers/ Load-save mask/ load mask from disk.
Layers/ merge/ merge group

4.Activate top layer
Copy ALGALW 25, paste as a new layer.
Position to your liking on the right hand side.
Layers/ duplicate layer, Image/ mirror, Image/flip
Layers/ merge/ merge down.
Layers/ duplicate layer, Image/ mirror,
Position to your liking,
Layers/ merge/ merge down.
Layers/ arrange/ send to bottom.
5.Copy ALGALW 8,
paste as a new layer,
position to your liking on the right hand side.
Layers/ duplicate layer, Image/ mirror, Image/flip
Layers/ merge/ merge down.
Layers/ duplicate layer, Image/ mirror,
Position to your liking,
Layers/ merge/ merge down.
Layers/ arrange/ move up.
6.Activate top layer,
Copy ALGALW 31,
paste as anew layer.
Image/ re-size, re-size 60%
all layers un-tabbed.
7.Copy the close-up tube,
paste as a new layer.
Image/ re-size, re-size 75% all layers un-tabbed.
Position to your liking and add a drop shadow.
I am using V0, H0, O100, B15.00, C #000000
8.Copy ALGALW 37, paste as a new layer.
Position at the bottom of the tube body
Erase any twigs hanging too far down.
9.Activate the top layer,
add a new raster layer.
Add all copyright info, your name.
Export as a transparent png file and save.
Subscribe to:
Posts
(Atom)
Stores


BNB Blinkie