
Showing posts with label Nice N Easy. Show all posts
Showing posts with label Nice N Easy. Show all posts
Saturday, 1 December 2012

Peace On Earth
Tutorial written by and © to Bits N Bobs 30th November 2012.
Results are for personal use only.
No monetry gain allowed and that includes placing them behind a paid or donation based membership area.
You are not allowed to share/forward or translate any of my tutorials or place them on any blog, website, DVD or anywhere else without my permission.
These tutorials are written from my own ideas and any similarities to any other tutorial is purely coincidental.
All tutorials are for those with a working knowledge of paintshop pro.
I reserve the right to amend these terms at any time.
Supplies needed.
Font of choice for your name.
I am using Alex brush.
Tube of choice.
I am using Liittle Wish by Arthur Crowe
Tube is not to be used without the correct licence
POE Cluster by Bits N Bobs from here
Plugins needed but not essential..
Penta.com dot and cross ( Garbage collection )
Note
This tutorial was written in PSP 9.
Open all supplies in paintshop except the font.
Double click on your font and minimize.
Install your plugins.
Open a new image, 600 w x 600 h at 72 dpi.
1. Copy your frame.
Paste as a new layer.
Select the center of both frames.
Flood fill with a colour of choice
I am using #cb832e
Effects/ Plugins/ Penta.com Dots and Cross
72 - 10 - 2
2. Copy your middle close up tube.
Paste as a new layer.
Image/ re-size to 400 pixels wide.
All layers un tabbed.
Place to your liking.
Erase any part that is outside the frame.
Add a drop shadow.
I used H3 V3 O80 B9 Colour #000000
Image/ mirror.
Layers/ properties/ blend mode to Luminance.
3. Copy your full tube.
Paste as a new layer.
Layers/ arrange/ move up.
Image/ re-size to 350 pixels wide.
Position to your liking.
Add a drop shadow.
I used H3 V3 O80 B9 Colour #000000
4. Layers/ Merge/ Merge Visible.
Add all copyright info, name and save as
a transparent png file.
Friday, 30 November 2012

Tutorial written by and © to Bits N Bobs 30th November 2012.
Results are for personal use only.
No monetry gain allowed and that includes placing them behind a paid or donation based membership area.
You are not allowed to share/forward or translate any of my tutorials or place them on any blog, website, DVD or anywhere else without my permission.
These tutorials are written from my own ideas and any similarities to any other tutorial is purely coincidental.
All tutorials are for those with a working knowledge of paintshop pro.
I reserve the right to amend these terms at any time.
Supplies needed.
Font of choice for your name.
I am using Alex brush.
Tube of choice.
I am using Darknsexy by Ismael Rac here
Tube is not to be used without the correct licence
Bah Humbug tag back 1 by Kristy from here
Vix mask 306 available here
Plugins needed but not essential..
Penta.com dot and cross ( Garbage collection )
Note
This tutorial was written in PSP 9.
Open all supplies in paintshop except the font.
Double click on your font and minimize.
Install your plugins.
Open a new image, 600 w x 600 h at 72 dpi.
1. Flood fill your working image with a colour of choice
I am using #b5181e
Effects/ Plugins/ Penta.com Dots and Cross
72 - 10 - 2
Layers/ new mask layer/ from image.
Scroll to the name of your mask and click ok.
Layers/ merge/ merge group.

Layers/ duplicate, Image/ mirror
Layers/ merge/ merge visible
2. Copy your cluster frame.
Paste as a new layer.
Image/ re-size to 500 pixels wide.
All layers un tabbed.
3. Copy your tube.
Paste as a new layer.
Image/ re-size to between 300 and 350 pixels high
dependng on the size of your tube
Position to your liking.
Add a drop shadow.
I used H3 V3 O80 B9 Colour #000000
4. Layers/ new raster
Using font IMPACT Forground #b5181e
background #000000 size 72 type
your choice of text.
( I gave mine a gradient glow using eye candy)
Position to your liking on the right hand side.
5. Layers/ Merge/ Merge Visible.
Add all copyright info, name and save as
a transparent png file.
Tuesday, 27 November 2012

Tutorial written by and © to Bits N Bobs 27th November 2012.
Results are for personal use only.
No monetry gain allowed and that includes placing them behind a paid or donation based membership area.
You are not allowed to share/forward or translate any of my tutorials or place them on any blog, website, DVD or anywhere else without my permission.
These tutorials are written from my own ideas and any similarities to any other tutorial is purely coincidental.
All tutorials are for those with a working knowledge of paintshop pro.
I reserve the right to amend these terms at any time.
Supplies needed.
Font of choice for your name.
I am using Christmas on crack.
Tube of choice.
I am using Black Fairy by Jose Cano
Although mine was from MPT you can now
purchase Jose's work from SATC
Tubes are not to be used without the correct licence
Gothic Wonderland frame from Julie's Jazz
Mask #7 by Myself available here ( 3rd one down )
Plugin needed but not essential..
Penta.com dot and cross ( Garbage collection )
Note
This tutorial was written in PSP 9.
Open all supplies in paintshop except the font.
Double click on your font and minimize.
Install your plugins.
Open a new image, 600 w x 600 h at 72 dpi.
1. Flood fill your working image with a colour of choice
I am using #000000
Effects/ Plugins/ Penta.com Dots and Cross
159 - 14 - 2
Layers/ new mask layer/ from image.
Scroll to the name of your mask and click ok.
Layers/ merge/ merge group.
2. Copy your cluster frame.
Paste as a new layer.
Image- re-size to 400 pixels wide.
Position to your liking.
3. Copy your tube.
Paste as a new layer.
Image/ mirror.
With your selection tool cut away the
front of her body.
We want just her rear end and legs.
Position inside the frame.
Layers/ arrange/ move down.
Position to your liking.
Erase any part outside the frame.
Add a drop shadow.
I used H3 V3 O100 B9 Colour #000000
Layers/ properties/ blend mode to Luminance.
4. Copy your tube and paste as a new layer.
Image/ re-size to 500 pixels wide.
Layers/ arrange/ move up.
Position towards the bottom.
Add a drop shadow.
I used H5 V5 O100 B9 Colour #000000
5. Layers/ Merge/ Merge Visible.
Add all copyright info, name and save as
a transparent png file.

Tutorial written by and © to Bits N Bobs 27th November 2012.
Results are for personal use only.
No monetry gain allowed and that includes placing them behind a paid or donation based membership area.
You are not allowed to share/forward or translate any of my tutorials or place them on any blog, website, DVD or anywhere else without my permission.
These tutorials are written from my own ideas and any similarities to any other tutorial is purely coincidental.
All tutorials are for those with a working knowledge of paintshop pro.
I reserve the right to amend these terms at any time.
Supplies needed.
Font of choice for your name.
I am using Alex brush.
Tube of choice.
I am using Angel by Jose Cano
Although mine was from MPT you can now
purchase Jose's work from SATC
Tubes are not to be used without the correct licence
Winter Wonderland frame from Julie's Jazz
Christmas Mask3 2010 by Vix available here
Plugin needed but not essential..
Penta.com dot and cross ( Garbage collection )
Note
This tutorial was written in PSP 9.
Open all supplies in paintshop except the font.
Double click on your font and minimize.
Install your plugins.
Open a new image, 600 w x 600 h at 72 dpi.
1. Flood fill your working image with a colour of choice
I am using #a1b7cb
Effects/ Plugins/ Penta.com Dots and Cross
159 - 14 - 2
Layers/ new mask layer/ from image.
Scroll to the name of your mask and click ok.
Layers/ merge/ merge group.
Add a drop shadow.
I used H2 V2 O80 B3 Colour #000000
2. Copy your cluster frame.
Paste as a new layer.
Image- re-size to 450 pixels wide.
Position to your liking.
Add a drop shadow.
I used H3 V3 O80 B9 Colour #000000
3. Copy your tube.
Paste as a new layer.
Cut away the bottom half of her body.
Layers/ arrange/ move down.
Position to your liking.
Erase any part outside the frame.
Add a drop shadow.
I used H3 V3 O80 B9 Colour #000000
Layers/ properties/ blend mode to Luminance.
4. Copy your tube and paste as a new layer.
Image/ re-size to 450 pixels high.
Layers/ arrange/ move up.
Position towards the right hand side.
Add a drop shadow.
I used H3 V3 O80 B9 Colour #000000
5. Layers/ Merge/ Merge Visible.
Add all copyright info, name and save as
a transparent png file.

Tutorial written by and © to Bits N Bobs 27th November 2012.
Results are for personal use only.
No monetry gain allowed and that includes placing them behind a paid or donation based membership area.
You are not allowed to share/forward or translate any of my tutorials or place them on any blog, website, DVD or anywhere else without my permission.
These tutorials are written from my own ideas and any similarities to any other tutorial is purely coincidental.
All tutorials are for those with a working knowledge of paintshop pro.
I reserve the right to amend these terms at any time.
Supplies needed.
Font of choice for your name.
I am using Mars Inside.
Tube of choice.
I am using Blue Candy Cane by Bits N Bobs from MyTubedArt
Tubes are not to be used without the correct licence
Winter Wonderland frame from DenzDesignz
Mask 429 by Vix available here
Plugin needed but not essential..
Penta.com dot and cross ( Garbage collection )
Note
This tutorial was written in PSP 9.
Open all supplies in paintshop except the font.
Double click on your font and minimize.
Install your plugin.
Open a new image, 600 w x 600 h at 72 dpi.
1. Flood fill your working image with a colour of choice
I am using #a1b7cb
Effects/ Plugins/ Penta.com Dots and Cross
72 - 10 - 2
Layers/ new mask layer/ from image.
Scroll to the name of your mask and click ok.
Layers/ merge/ merge group.

Add a drop shadow.
I used H1 V1 O25 B2 Colour #000000
2. Copy your cluster frame.
Paste as a new layer.
Add a drop shadow.
I used H3 V3 O80 B9 Colour #000000
3. Copy your tube.
Paste as a new layer.
Image/ Re size to 450 pixels high.
Position to your liking.
Mine is on the far right.
Add a drop shadow.
I used H3 V3 O80 B9 Colour #000000
4. Using your selection tool go back
to your original tube file.
Select just the head and shoulders.
Copy and paste as a new layer on
your working image.
Image/ mirror.
Position over the center of the left frame.
Layers/ arrange/ move down - move down once more.
Add a drop shadow.
I used H3 V3 O80 B9 Colour #000000
5. Copy the selected head and shoulders again.
Paste as a new layer on
your working image.
Position under the center frame.
Add a drop shadow.
I used H3 V3 O80 B9 Colour #000000
Layers/ properties/ blend mode to Luminance.
6. Layers/ Merge/ Merge Visible.
Add all copyright info, name and save as
a transparent png file.
Monday, 26 November 2012

Tutorial written by and © to Bits N Bobs 26th November 2012.
Results are for personal use only.
No monetry gain allowed and that includes placing them behind a paid or donation based membership area.
You are not allowed to share/forward or translate any of my tutorials or place them on any blog, website, DVD or anywhere else without my permission.
These tutorials are written from my own ideas and any similarities to any other tutorial is purely coincidental.
All tutorials are for those with a working knowledge of paintshop pro.
I reserve the right to amend these terms at any time.
Supplies needed.
Font of choice for your name.
I am using Alex brush.
Tube of choice.
I am using one I have tubed myself from Cris Ortega.
You can download this in the supplies below.
Tube is not to be used without the correct copyright.
In this case © Cris Ortega www.crisortega.com
Steampunk Cluster frame from DenzDesignz
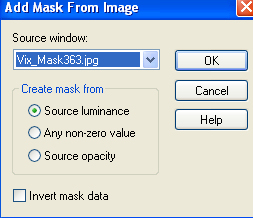
Mask 363 by Vix in the supplies below.
Tut Supplies Here
Plugin needed but not essential..
Penta.com dot and cross ( Garbage collection )
Note
This tutorial was written in PSP 9.
Open all supplies in paintshop except the font.
Double click on your font and minimize.
Install your plugins.
Open a new image, 600 w x 600 h at 72 dpi.
1. Flood fill your working image with a colour of choice
I am using #4e4005
Effects/ Plugins/ Penta.com Dots and Cross
72 - 10 - 2
Layers/ new mask layer/ from image.
Scroll to the name of your mask and click ok.
Layers/ merge/ merge group.
2. Copy your cluster frame.
Paste as a new layer.
Image/ re-size to 450 pixels wide.
All layers un tabbed.
3. Copy your tube.
Paste as a new layer.
Image/ Re size to 450 pixels high.
Position to your liking.
Activate the frame layer,
select the center of the frame ,
selections/ modify/ expand by 2
Selections/ invert.
Activate your tube layer.
Erase the bottom of the tube.
You want her popping out of the frame.
Selections/ select none.
Add a drop shadow.
I used H3 V3 O80 B9 Colour #000000
4. Layers/ Merge/ Merge Visible.
Add all copyright info, name and save as
a transparent png file.

Tutorial written by and © to Bits N Bobs 26th November 2012.
Results are for personal use only.
No monetry gain allowed and that includes placing them behind a paid or donation based membership area.
You are not allowed to share/forward or translate any of my tutorials or place them on any blog, website, DVD or anywhere else without my permission.
These tutorials are written from my own ideas and any similarities to any other tutorial is purely coincidental.
All tutorials are for those with a working knowledge of paintshop pro.
I reserve the right to amend these terms at any time.
Supplies needed.
Font of choice for your name.
I am using Alex brush.
Tube of choice.
I am using Kandy Kane by Arthur Crowe
Although mine is from PTE (now closed) you can purchase
Arthur's work here
Tube is not to be used without the correct licence
Frame 1 cluster from here
Christmas mask 5 by Vix available here
Plugins needed but not essential..
Penta.com dot and cross ( Garbage collection )
Note
This tutorial was written in PSP 9.
Open all supplies in paintshop except the font.
Double click on your font and minimize.
Install your plugins.
Open a new image, 600 w x 600 h at 72 dpi.
1. Flood fill your working image with a colour of choice
I am using #c90927
Effects/ Plugins/ Penta.com Dots and Cross
72 - 10 - 2
Layers/ new mask layer/ from image.
Scroll to the name of your mask and click ok.
Layers/ merge/ merge group.

2. Copy your cluster frame.
Paste as a new layer.
Image/ re-size to 450 pixels wide.
All layers un tabbed.
3. Copy your middle tube.
Paste as a new layer.
Layers/ arrange/ move down.
Position to your liking.
Add a drop shadow.
I used H3 V3 O80 B9 Colour #000000
Lower layer opacity to 85%
Using your eraser rub away any part
outside of the frame.
4. Copy your main tube.
Paste as a new layer.
Image/ mirror.
Add a drop shadow.
Layers/ Arrange/ Move up.
Position to your liking on the right hand side.
5. Layers/ Merge/ Merge Visible.
Add all copyright info, name and save as
a transparent png file.

Tutorial written by and © to Bits N Bobs 26th November 2012.
Results are for personal use only.
No monetry gain allowed and that includes placing them behind a paid or donation based membership area.
You are not allowed to share/forward or translate any of my tutorials or place them on any blog, website, DVD or anywhere else without my permission.
These tutorials are written from my own ideas and any similarities to any other tutorial is purely coincidental.
All tutorials are for those with a working knowledge of paintshop pro.
I reserve the right to amend these terms at any time.
Supplies needed.
Font of choice for your name.
I am using Alex brush.
Tube of choice.
I am using Miss Santa by Arthur Crowe
Although mine is from MPT (now closed) you can purchase
Arthurs work here
Tube is not to be used without the correct licence
Christmas Cluster frame #3 from here
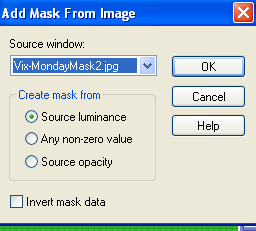
MondayMask2 by Vix available here
Plugin needed but not essential.
Penta.com dot and cross ( Garbage collection )
Note
This tutorial was written in PSP 9.
Open all supplies in paintshop except the font.
Double click on your font and minimize.
Install your plugins.
Open a new image, 600 w x 600 h at 72 dpi.
1. Flood fill your working image with a colour of choice
I am using #23a323
Effects/ Plugins/ Penta.com Dots and Cross
72 - 10 - 2
Layers/ new mask layer/ from image.
Scroll to the name of your mask and click ok.
Layers/ merge/ merge group.
2. Copy your cluster frame.
Paste as a new layer.
Image/ re-size to 450 pixels wide.
All layers un tabbed.
3. Copy close up of your tube.
Paste as a new layer.
Image/ Mirror.
Image/ re-size to 450 pixels wide.
All layers un tabbed.
Add a drop shadow of choice.
I am using H3, V3, O80, B9, colour #000000
Layers/ Arrange/ Move down.
Erase any part outside of the frame.
Lower layer opacity to 60%
4. Copy your main tube.
Paste as a new layer.
Add a drop shadow.
Layers/ Arrange/ Move up.
Position to your liking on the left hand side.
5. Layers/ Merge/ Merge Visible.
Add all copyright info, name and save as
a transparent png file.
Sunday, 25 November 2012

Tutorial written by and © to Bits N Bobs 25th November 2012.
Results are for personal use only.
No monetry gain allowed and that includes placing them behind a paid or donation based membership area.
You are not allowed to share/forward or translate any of my tutorials or place them on any blog, website, DVD or anywhere else without my permission.
These tutorials are written from my own ideas and any similarities to any other tutorial is purely coincidental.
All tutorials are for those with a working knowledge of paintshop pro.
I reserve the right to amend these terms at any time.
Supplies needed.
Font of choice for your name.
I am using Dean Martin
Tube of choice.
I am using Snowy By Orkus Art
Tube is not to be used without the correct licence.
Mask of choice.
I am using Mask 301 by Vix
Cluster frame by Julies Jazziness
Note
This tutorial was written in PSP 9
Open all supplies in paintshop except the font.
Double click on your font and minimize.
Open a new image, 600 w x 600 h at 72 dpi.
1. Copy your frame, paste as a new layer.
Image re-size to 450 pixels wide.
Copy your tube, paste as a new layer.
Activate the frame layer.
Select the center with your magic wand.
Selections/ modify/ expand by 4.
Flood fill with a colour of choice.
I am using #23a323.
Effects/ penta.com/ dot and cross.
Default settings.
2. Activate your tube layer.
Selections/ invert.
Using your eraser you want to make the
tube look she is popping out of the frame.

Add a drop shadow of choice.
I am using V3 - H3 - O80 - B7.00 - C #000000
3. Layers new raster layer flood fill with a colour
from your tube. I am using #b20404.
Layers/ new mask layer/ add mask from image.

Layers/ merge/ merge group.
Position towards the top left.
Layers/ duplicate, Image/ mirror,
Image/ flip. Layers/ merge/ merge down.
Layers/ arrange/ send to bottom.
4. Layers/ merge/ merge visible.
Add all your copyright info.
Save.
Subscribe to:
Posts
(Atom)
Stores


BNB Blinkie