


Tutorial written by and © to Bits N Bobs 17th January 2022.
Results are for personal use only.
No monetry gain allowed and that includes placing them behind a paid or donation based membership area.
You are not allowed to share/forward or translate any of my tutorials or place them on any blog, website, DVD or anywhere else without my permission.
These tutorials are written from my own ideas and any similarities to any other tutorial is purely coincidental.
All tutorials are for those with a working knowledge of paintshop pro.
I reserve the right to amend these terms at any time.
Supplies needed.
Font of choice for your name.
I am using Winter in January
Tube of choice.
I am using 102-2 by Anna Liwanag
Any sparkle you have.
I have included mine below if you would like to use it.

DSB Flux/ Linear transmission
Note
This tutorial was written in PSP 9.
Double click on your font and minimize.
Open all other supplies in paintshop.
Install any required plugins
Open a new image, 600 w x 250 h at 72 dpi.
1. On working image pick a colour from your tube and flood fill.
I have chosen black, #000000
Copy your tube, paste as a new layer on working image.
Image/ rotate/ free rotate/ left 90 all layers untabbed.
Effects/ Edge effects/ Enhance more.
Layers/ Duplicate layer.
Repeat so you have 4 layers.
Rename them 1 - 5 starting with your bottom flooded layer as Layer 1
2. Activate Layer 2
Effects/ Dsb flux/ Linear transmission.
Slice size 7, Offset 4, Blend -4, Direction Vertical.
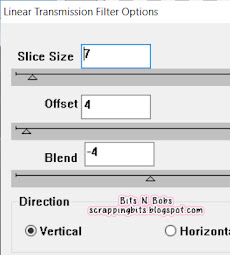
Layer 3 repeat the effect but change the Offset to 8.
Layer 4 repeat the effect but change the Offset to 12.
Layer 5 repeat the effect but change the Offset to 16.
3. Activate layer 2,
Copy your sparkle and paste as a new selection in several areas.
Where is entirely up to you but remember Selections./ Select None after each layer
Activate layer 3 and repeat, trying to place the sparkle in different areas.
Do the same for layers 4 and 5.
You should have finished with Layer 5 active.
4. Copy your tube, paste as a new layer.
Position to your liking on the right hand side.
Add a drop shadow off choice.
I am using...
V 3 - H 3 - O 65 - B 11 - Colour #000000

Add any text you wish on this layer.
I added 'You're As Cold As Ice' with the same dropshadow
Add your copyright info and name.
Layers/ merge/ Merge down, rename this to layer 6.
NOTE:
If not animating then you can File/ Export and save.
END NOTE:
ANIMATION.
Layers/ Duplicate, repeat so you have 4 of the floodfill layer.
Activate the top floodfilled layer,
Layers/ Arrange/ Move Up, repeat until it is below Layer 5.
Do the same so each layer (1-5) have a flood fill layer below it.
Once done activate Layer 5, Layers/ Merge/ Merge Down.
Rename back to layer 5
Activate Layer 4, Layers/ Merge/ Merge Down.
Rename back to layer 4
Repeat until each layer (2-5) is merged with it's flood filled
layer and renamed.
7. Turn off Layers 3-6) Activate layer 2, Edit/ copy merged, Turn off layer.
Open animation shop, paste as a new animation.
In paintshop, open layer 3, Edit/ copy merged, Turn off layer.
In animation shop, Edit/ paste after current frame.
In paintshop, open layer 4, Edit/ copy merged, Turn off layer.
In animation shop, Edit/ paste after current frame.
In paintshop, open layer 5, Edit/ copy merged, Turn off layer.
In animation shop, Edit/ paste after current frame.
Still in animation shop, Edit/ select all.
Click on F3, Edit/ copy, Click on F4 Edit/paste after current frame.
Click on F2, Edit/ copy, Click on F5 Edit/paste after current frame.
Click on F1, Edit/ copy, Click on F6 Edit/paste after current frame.
Edit/ Select all.
In paintshop, open layer 6, Edit/ copy merged, Turn off layer.
Open animation shop, paste as a new animation.
Edit/ copy, paste after current frame,
repeat paste affer current frame until you have 7 frames.
Edit/ select all.
Activate your working sliced animation,
Make sure all are still selected.
Edit/ Paste into selected frames.
8. In animation shop Edit/ Select all,
Crop your signature animation so it is
roughly 150 x 150
Animation/ re-size settings.
Resize to 150 x 150 (untab the ratio)
Create your copyright and initial in paintshop.
Copy and back in animation shop paste as a new animtaion.
Edit/ copy.
Activate your avatar.
Edit/ select all, edit/ propogate paste, Edit/ paste into selected frame.
Save as your avatar.


The perfect Winter
Tutorial written by and © to Bits N Bobs 19th August 2021.
Results are for personal use only.
No monetry gain allowed and that includes placing them behind a paid or donation based membership area.
You are not allowed to share/forward or translate any of my tutorials or place them on any blog, website, DVD or anywhere else without my permission.
These tutorials are written from my own ideas and any similarities to any other tutorial is purely coincidental.
All tutorials are for those with a working knowledge of paintshop pro.
I reserve the right to amend these terms at any time.
Supplies needed.
Font of choice for your name.
I am using Boshela
Tube of choice.
I am using the one included in the kit.
Scrap kit The perfect Winter by Creative Scraps by Crys
Available here for free at the time of writing this tutorial
A truly beautiful Kit created for a Truly beautiful woman, Tonya.
Missed by so many in the tagging world but especially those at Misfits.
Items I have used are...
Elements 1, 3, 7, 24, 26, 47, 62, 96, 99 wordart 2,
Paper 3
Mask of choice
I am using Vix-Winter20-Mask1
Plugin Filter
Muras Meister Copies download here
Note
This tutorial was written in PSP 9.
Double click on your font and minimize.
Open all other supplies in paintshop.
Open a new image 800 wide X 800 high at 72 dpi
1. Selections/ select all.
Open your paper,
Copy, paste into selection, select none.
Close paper.
Open your chosen mask and crop it.
You want the mask to fill the whole paper so no blank sides.
Once done minimize and go back to your working image
Layers/ new mask layer/ from image and select your mask.
Layers/ merge/merge group
insert ss1
2. Copy E62, paste as a new layer.
Image/resize 23%, all layers untabbed.
Copy wordart 2, paste as a new layer.
Image/resize 5%, all layers untabbed.
Position to the center of the flower
Add a drop shadow.
I am using...
V 0 - H 0 - O 80 - B 7 - Colour #000000
Lerys/ merge/ merge down
Effects/ Plugins/ Muras meister/ copies
Settings:
Shift mode/ Circle,
Tile mode/ Wraparound,
Blend mode/ Normal,
15, 50, 50, 0, 0, 0, 100, 0, 100, 0, 0, 30, 0
See screenshot below
insert ss2
Add a drop shadow.
I am using...
V 3 - H 3 - O 70 - B 9 - Colour #000000
Your flower frame should be automatically centered
but feel free to move it to your liking.
3. Now to add some elements.
Copy and paste element 96,
Layers/ arrange/ move down.
Position to the left.
Layers/ duplicate,
Image/ Mirror, Image/ flip.
Layers/ arrange / move down.
Using your eraser or selction tool,
remove any of the element from the center of the frame.
Layers/ merge/ merge down.
4. Activate your top layer.
Copy Element 1, paste as a new layer.
Image/ resize 69% all layers untabbed.
Adjust/ Sharpness/ sharpen
Position to your liking.
Mine is towards the left.
Add your drop shadow.
Copy element 2, paste as a new layer.
Position to your liking.
Mine is on the right hand side.
Add your drop shadow.
Copy element 99, paster as a new layer.
Position to your liking.
Mine is towards the right slightly.
Copy Element 3, paste as a new layer.
Image/ resize 31% all layers untabbed.
Position to your liking.
Mine is on her hand.
Erase the string on the star.
Add your drop shadow.
5. Copy and paste element 26 and resize to 31%
Position by the tubes feet.
Add your dropshadow.
Copy and paste element 24 and resize to 31%
Position at the base of the tree on the left.
Add your dropshadow.
Copy and paste element 86 and resize to 57%
Position at the bottom on the left corner.
Layers/ duplicate, Image/ Mirror, Layers/ Merge/ merge down.
Add your dropshadow.
Layers/ Arrange/ move down.
Keep moving down until it is below your tube layer.
Copy and paste element 47 and resize to 57%
Position at the bottom in the center to cover the gap.
Add your dropshadow.
Copy and paste element 98,
Layers/ duplicate,
Layers/Arrange/ Merge, merge down.
Copy and paste element 7 and resize to 39%
Adjust/ Sharpness/ sharpen.
Position to the bottom left corner of your tube.
Add your dropshadow.
6. Activate your top layer.
Copy and paste your wordart 3,
Resize it to 41%.
Adjust/ Colour balance/ Manual Colour correction.
Target #e292a2 Source #f4efdd
Layers/ Duplicate, Layers/ Merge/ Merge down.
Position to your liking.
Mine is in the center.
Layers/ Arrange/ Move down.
Repeat until it is 1 layer above your snow flurries.
I haven't added a drop shadow but it is your choice.
7. For your name, activate top layer.
I have used Boshela at size 48,
colour #e99baa in stroke and fill.
Stroke width 1, antialias smooth.
put it below the wordart.
Export and save in your chosen format.
I use a transparent png.
If you just want this tag you are finished.
If you want the set continue.
8. Open a new image,
700 x 250 at 72 dpi.
Now it is just a case of copying images from your main tag image
(remember you didn't merge it) and placing them wherever you want.
Here is mine.
Flood fill with #e290a0
Selections/ all, Selections/ Float, Selections/ defloat
Selections/ modify/ contract by 5, flood fill with #FFFFFF
Selections/ modify/ contract by 3, flood fill with #e290a0
Selections/ modify/ contract by 1, Edit/cut
Layers/ new raster layer, Arrange/ layers/ move down, floodfill #FFFFFF
Copy the background from your tag, paste as a new layer,
Layers/ duplicate, layers/ Merge/ merge down.
Position in the bottom left corner so the top laft corner of the background is showing
Layers/ duplicate, Image/ Mirror, layers/ Merge/ merge down.
Copy your penguin, paste and position in the bottom right corner.
Copy your cat, paste and position in the bottom left corner.
Copy your tube, paste and position in the center and slightly to the right.
Copy your winter wonderland wordart, paste and position at the bottom between the tube and the penguin.
adjust the layers blend mode to Dodge.
Copy your frame, paste and position on the left hand side,
adjust the layers blend mode to Overlay.
Layers/ Duplicate, Image/ mirror, layers/ Merge/ merge down.
Add your copyright info, add your name using
the same settings as step 7 of the tag, then save as you did your tag.
8. For your avatar open a new image,
180 x 180 at 72 dpi.
Copy your tag, paste as a new layer.
Position to your liking.
Layers/ merge/ merge visible.
Add your copyright info, initial and then save.


Wonder of Alice
Tutorial written by and © to Bits N Bobs 3rd July 2021.
Results are for personal use only.
No monetry gain allowed and that includes placing them behind a paid or donation based membership area.
You are not allowed to share/forward or translate any of my tutorials or place them on any blog, website, DVD or anywhere else without my permission.
These tutorials are written from my own ideas and any similarities to any other tutorial is purely coincidental.
All tutorials are for those with a working knowledge of paintshop pro.
I reserve the right to amend these terms at any time.
Supplies needed.
Font of choice for your name.
I am using Alice in Wonderland from Dafont HERE
Tube of choice.
I am using Alice in Wonderland by Dilara HERE
Tube is not to be used without the correct licence.
Scrap kit Alice by Wicked Diablo HERE
Items I have used are...
Elements 6, 7, 8, 20, 47, 48, 52, 59, 60,
Paper 1
Mask of choice
I am using cornered octagon by Essex Girl My supplies download HERE
Wording in the same zip file as the mask.
Note
This tutorial was written in PSP 9.
Double click on your font and minimize.
Open all other supplies in paintshop.
Remember to save your work regularly so you don't lose it.
Open a new image 650 wide X 650 high at 72 dpi
1. Selections/ select all.
Open your paper,
Copy, paste into selection, select none.
Close paper.
Layers/ new mask layer/ from image and select your mask.
Layers/ merge/merge group/ merge visible

2. Copy E7, paste as a new layer.
Image/ resize 75% position in the middle.
Add a drop shadow.
I am using...
V 3 - H 3 - O 80 - B 7 - Colour #000000
Copy your chosen tube and paste as a new layer.
Image/ resize 21% (all layers untabbed always)
position towards the bottom right hand side.
Add the same drop shadow as before.
Copy E20, paste as a new layer.
Image/ resize 29% and position so it looks like Alice is leaning on it.
Add the same drop shadow as before.
3. Now to add some more elements.
This is the longest part.
Copy E59, paste as a new layer.
Image/mirror, Image/ resize 19%
Position on top of the mushroom on the left of Alice.
Add the same drop shadow as before.
Copy E60, paste as a new layer.
Image/ resize 23%
Position to the left so i'ts pouring into the cup.
Add the same drop shadow as before.
Copy E6, paste as a new layer.
Image/mirror, Image/ resize 45%
Position to the left bottom corner.
Add the same drop shadow as before.
Copy E48, paste as a new layer.
Image/ resize 25%
Position to the right so it looks like it is coming out
of Alice's pocket and being held by the caterpillar.
Add the same drop shadow as before.

Copy E52, paste as a new layer.
Image/ resize 21%
Position to the right and layers/ arrange/ move down
until it is below the tube layer and position behind
the caterpillar.
Add the same drop shadow as before.
Copy E47, paste as a new layer.
Image/ resize 21%
Position ontop of the mushroom behind the teapot and cup
Add the same drop shadow as before.
Copy E8, paste as a new layer.
Image/ resize 27%
Position behind the rabbit.
Layers/ duplicate layer, Image/mirror.
Turn off your tube layer for this next part.
Move the right roses up slightly so it's not
in the keyhole of the book.
Turn your tube layer back on.
Right rose layer, Layers/ merge/ merge down.
Layers/ arrange/ move down X 2
Add the same drop shadow as before.
Copy E8 again, paste as a new layer.
Image/ resize 27%
Position towards the top left corner,
Layers/ duplicate layer, layers/ arrange/ move down X2.
Image/mirror layers/ merge/ merge down.
Add the same drop shadow as before.
5. Copy the wording file and paste as a new layer.
Position to your liking.
Mine is at the top center.
Layers/ properties, change the blend mode to Lighten.
DO NOT MERGE
6. Layers/ new raster layer.
Add your copyright info.
7. For your name.
Use font Alice in Wonderland, size 48 colour #f50203.
Layers/new raster layer.
Add your name, selections/modify/ expand by 3,
layers/new raster layer flood fill with white, #FFFFFF
Layers/ arrange/ move down.
Selections/modify/ expand by 1
layers/new raster layer flood fill with blue, #0058af
Layers/ arrange/ move down.
Selections/ select none.
Add the same drop shadow as before.
Active your red name layer,
Layers/ merge/ merge down X2
Layers/ properties, change the blend mode to Lighten.
Export and save in your chosen format.
I use a transparent png.
If you just want this tag you are finished.
If you want the set continue.
8. Open a new image,
600 x 250 at 72 dpi.
Now it is just a case of copying images from your main tag image
(remember you didn't merge it) and placing them wherever you want.
Here is mine.
9. Copy your top corner rose layer, paste as a new layer.
Posiotion to top left corner.
Layers/ duplicate/ duplpicate layer, Image/ mirror
Layers/ merge/ merge down. Layers/ duplicate, Image/ flip.
Layers/ merge/ merge down.
Add the same drop shadow as before.
Copy your rabbit layer, paste as a new layer.
Image/resize 65% position to the left.
Layers/ duplicate, Image/ mirror.
Copy Alice layer, paste as a new layer.
Image/resize 65% position to the left.
Copy your wording layer, paste as a new layer.
Position slightly towards the top center.
You want to be able to see the rabbit faces.
Activate your rabbit layer.
Copy your small cards, paste as a new layer.
Position in the center.
Copy your teacup, paste as a new layer.
Position towards the bottom.
Copy your teapot, paste as a new layer.
Position towards the bottom.
Now position your teacup and teapot so the are more central at the bottom.
Copy your cake layer, Image/ resize 39% position the the left of the teapot.
Layers/ duplicate, position to the right of the teacup.
10. Add your copyright info, add your name using
the same settings as step 7. then save as you did your tag.
11. For your avatar open a new image,
180 x 180 at 72 dpi.
Merge your first tag.
Copy your tag, paste as a new layer.
Position to your liking.
Layers/ merge/ merge visible.
Add your copyright info, add your initial using
the same settings as step 7. then save as you did your tag.
If you followed this whole tutorial thank you it took me forever to write it lol


Forever Love
Tutorial written by and © to Bits N Bobs 29th January 2018.
Results are for personal use only.
No monetry gain allowed and that includes placing them behind a paid or donation based membership area.
You may add a link for this tutorial on your forum etc.
You are not allowed to share/forward or translate any of my tutorials or place them on any blog, website, DVD or anywhere else without my permission.
These tutorials are written from my own ideas and any similarities to any other tutorial is purely coincidental.
All tutorials are for those with a working knowledge of paintshop pro.
I reserve the right to amend these terms at any time.
Supplies needed.
Font of choice for your name.
I am using Midnight Legend http://www.dafont.com/midnight-legend.font
Tube of choice.
I am using the one from the kit by Bits N Bobs available here
Mask of choice.
I am using Vix_Mask448 by Vix available in the supplies file
Scrap kit Forever Love by Bits N Bobs
Plugins required (optional)
Plugin - Penta.com dot and cross ( Garbage collection)
Note
Download extra supplies here
This tutorial was written in PSP 9 and
uses animation shop 3 for animation.
Open all supplies in paintshop except the font.
Double click on your font and minimize.
Add your mask to your mask folder.
Open a new image 600 X 250 at 72 dpi
1. Activate and copy paper 8.
Activate your working image.
Edit/ paste as a new layer.
Activate and copy paper 9.
Activate your working image.
Edit/ paste as a new layer.
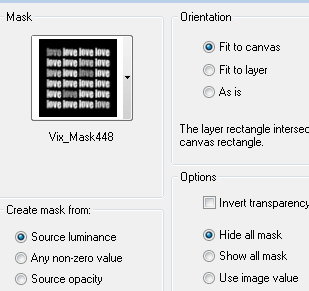
Layers/ Load/Save mask, Load mask from Disk,
scroll through and select your mask.
Tab Source Luminance, Fit to canvas, hide all mask.
Layers/ merge/ merge group.
Effects/ plugins/ penta.com/ Dots and cross
Amount:72 Cross distance:10 Cross width:2

Layers/ merge/ merge visible.
2. Copy element 71.
Paste as a new layer.
Image/ re-size to 500 pixels wide,
all layers un-tabbed.
Add a dropshadow of choice.
I have used V3 H3 O40 B7 Colour #000000

3. Copy element 3.
Paste as a new layer.
Image/ re-size to 250 pixels wide,
all layers un-tabbed.
Position to the top left corner
Add your drop shadow.
4. Copy element 7.
Paste as a new layer.
Image/ re-size to 150 pixels wide,
all layers un-tabbed.
Position to the bottom left corner
Add your drop shadow.
5. Copy element 72.
Paste as a new layer.
Image/ re-size to 100 pixels wide,
all layers un-tabbed.
Position towards the top
Add your drop shadow.
6. Copy element 12.
Paste as a new layer.
Image/ re-size to 240 pixels wide,
all layers un-tabbed.
Position towards the bottom
Add your drop shadow.
7. Copy your tube (element 80).
Paste as a new layer.
Image/ re-size to 400 pixels wide,
all layers un-tabbed.
Position towards the bottom right corner
Add your drop shadow.
Layers/ merge/ merge visible.
Adjust/ sharpness/ sharpen
8. Layers/ new raster layer.
Click on your forground pallette and pick a
colour from your tag for your border.
I have chosen #7bc4c2
Floodfill with your chosen colour.
Selections/ select all, Selections/ float, Selections/ defloat
Selections/ modify/ contract by 5
Edit/ cut, Selections/ select none.
9. Add all copyright info.
Export and save as a jpg
Matching AV
10. For a matching AV open a new image
180 x 180 and 72 dpi.
Copy your tag and paste as a new layer.
Position to your liking.
Layers/ new raster layer
Floodfill with your chosen colour.
Selections/ select all, Selections/ float, Selections/ defloat
Selections/ modify/ contract by 3
Edit/ cut, Selections/ select none.
Add copyright info and name,
export as before and save.


Tutorial written by and © to Bits N Bobs 19th March 2015.
Results are for personal use only.
No monetry gain allowed and that includes placing them behind a paid or donation based membership area.
You are not allowed to share/forward or translate any of my tutorials or place them on any blog, website, DVD or anywhere else without my permission.
These tutorials are written from my own ideas and any similarities to any other tutorial is purely coincidental.
All tutorials are for those with a working knowledge of paintshop pro.
I reserve the right to amend these terms at any time.
Supplies needed.
Font of choice for your name.
I am using Roundy
Tube of choice.
You will need one that contains a background
and one floral.
I am using two by Italia Ruotolo
Mine are Pink on pink and Pink study.
Both are available at MyTubedArt
These tubes are not to be used without the correct licence.
Animation of choice.
I am using SimoneAni125 available at Scrappybitoffun
Plugins needed.
I.C.NET FiltersUnlimited 2
Note
This tutorial was written in PSP 9.
Double click on your font and minimize.
Install your plugin.
Open a new image, 600 w x 250 h at 72 dpi.
1. Flood fill with a colour from your tube.
I have used #c16492
Copy the background layer of the tube.
Paste as a new layer.
Effects/ plugins/ ICNet software/ filters unlimited 2/
Distortion filters/ warp jump.
Intensity 200.
Image/ rotate/ free rotate / right, 90, rotate single layer tabbed.
Position to your liking.
I have mine so what's left of her face is at the top.
2. Layers/ merge down.
Edit/ copy.
Now we move over to animation shop.
Edit/ paste as a new animation.
Edit/ paste after current frame.
Repeat until you have 5 frames.
Edit/ select all.
Open your animation.
Edit/ select all, Edit/copy
Activate your tag,
Edit/ paste into selected frames.
Before you press anything move your animation to the right hand side.
If you don't like where it landed just undo and paste again
3. Go back over to paint shop.
Close the merged layer.
Copy your tube.
Paste as a new layer.
Position to the left.
Add a drop shadow of choice.
I have used...
O3, H3, O100, B13, Colour #000000

4. Copy your rose tube.
Paste as a new layer.
Image/ re-size to 420 pixels wide.
Image/ mirror, position to the right bottom corner.
Add a drop shadow of choice.
Layers/ arrange/ move down.
Activate top layer.
Layers/ new raster layer.
Add your text and copyright info.
Edit/ copy merged
Head back over to animation shop.
5. Edit/ paste as a new animation.
Edit/ paste after current frame.
Repeat until you have 5 frames.
Edit/ select all/ edit copy.
Activate your merged tag frames you animated earlier.
Edit/ select all.
Scroll in a little so you can see where you are going to paste.
Edit/ paste into selected frames.
Before you press anything move your image so it lines up correctly.
If you don't like where it landed just undo and paste again
File, Save as.
6. For your avatar crop your animation down to as close to 180 x 180 as you can.
Create your Initial in paintshop as normal, copy the file
and paste as a new animation into animation shop.
Copy the Initial in animation shop, activate your AV,
Edit/ select all, edit/ paste into selected frame and then file/save as.

Tutorial written by and © to Bits N Bobs 14th March 2015
Results are for personal use only.
No monetry gain allowed and that includes placing them behind a paid or donation based membership area.
You are not allowed to share/forward or translate any of my tutorials or place them on any blog, website,
DVD or anywhere else without my permission.
You are welcome though to add a link to my tutorial page.
These tutorials are written from my own ideas and any similarities to any other tutorial is purely coincidental.
All tutorials are for those with a working knowledge of paintshop pro.
I reserve the right to amend these terms at any time.
Supplies needed.
Font of choice for your name.
I am using PWComics.
Tube of choice.
I am using the tube Kiss Me by BitsNBobs
Tube is not to be used without the correct licence.
Mask of choice.
I am using Vix_Mask431 available here
Kit used is Lucky Charm add on freebie by Bits N Bobs
Items I have used are....
Paper 1
Elements 2, 11, 12, 16, 21, 26, 32,
Plugins
None required
Note
This tutorial was written in PSP 9.
Double click on your font and minimize.
Open all other supplies in paintshop.
1. Open a new image, 600 w x 600 h at 72 dpi.
Selections/ select all.
Copy your paper, paste into selection.
Layers/ new mask layer/ from image.
Look for your mask, source luminance checked
all else unchecked.
Click ok.
Selections/ none.
Layers/ merge/ merge group
2. Activate your frame
Image/re-size to 600 pixels wide.
Copy and paste as a new layer.
3. Copy element 2,
paste as a new layer.
Image/ re-size to 300 pixels wide,
all layers un-tabbed.
Position to your liking.
Mine is top right.
Using your lassoo selection erase any
part the is showing inside of the frame.
Add a dropshadow of choice.
For this tutorial I am using...
V3, H3, O70, B7, C#000000
4. Copy element 26,
paste as a new layer.
Image/ re-size to 300 pixels wide,
all layers un-tabbed.
Position to your liking.
Mine is top right over the leaves.
Layers/ duplicate, image/ mirror, image/ flip
Layers/ merge/ merge down
Add a dropshadow of choice.
5. Activate top layer.
Copy element 11,
paste as a new layer.
Image/ re-size to 300 pixels wide,
all layers un-tabbed.
Image/ mirror
Position to your liking.
Mine is bottom left corner.
Add a dropshadow of choice.
6. Copy element 16,
paste as a new layer.
Image/ re-size to 300 pixels wide,
all layers un-tabbed.
Position to your liking.
Mine is bottom right corner.
Add a dropshadow of choice.
7. Copy element 12,
paste as a new layer.
Image/ re-size to 185 pixels wide,
all layers un-tabbed.
Position to your liking.
Mine is bottom right corner.
Add a dropshadow of choice.
8. Copy element 21,
paste as a new layer.
Image/ re-size to 185 pixels wide,
all layers un-tabbed.
Position to your liking.
Mine is sitting on the top of the frame.
Add a dropshadow of choice.
9. Copy your full body tube.
Image/ re-size to 250 pixels wide,
all layers un-tabbed.
Position to your liking.
Mine is on the left hand side.
Add a dropshadow of choice.
10. On your original full body tube,
using your rectangle selection tool
select her butt section with the writing.
INSERT SS2
Copy and paste as a new layer onto your working tag.
Layers/ arrange layers/ move down,
Continue moving down until it is below the frame layer.
Position so the writing is in the diamond part of the frame.
Add a dropshadow of choice.
Erase an part outside of the diamond frame section.
11. On your original full body tube,
using your rectangle selection tool
select her head and shoulders.
INSERT SS3
Copy and paste as a new layer onto your working tag.
Image/ mirror.
Position so her face is in the square part of the frame.
Add a dropshadow of choice.
Erase an part outside of the square frame section.
12. Add any text you want.
Add your copy right info and name.
File/ export/ save as a png transparent bg or jpg if you want a white background.
13. For a forum set arrange the elements to your liking.
Edit/ copy merged.
Open a new image 600w x 250h
Edit/ paste as a new layer.
Position to your liking.
Add your copyright info, Name and then save.
14. For your avatar open a new image,
180 x 180 at 72 dpi.
Re-arrange your elements on your tag to your liking.
Edit/Copy merged , paste as a new layer.
Add your copyright info, initial and then save.


Heaven Sent
Tutorial written by and © to Bits N Bobs 7th March 2015
Results are for personal use only.
No monetry gain allowed and that includes placing them behind a paid or donation based membership area.
You are not allowed to share/forward or translate any of my tutorials or place them on any blog, website,
DVD or anywhere else without my permission.
You are welcome though to add a link to my tutorial page.
These tutorials are written from my own ideas and any similarities to any other tutorial is purely coincidental.
All tutorials are for those with a working knowledge of paintshop pro.
I reserve the right to amend these terms at any time.
Supplies needed.
Font of choice for your name.
I am using Miama.
Tube of choice.
I am using the tube from the kit by BitsNBobs
Tube is not to be used without the correct licence.
Scrap kit Heaven Sent available at Picsfordesign
Items I have used are....
Papers 15
Elements 1, 16, 36, 77, 103
Plugins
None required
Note
This tutorial was written in PSP 9.
Double click on your font and minimize.
Open all other supplies in paintshop.
1. Open a new image 600 wide X 250 high at 72 dpi
Open your paper,
Copy, paste as a new layer.
Layers/ merge/ merge visible.
2. Copy element 36, paste as a new layer.
Image/re-size 300 pixels wide all layers un-tabbed.
Add a drop shadow of choice.
I have used...
V 1, H 1, O 56, B 3, C #000000
Position to the left side.
Layers/ Duplicate layer, Image/ mirror.
Layers/ merge, merge down.
3. Copy element 5, paste as a new layer.
Layers/ Duplicate layer.
Layers/ merge, merge down.
Position towards the top left corner.
Layers/ Duplicate layer, Image/ mirror, Image/flip
Layers/ merge, merge down.
4. Copy element 16, paste as a new layer.
Position to your liking on the left.
Add a drop shadow of choice.
I have used...
V 3, H 3, O 56, B 6, C #000000
5. Copy element 77, paste as a new layer.
Layers/ arrange, move down, move down.
Add a drop shadow of choice.
I have used...
V 3, H 3, O 56, B 6, C #000000
6. Copy element 103, paste as a new layer.
Position to your liking.
Add a drop shadow of choice.
I have used...
V 3, H 3, O 56, B 6, C #000000
7. Add any text you want.
Add your copy right info and name.
File/ export/ save as a jpg.
8. For your avatar open a new image,
180 x 180 at 72 dpi.
Re-arrange your elements on your tag to your liking.
Edit/Copy merged , paste as a new layer.
Add your copyright info, initial and then save.


Tutorial written by and © to Bits N Bobs 5th January 2014.
Results are for personal use only.
No monetry gain allowed and that includes placing them behind a paid or
donation based membership area.
You may add a link for this tutorial on your forum etc.
You are not allowed to share/forward or translate any of my tutorials or
place them on any blog, website, DVD or anywhere else without my
permission.
These tutorials are written from my own ideas and any similarities to any
other tutorial is purely coincidental.
All tutorials are for those with a working knowledge of paintshop pro.
I reserve the right to amend these terms at any time.
Supplies needed.
Font of choice for your name.
I am using MV Boli
Tube of choice.
I am using Rebellicious by Bits N Bobs
available here at MTA
Tube is not to be used without the correct licence.
Rebel wordart available here
I have used rebel without a cause circle by Melissas Creationz
and rebel worart 5 by Alisha
Masks of choice.
I am using Vix_Mask363 by Vix
and Sg_double-stencilled eclipse1 by Essex Girl
both available here
Scrap kit of choice.
I have used Rock Princess by Bits N Bobs
I am using Papers 4, 10 and Elements 1, 13, 33, 34, 45, 52, 65,
Note
This tutorial was written in PSP 9.
Double click on your font and minimize.
Install your masks.
Open a new image, 600 w x 600 h at 72 dpi.
1. Copy paper 4.
Activate your working image.
Selections/ select all, paste into selction.
Layers/ Load/Save mask, Load mask from Disk,
scroll through and select your mask.
Tab Source Luminance, Fit to canvas, Invert transparency.

Layers/ merge/ merge group.
Selections/ select none.
2. Copy paper 10.
Activate your working image.
Selections/ select all, Layers/ new raster layer,
paste into selction.
Layers/ Load/Save mask, Load mask from Disk,
scroll through and select your mask.
Tab Source Luminance, Fit to canvas.

Selections/ select none.
Image/ Canvas size/ Width 800, height 800,
center placement.

3. Copy element 33.
Paste as a new layer.
Position to the left hand side and up slightly.
Layers/ Duplicate layer.
Image/ mirror, image/ flip.
Layers/ merge/ merge down.
Layers/ arrange/ send to bottom.
4. Activate your top layer.
Copy element 34.
Paste as a new layer.
Position to the right hand side and up slightly.
Layers/ Duplicate layer.
Image/ mirror, image/ flip.
Layers/ merge/ merge down.
Layers/ arrange/ send to bottom.
5. Activate your top layer.
Copy element 52.
Paste as a new layer.
Image/ re-size to 600 pixels wide,
all layers un-tabbed.
Position to the right hand side.
Layers/ Duplicate layer.
Image/ mirror, move up slightly.
Layers/ merge/ merge down.
Layers/ arrange/ move down.
6. Activate your top layer.
Copy element 13.
Paste as a new layer.
Image/ re-size to 600 pixels wide,
all layers un-tabbed.
Position to the right hand side,
move up slightly.
7. Copy element 65.
Paste as a new layer.
Using your raster deform tool turn
the element to a slight angle upwards.
Position towards the bottom center.
Layers/ Duplicate layer.
Image/ flip
8. Activate the bottom ric rac.
Copy element 1,
paste as a new layer.
Position towards the bottom
in the middle of the two black ric racs.
9. Copy element 45,
paste as a new layer.
Position so the skull is on top of the
white skull in the top left corner.
10. Activate the layer with the ribbon.
Copy your tube, paste as a new layer.
Erase your tubes legs from mid thigh down.
Position to the right so her thighs are
just below the ric racs but not hanging
out from the bottom.
Erase more from her legs if needed.
11. Copy your rebel without a cause circle word art.
Activate the circle mask layer.
Paste as a new selection and position over the top
of the top left corner circle.
Selections/ select none.
Copy the same word art again.
Paste as a new selection and position over the top
of the top left corner circle.
Selections/ select none.
12. Activate the top layer.
Copy the rebel worart 5,
paste as a new layer.
Using your magic wand select all of the
black rebel word.
Copy your paper 10, paste into selection.
Effects/ 3D effects/ inner bevel.
Bevel 2, Width 20, Smoothness 25, Depth 9,
Ambience 0, Shininess 0, Colour #ffffff, angle 315,
Intensity 50, elevation 30.
Selections/ select none.

13. Image/ re-size to 600 pixels wide,
all layers un-tabbed.
Position to the bottom in the center.
Selections/ select all, Selections/ float,
Selections/ defloat.
Selections/ modify/ expand by 3.
Layers/ new raster layer.
Flood fill with white #ffffff
Layers/ arrange/ move down.
Activate the rebel word art layer.
Layers/ merge/ merge down.
Selections/ select none.
14. Add a drop shadow to any layer you require.
I have used ...
O 3, V 3, O 100, B 7, Colour #000000
on all but the mask layers.
15. Layers/ merge/ merge visible.
Image/ re-size to 600 pixels high.
All layers tabbed.
Adjust/ sharpness/ sharpen.
Add all copyright info.
Export and save as a transparent png.
Matching AV
16. For a matching AV open a new image
180 x 180 and 72 dpi.
Copy your tag and paste as a new layer.
Position to your liking.
Mine has the top left corner showing.
Paste your tag again.
This time position so the skull of the dangly
is in the top left corner.
Layers/ arrange/ send to bottom.
Layers/ properties/ layer opacity to 50%.
Activate your top layer.
Copy your tube, paste as a new layer.
Image/ re-size to 130 pixels high.
All layers un-tabbed.
Adjust/ sharpness/ sharpen.
Add a dropshadow of choice.
I have used the same settings as before.
Layers/ merge/ merge flatten.
Add copyright info and name,
export as before and save.


VeryMany Christmas 2
Tutorial written by and © to Bits N Bobs 15th December 2013.
Results are for personal use only.
No monetry gain allowed and that includes placing them behind a paid or donation based
membership area.
You may add a link for this tutorial on your forum etc.
You are not allowed to share/forward or translate any of my tutorials or place them on any
blog, website, DVD or anywhere else without my permission.
These tutorials are written from my own ideas and any similarities to any other tutorial is
purely coincidental.
All tutorials are for those with a working knowledge of paintshop pro.
I reserve the right to amend these terms at any time.
Supplies needed.
Font of choice for your name.
I am using Sweetly Broken
Completion of this tutorial
Plugins
AAA frames fotoframe
This tutorial was written in PSP 9.
Double click on your font and minimize.
Open a new image, 600 w x 250 h at 72 dpi.
1. Copy your complete tag and paste as a new layer.
Layers/ duplicate.
Effects/ image effects/ seamless tiling.
Corner, bidirectional, H2, V0, T100,Linear.

Move this layer up slightly.
Layers/ duplicate, image/ flip.
Layers/ arrange/ move down.
Activate your top layer.
Layers/ merge/ merge down.
Layers/ arrange/ send to bottom.
2. Go back to your original completed tag.
Activate you freehand selection tool (lassoo),
Selection type: Freehand, Mode: Replace, Feather: 16
Range: 10, Smoothing: 0, Anti-alias tabbed.

Select closely around your text.
When done it will jump out due to the feather.
Edit/ copy.

Go back to your working image and paste as a new layer.
Position to your liking.
Mine is in the bottom right corner.
Layers/ merge/ merge flatten.
Effects/ plug ins/ AAA Frames/ Foto frame.
15, 0, 3, 0, 0, ,0 ,0 62

3. For a matching AV open a 180 x 180 new file.
Copy your tag image, paste as a new layer.
Position to your liking.
Layers/ merge/ merge visible.
Effects/ plug ins/ AAA Frames/ Foto frame.

4. Add your copyright info to both files.
File/ export/ transparent png and save.


Tutorial written by and © to Bits N Bobs 11th December 2013.
Results are for personal use only.
No monetry gain allowed and that includes placing them behind a paid or
donation based membership area.
You may add a link for this tutorial on your forum etc.
You are not allowed to share/forward or translate any of my tutorials or
place them on any blog, website, DVD or anywhere else without my
permission.
These tutorials are written from my own ideas and any similarities to any
other tutorial is purely coincidental.
All tutorials are for those with a working knowledge of paintshop pro.
I reserve the right to amend these terms at any time.
Supplies needed.
Font of choice for your name.
I am using Silent Reaction
Tube of choice.
I am using Winter Girl by Eugene Rzhevskii available at PFD
Tube is not to be used without the correct licence.
Snow animation here.
Thank you to Bev at Horseplaypastures for her permission to use this.
Please do not share or include this snow animation in any other tutorials
with first obtaining Bev's permission.
Plugins needed.
Penta.com dot and cross ( Garbage collection )
Scrap kit Winter Dreams by Bits N Bobs
I am using Elements 1, 2, 9, 16,
Note
This tutorial was written in PSP 9.
Double click on your font and minimize.
Install your plugins.
Open a new image, 600 w x 250 h at 72 dpi.
1. Flood fill with a colour from your tube.
I am using #3070b8 from the tube background.
Effects/ plugins/ penta.com/ dots and cross
72 - 10 - 2
Copy the background from your tube.
Paste as a new layer onto your working image.
Image re-size to 200 pixels wide.
All layers un-tabbed.
Lower the layer opacity to 65%
2. Copy element 1, paste as a new layer.
Image re-size to 50 pixels high.
Position to the top left hand side.
All layers un-tabbed.
Copy element 2, paste as a new layer.
Image re-size to 50 pixels high.
All layers un-tabbed.
Position to the top next to but slightly
lower down to the previous one.
Layers/ merge/ merge down.
Edit/ copy, paste as a new layer and
position next to the previous 2.
Edit/ copy, paste as a new layer and
position next to the previous.
Edit/ copy, paste as a new layer and
position next to the previous.
See tag for exact positions.
Merge/ merge down.
Repeat until snowflakes are all on the same layer.
Add a drop shadow of choice.
I have used...
V3, H3, O55, B5, Colour #000000
3. Copy your tube.
I am using the blue version.
Paste as a new layer.
Image re-size to 400 pixels wide.
Position to the left hand side so only
the face is showing.
Add a drop shadow of choice.
Change blend mode of this layer to overlay.
Add a drop shadow of choice.
4. Copy your tube again.
Paste as a new layer.
Image re-size to 400 pixels wide.
Image/ mirror.
Position slightly to the right.
Add a dropshadow of choice.
I have used....
V0, H0, O100, B11, Colour #000000
5. Activate element 9.
Use your freehand selection tool to cut away the tree.
Copy element 9.
Paste as a new layer.
Layers/ arrange/ move down.
Position to your liking.
See the tag for my positioning.
6. Copy element 16.
Paste as a new layer.
Change layer blend mode to overlay.
Position to your liking.
NOTE *****
If you do not wish to animate add your copyright info
name and save.
END NOTE *****
6. Close off the top five layers.
Active your bottom layer.
Layers/ merge / merge visible.
Rename this layer to BG.
Close the BG layer and open up the other 5.
Activate the top layer.
Layers/ merge / merge visible.
Open and active the BG layer.
We will now begin adding the snow.
7. On the snow image copy frame 1,
paste as a new layer on your working image.
Repeat until you have 10 layers of snow.
Now for the animation.
8. Close all snow layers except snow layer 1.
Edit/ Copy merged.
Open animation shop.
Paste as a new animation.
Return to paintshop.
Close snow layer 1.
Un hide snow layer 2.
Edit/ Copy merged.
Back to animation shop,
edit and paste after current layer.
Keep repeating these steps until you have activated snow layer 10.
Edit/ Copy merged.
Back to animation shop and paste after current layer.
Don't forget to create your name and copyright info in paintshop.
Copy it back to animation shop. Paste as a new animation.
Edit/ copy, activate your animation, edit/ select all, edit/ propogate
paste, edit/ paste
into selected frames and save.
9. In animation shop Edit/ Select all,
Crop your signature animation so it is
roughly 150 x 150
Animation/ re-size settings.
Resize to 150 x 150
Create your copyright and initial in paintshop.
Copy and back in animation shop paste as a new animtaion.
Edit/ copy.
Activate your avatar.
Edit/ select all, edit/ propogate paste, Edit/ paste into selected frame.
Save as your avatar.


Polka Danielle
Tutorial written by and © to Bits N Bobs 17th March 2013.
Results are for personal use only.
No monetry gain allowed and that includes placing them behind a paid or donation based membership area.
You are not allowed to share/forward or translate any of my tutorials or place them on any blog, website, DVD or anywhere else without my permission.
These tutorials are written from my own ideas and any similarities to any other tutorial is purely coincidental.
All tutorials are for those with a working knowledge of paintshop pro.
I reserve the right to amend these terms at any time.
Supplies needed.
Font of choice for your name.
I am using Springtime Flourish.
Tube of choice.
I am using Danielle by Bits N Bobs available at Picsfordesign
Tube is not to be used without the correct licence.
Plugins
AAA frames fotoframe
Mura's Seamless - Polka dot you can now download this file here on my account
Note
This tutorial was written in PSP 9.
Double click on your font and minimize.
Open all other supplies in paintshop.
Open a new image 600 wide X 250 high at 72 dpi
1. Flood fill with a colour from your tube.
I am using #e77c8f
Adjust/ add-remove noise,
Guassian and Monochrome checked, 60%

Effects/ Plugins/ Mura's Seamless/ Polkadot
0,0,0,255,65,11,6,24
Lower layer opacity to 50%

2. Copy your tube, paste as a new layer on your working image.
Image/rotate/ free rotate/ right 90 all layers untabbed.
Position in the center.
Effects/ Distortion effect/ Wave


Add a drops shadow of choice.
I have used...
V -5, H 2, O 68, B 15, C #000000

3. Copy your tube, paste as a new layer on your working image.
(if not using for easter do not incude her ears)
Image re-size to 80% all layers un-tabbed.
Position her face on the right hand side.
Layers/ properties/ blend mode to Lighten.
4. Copy your tube, paste as a new layer on your working image.
Position on the left hand side so her ruffles and bows are the main view.
Add a drop shadow of choice.
I have used the same settings as in step 2.
Layers/ properties/ blend mode to Lighten.
5. Copy your tube, paste as a new layer on your working image.
Position on the left hand side so her top part is the main view.
Add a drop shadow of choice.
I have used the same settings as in step 2.
6. Layers/ Duplicate, position next to the first one.
Layers/ Duplicate, position next to the second one.
Layers/ merge/ merge down.
Layers/ Duplicate, position next to the third one.
You should have 4 and a half images.
Activate the layer with the 2nd and 3rd tube.
Layers/ properties/ blend mode to Luminance Legacy.
Lower layer opacity to 45%.
Activate the layer with the 4th and half tube.
Layers/ properties/ blend mode to Multiply.
Lower layer opacity to 45%.
7. Close the layer with the 1st tube image.
Activate any other layer.
Layers/ merge/ merge visible.
Effects/ plug ins/ AAA Frames/ Foto frame.
10, 0, 5, 3, 0, ,0 ,0 100

8. Layers/ new raster layer.
Effects/ Plugins/ Mura's Seamless/ Polkadot
Same settings as step 1.
Adjust/ Colour Balance/ Manual colour correction.
Hue 245, Saturation 183, Lightness 167,
Colour # 000000 Target #e66886

9. Copy your tube, paste as a new layer.
Image/ re-size to 60%, position on the left
with her face in view.
Add a drop shadow.
Layers/ properties/ blend mode to Luminance Legacy.
Un tab your 1st tube image.
10. Layers/ new raster layer.
Add any text you want.
Add your copy right info and name.
Layers/ merge / merge visible and save.
11. For a matching AV open a 180 x 180 new file.
Copy your tag image, paste as a new layer.
Position to your liking.
Layers/ merge/ merge visible.
Effects/ plug ins/ AAA Frames/ Foto frame.
5, 0, 2, 1, 0, ,0 ,0 100

Layers/ add a new raster layer.
Add your copy right info and initial.
Layers/ merge / merge visible and save.
Stores


BNB Blinkie