


Tutorial written by and © to Bits N Bobs 17th January 2022.
Results are for personal use only.
No monetry gain allowed and that includes placing them behind a paid or donation based membership area.
You are not allowed to share/forward or translate any of my tutorials or place them on any blog, website, DVD or anywhere else without my permission.
These tutorials are written from my own ideas and any similarities to any other tutorial is purely coincidental.
All tutorials are for those with a working knowledge of paintshop pro.
I reserve the right to amend these terms at any time.
Supplies needed.
Font of choice for your name.
I am using Winter in January
Tube of choice.
I am using 102-2 by Anna Liwanag
Any sparkle you have.
I have included mine below if you would like to use it.

DSB Flux/ Linear transmission
Note
This tutorial was written in PSP 9.
Double click on your font and minimize.
Open all other supplies in paintshop.
Install any required plugins
Open a new image, 600 w x 250 h at 72 dpi.
1. On working image pick a colour from your tube and flood fill.
I have chosen black, #000000
Copy your tube, paste as a new layer on working image.
Image/ rotate/ free rotate/ left 90 all layers untabbed.
Effects/ Edge effects/ Enhance more.
Layers/ Duplicate layer.
Repeat so you have 4 layers.
Rename them 1 - 5 starting with your bottom flooded layer as Layer 1
2. Activate Layer 2
Effects/ Dsb flux/ Linear transmission.
Slice size 7, Offset 4, Blend -4, Direction Vertical.
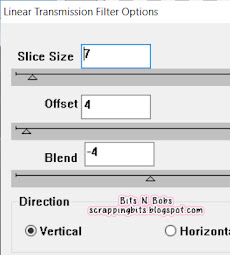
Layer 3 repeat the effect but change the Offset to 8.
Layer 4 repeat the effect but change the Offset to 12.
Layer 5 repeat the effect but change the Offset to 16.
3. Activate layer 2,
Copy your sparkle and paste as a new selection in several areas.
Where is entirely up to you but remember Selections./ Select None after each layer
Activate layer 3 and repeat, trying to place the sparkle in different areas.
Do the same for layers 4 and 5.
You should have finished with Layer 5 active.
4. Copy your tube, paste as a new layer.
Position to your liking on the right hand side.
Add a drop shadow off choice.
I am using...
V 3 - H 3 - O 65 - B 11 - Colour #000000

Add any text you wish on this layer.
I added 'You're As Cold As Ice' with the same dropshadow
Add your copyright info and name.
Layers/ merge/ Merge down, rename this to layer 6.
NOTE:
If not animating then you can File/ Export and save.
END NOTE:
ANIMATION.
Layers/ Duplicate, repeat so you have 4 of the floodfill layer.
Activate the top floodfilled layer,
Layers/ Arrange/ Move Up, repeat until it is below Layer 5.
Do the same so each layer (1-5) have a flood fill layer below it.
Once done activate Layer 5, Layers/ Merge/ Merge Down.
Rename back to layer 5
Activate Layer 4, Layers/ Merge/ Merge Down.
Rename back to layer 4
Repeat until each layer (2-5) is merged with it's flood filled
layer and renamed.
7. Turn off Layers 3-6) Activate layer 2, Edit/ copy merged, Turn off layer.
Open animation shop, paste as a new animation.
In paintshop, open layer 3, Edit/ copy merged, Turn off layer.
In animation shop, Edit/ paste after current frame.
In paintshop, open layer 4, Edit/ copy merged, Turn off layer.
In animation shop, Edit/ paste after current frame.
In paintshop, open layer 5, Edit/ copy merged, Turn off layer.
In animation shop, Edit/ paste after current frame.
Still in animation shop, Edit/ select all.
Click on F3, Edit/ copy, Click on F4 Edit/paste after current frame.
Click on F2, Edit/ copy, Click on F5 Edit/paste after current frame.
Click on F1, Edit/ copy, Click on F6 Edit/paste after current frame.
Edit/ Select all.
In paintshop, open layer 6, Edit/ copy merged, Turn off layer.
Open animation shop, paste as a new animation.
Edit/ copy, paste after current frame,
repeat paste affer current frame until you have 7 frames.
Edit/ select all.
Activate your working sliced animation,
Make sure all are still selected.
Edit/ Paste into selected frames.
8. In animation shop Edit/ Select all,
Crop your signature animation so it is
roughly 150 x 150
Animation/ re-size settings.
Resize to 150 x 150 (untab the ratio)
Create your copyright and initial in paintshop.
Copy and back in animation shop paste as a new animtaion.
Edit/ copy.
Activate your avatar.
Edit/ select all, edit/ propogate paste, Edit/ paste into selected frame.
Save as your avatar.


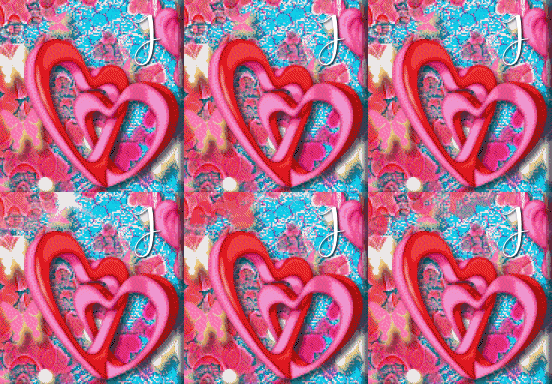
Candy Kisses
Tutorial written by and © to Bits N Bobs 12th January 2022.
Results are for personal use only.
No monetry gain allowed and that includes placing them behind a paid or donation based membership area.
You are not allowed to share/forward or translate any of my tutorials or place them on any blog, website, DVD or anywhere else without my permission.
These tutorials are written from my own ideas and any similarities to any other tutorial is purely coincidental.
All tutorials are for those with a working knowledge of paintshop pro.
I reserve the right to amend these terms at any time.
Supplies needed.
Font of choice for your name.
I am using Mister Valentine
Tube of choice.
I am using Cupids Bow is coming by Bits N Bobs
Tube is not to be used without the correct licence.
Scrap kit freebie Candy Kisses by Bits N Bobs
Items I have used are...
Elements 1, 5, 8,
Papes 1 and 2
Mask of choice
I am using mask 0316 by Simone
Animation
I am using Ani 253 by Simone
Note
This tutorial was written in PSP 9.
Double click on your font and minimize.
Open all other supplies in paintshop.
Install any required plugins
Re-size both papers to 600 pixels wide.
Open a new image, 600 w x 250 h at 72 dpi.
1. Open paper 1,
Copy, paste as a new layer on working image.
Effects/ Edge effects/ Enhance more.
Open paper 4,
Layers/ new mask layer/ from image and select your mask.
Layers/ merge/merge group
Copy, paste as a new layer on working image.
Effects/ Edge effects/ Enhance more.
2. Copy E1, paste as a new layer.
Re-size to 22%, all layers untabbed.
Position to your liking on the right.
Layers/ Duplicate, Image/ Mirror, Image/ Flip
Layers/ Merge/ Merge down.
Add a drop shadow.
I am using...
V 3 - H 3 - O 65 - B 5 - Colour #000000


Layers/ Merge/ merge visible.
File, save as PSP 1.
3. Open a new image, 600 w x 250 h at 72 dpi.
Copy E5, paste as a new layer.
Re-size to 11%, all layers untabbed.
Position to your liking in the top left corner.
Layers/ Duplicate, Image/ Mirror
Layers/ Merge/ Merge down.
Add a drop shadow.
I am using the same settings throughout.
4. Copy your chosen tube, paste as a new layer.
Re-size to 60%
Position to the left hand side.
Add dropshadow.
V 3 - H 3 - O 65 - B 5 - Colour #000000
5. Copy E8, paste as a new layer.
Re-size to 5%, all layers untabbed.
Position to your liking in the bottom right corner.
Add dropshadow.
V 3 - H 3 - O 65 - B 5 - Colour #000000
6. Copy paper 2, paste as a new layer.
Selections/Select all, Image/ crop to selection.
Selections/Select all, Selections /Modify, contract by 5,
Edit/ Cut.
Add dropshadow.
Repeat dropshadow with H -3 and V -3
7. Layers/ New raster layer and addd your copyright info
Layers/ Merge/ merge visible.
File, save as PSP 2.
For animation skip the step in the note below and skip to ANIMATION SHOP.
NOTE *****
If you don't want animation
Add your copyright info, Name and File/Export as jpg and save.
END NOTE *****
ANIMATION SHOP
8. Now we open animation shop.
Open PSP 1
Edit/ Copy, Paste after current frame.
Press Shift+Ctrl+L until you have a total of 16 frames
Or as many frames as your chosen animation has.
Edit/ Select all.
9. Open your chosen animation.
Edit/ Select all, Edit/ Copy
Go back to your working image,
Be sure all are still selected.
Edit/ Paste into selcted frames.
Click View/ Animation.
If you don't like it, undo and re paste into selected frames
and move your mouse before pasting so it's in a different position.
Placing an animation is always trial and error so don't worry if it takes a few attempts.
10. Go back to paintshop.
Activate PSP 2. Copy,
Back to Animation Shop and paste as a new animation.
Edit/ Copy, Paste after current frame.
Press Shift+Ctrl+L until you have a total of 16 frames
Or as many frames as your chosen animation has.
Edit/ Select all.
On working image, Edit/ paste into selected frames.
Be sure it lines up before placing.
File/ Optimiazation wizard
Customize then follow the screen shots for my settings.

You may need to adjust these setting depedning on your tube
but these are what I have used for this particular anamtion.
11. In animation shop Edit/ Select all,
Crop your signature animation so it is
roughly 150 x 150
Animation/ re-size settings.
Resize to 150 x 150 (untab the ratio)
Create your copyright and initial in paintshop.
Copy and back in animation shop paste as a new animtaion.
Edit/ copy.
Activate your avatar.
Edit/ select all, edit/ propogate paste, Edit/ paste into selected frame.
Save as your avatar.


Steampunked
Tutorial written by and © to Bits N Bobs 25th August 2021.
Results are for personal use only.
No monetry gain allowed and that includes placing them behind a paid or donation based membership area.
You are not allowed to share/forward or translate any of my tutorials or place them on any blog, website, DVD or anywhere else without my permission.
These tutorials are written from my own ideas and any similarities to any other tutorial is purely coincidental.
All tutorials are for those with a working knowledge of paintshop pro.
I reserve the right to amend these terms at any time.
Supplies needed.
Font of choice for your name.
I am using Candle Script demo
Tube of choice.
I am using Marianne by Chris Pastel
Scrap kit Steampunked by BitsNBobs
Available HERE for free at the time of writing this tutorial
Items I have used are...
Elements 1, 17, 18, 36, 39,
Paper 8
Mask of choice
I am using Vix-mask481 by Vix you can download this HERE
Plugin Filter
Garbage collections Pentacom Dot and Cross HERE
https://www.mediafire.com/file/hgj80b3a09t276w/mmCopies13.zip/file
Note
This tutorial was written in PSP 9.
Install any filters/plugins
Double click on your font and minimize.
Open all other supplies in paintshop.
Open a new image 800 wide X 800 high at 72 dpi
1. Selections/ select all.
Open your paper,
Copy, paste into selection, select none.
Close paper.
Open your chosen mask and crop it.
You want the mask to fill the whole paper so no blank sides.
Once done minimize and go back to your working image
Layers/ new mask layer/ from image and select your mask.
Layers/ merge/merge group
insert ss1
2. Copy E1, paste as a new layer.
Add a drop shadow.
I am using...
V 3 - H 3 - O 70 - B 9 - Colour #000000
insert ss2
Arrange your element to your liking.
I have left mine as is.
3. Copy and paste E39,
Using your magic wand select the blank spaces of the frame.
Hold down your shift key whilst doing so as there are more than one.
Selections/ modify/ expand by 15
Layers/ new raster layer
Flood fill with your colour of choice.
I am using #a66a45
Lyers/ arrange/ move down.
Selections/ select none.
Effects/ pentacom/ dots and cross
Amount: 134 Distance: 11 Width: 2
insert ss3
Layers/ properties/ blend mode/ screen
Opacity: 100, link set: 0, layers visible: checked
4. Activate your top layer.
Now to add some elements.
Copy E18, paste as a new layer.
Image/ resize 55% all layers untabbed.
Adjust/ Sharpness/ sharpen
Position to your liking.
Mine is in the bottom right corner.
Layers/ duplicate, Image/ flip, Image/ mirror
Layers/ merge/ merge down.
Add your drop shadow.
Copy E17, paste as a new layer.
Position to your liking.
Mine is in the top right corner.
Add your drop shadow.
Copy E36, paste as a new layer.
Image/ resize 55% all layers untabbed.
Adjust/ Sharpness/ sharpen
Position to your liking.
Mine is in the bottom left corner.
Add your drop shadow.
5. Be sure your top layer is active.
Copy your tube and paste as a new layer.
Image/ resize 55% all layers untabbed.
Adjust/ Sharpness/ sharpen
Position to your liking.
Mine is in the center.
Add your drop shadow.
Erase the bottom part of your tube so it looks like she is
popping out of the frame.
6. For your name, activate top layer.
I have used Candlescript Demo at size 65,
colour #e99baa
Export and save in your chosen format.
I use a transparent png.
If you just want this tag you are finished.
If you want an AV continue.
7. For your avatar open a new image,
180 x 180 at 72 dpi.
Copy your tag, paste as a new layer.
Position to your liking.
Layers/ merge/ merge visible.
Add your copyright info, initial and then save.


The perfect Winter
Tutorial written by and © to Bits N Bobs 19th August 2021.
Results are for personal use only.
No monetry gain allowed and that includes placing them behind a paid or donation based membership area.
You are not allowed to share/forward or translate any of my tutorials or place them on any blog, website, DVD or anywhere else without my permission.
These tutorials are written from my own ideas and any similarities to any other tutorial is purely coincidental.
All tutorials are for those with a working knowledge of paintshop pro.
I reserve the right to amend these terms at any time.
Supplies needed.
Font of choice for your name.
I am using Boshela
Tube of choice.
I am using the one included in the kit.
Scrap kit The perfect Winter by Creative Scraps by Crys
Available here for free at the time of writing this tutorial
A truly beautiful Kit created for a Truly beautiful woman, Tonya.
Missed by so many in the tagging world but especially those at Misfits.
Items I have used are...
Elements 1, 3, 7, 24, 26, 47, 62, 96, 99 wordart 2,
Paper 3
Mask of choice
I am using Vix-Winter20-Mask1
Plugin Filter
Muras Meister Copies download here
Note
This tutorial was written in PSP 9.
Double click on your font and minimize.
Open all other supplies in paintshop.
Open a new image 800 wide X 800 high at 72 dpi
1. Selections/ select all.
Open your paper,
Copy, paste into selection, select none.
Close paper.
Open your chosen mask and crop it.
You want the mask to fill the whole paper so no blank sides.
Once done minimize and go back to your working image
Layers/ new mask layer/ from image and select your mask.
Layers/ merge/merge group
insert ss1
2. Copy E62, paste as a new layer.
Image/resize 23%, all layers untabbed.
Copy wordart 2, paste as a new layer.
Image/resize 5%, all layers untabbed.
Position to the center of the flower
Add a drop shadow.
I am using...
V 0 - H 0 - O 80 - B 7 - Colour #000000
Lerys/ merge/ merge down
Effects/ Plugins/ Muras meister/ copies
Settings:
Shift mode/ Circle,
Tile mode/ Wraparound,
Blend mode/ Normal,
15, 50, 50, 0, 0, 0, 100, 0, 100, 0, 0, 30, 0
See screenshot below
insert ss2
Add a drop shadow.
I am using...
V 3 - H 3 - O 70 - B 9 - Colour #000000
Your flower frame should be automatically centered
but feel free to move it to your liking.
3. Now to add some elements.
Copy and paste element 96,
Layers/ arrange/ move down.
Position to the left.
Layers/ duplicate,
Image/ Mirror, Image/ flip.
Layers/ arrange / move down.
Using your eraser or selction tool,
remove any of the element from the center of the frame.
Layers/ merge/ merge down.
4. Activate your top layer.
Copy Element 1, paste as a new layer.
Image/ resize 69% all layers untabbed.
Adjust/ Sharpness/ sharpen
Position to your liking.
Mine is towards the left.
Add your drop shadow.
Copy element 2, paste as a new layer.
Position to your liking.
Mine is on the right hand side.
Add your drop shadow.
Copy element 99, paster as a new layer.
Position to your liking.
Mine is towards the right slightly.
Copy Element 3, paste as a new layer.
Image/ resize 31% all layers untabbed.
Position to your liking.
Mine is on her hand.
Erase the string on the star.
Add your drop shadow.
5. Copy and paste element 26 and resize to 31%
Position by the tubes feet.
Add your dropshadow.
Copy and paste element 24 and resize to 31%
Position at the base of the tree on the left.
Add your dropshadow.
Copy and paste element 86 and resize to 57%
Position at the bottom on the left corner.
Layers/ duplicate, Image/ Mirror, Layers/ Merge/ merge down.
Add your dropshadow.
Layers/ Arrange/ move down.
Keep moving down until it is below your tube layer.
Copy and paste element 47 and resize to 57%
Position at the bottom in the center to cover the gap.
Add your dropshadow.
Copy and paste element 98,
Layers/ duplicate,
Layers/Arrange/ Merge, merge down.
Copy and paste element 7 and resize to 39%
Adjust/ Sharpness/ sharpen.
Position to the bottom left corner of your tube.
Add your dropshadow.
6. Activate your top layer.
Copy and paste your wordart 3,
Resize it to 41%.
Adjust/ Colour balance/ Manual Colour correction.
Target #e292a2 Source #f4efdd
Layers/ Duplicate, Layers/ Merge/ Merge down.
Position to your liking.
Mine is in the center.
Layers/ Arrange/ Move down.
Repeat until it is 1 layer above your snow flurries.
I haven't added a drop shadow but it is your choice.
7. For your name, activate top layer.
I have used Boshela at size 48,
colour #e99baa in stroke and fill.
Stroke width 1, antialias smooth.
put it below the wordart.
Export and save in your chosen format.
I use a transparent png.
If you just want this tag you are finished.
If you want the set continue.
8. Open a new image,
700 x 250 at 72 dpi.
Now it is just a case of copying images from your main tag image
(remember you didn't merge it) and placing them wherever you want.
Here is mine.
Flood fill with #e290a0
Selections/ all, Selections/ Float, Selections/ defloat
Selections/ modify/ contract by 5, flood fill with #FFFFFF
Selections/ modify/ contract by 3, flood fill with #e290a0
Selections/ modify/ contract by 1, Edit/cut
Layers/ new raster layer, Arrange/ layers/ move down, floodfill #FFFFFF
Copy the background from your tag, paste as a new layer,
Layers/ duplicate, layers/ Merge/ merge down.
Position in the bottom left corner so the top laft corner of the background is showing
Layers/ duplicate, Image/ Mirror, layers/ Merge/ merge down.
Copy your penguin, paste and position in the bottom right corner.
Copy your cat, paste and position in the bottom left corner.
Copy your tube, paste and position in the center and slightly to the right.
Copy your winter wonderland wordart, paste and position at the bottom between the tube and the penguin.
adjust the layers blend mode to Dodge.
Copy your frame, paste and position on the left hand side,
adjust the layers blend mode to Overlay.
Layers/ Duplicate, Image/ mirror, layers/ Merge/ merge down.
Add your copyright info, add your name using
the same settings as step 7 of the tag, then save as you did your tag.
8. For your avatar open a new image,
180 x 180 at 72 dpi.
Copy your tag, paste as a new layer.
Position to your liking.
Layers/ merge/ merge visible.
Add your copyright info, initial and then save.

Tutorial written by and © to Bits N Bobs 6th July 2021.
Results are for personal use only.
No monetry gain allowed and that includes placing them behind a paid or donation based membership area.
You are not allowed to share/forward or translate any of my tutorials or place them on any blog, website, DVD or anywhere else without my permission.
These tutorials are written from my own ideas and any similarities to any other tutorial is purely coincidental.
All tutorials are for those with a working knowledge of paintshop pro.
I reserve the right to amend these terms at any time.
Supplies needed.
Download my supplies HERE including the mask
Font of choice for your name.
I am using Rage Italic from FontsGeek here
Tube of choice.
I am using Marie is coming by Jenny here
Tube is not to be used without the correct licence.
Mask of choice
I am using mask Christmas 5 by Essex girl (in the supply zip)
Note
This tutorial was written in PSP 9.
Double click on your font and minimize.
Open all other supplies in paintshop.
Open a new image 650 wide X 650 high at 72 dpi
1. Selections/ select all, Selections/ modify,
Selections/ modify contract by 30.
Copy your tube, paste into selection.
Effects/ Dsb flux/ Central mirror, Mirrors 9, Rotation 147
Selections/ modify/ expand by 15.
Layers/ new raster layer.
Flood fill with a colour from your tube.
I have chosen #1d5837
Layers/ arrange/ move down.
Selections/ select none.
Layers/ new mask layer/ from image and select your mask.
Layers/ merge/merge group/ merge visible

Activate your filtered tube layer and change the blend mode to lighten.
Lower the layer opacity to 75%
2. Copy and paste your tube as a new layer.
Position to your liking, mine is on the right hand side.
Add a drop shadow.
I am using...
V 3 - H 3 - O 80 - B 7 - Colour #000000
3. Activate your filtered tube layer,
Copy the fireplace, paster as a new layer.
Position up and to the left slightly.
Add the same drop shadow as before.
Copy Noel element, paste as a new layer.
Layers / resize to 41%, position on the to of the fireplace.
Add the same drop shadow as before.
4. Layers/ new raster layer.
Add your copyright info and name
export and save in your chosen format.
I use a transparent png.
5. For your avatar open a new image,
180 x 180 at 72 dpi.
Copy your tag, paste as a new layer.
Position to your liking.
Layers/ merge/ merge visible.
Add your copyright info, initial and then save.


Beautiful Mermaid
Tutorial written by and © to Bits N Bobs 1st July 2021.
Results are for personal use only.
No monetry gain allowed and that includes placing them behind a paid or donation based membership area.
You are not allowed to share/forward or translate any of my tutorials or place them on any blog, website, DVD or anywhere else without my permission.
These tutorials are written from my own ideas and any similarities to any other tutorial is purely coincidental.
All tutorials are for those with a working knowledge of paintshop pro.
I reserve the right to amend these terms at any time.
Supplies needed.
Font of choice for your name.
I am using Sun Sea Sand from Dafont
Tube of choice.
I am using Beautiful Mermaid by Alex Prihodko
Tube is not to be used without the correct licence.
Plugins
Graphnet plugins Funhouse available here
and DSB Flux available here
Note
This tutorial was written in PSP 9.
Double click on your font and minimize.
Open all other supplies in paintshop.
Open a new image 600 wide X 250 high at 72 dpi
1. Selection a colour from your tube and flood fill your image.
I am using #d1f9fe
Copy and then paste your tube onto your working image.
Position all the way to the right so just her tail is in your image.
Layers/duplicate, Image/mirror, Layers/merge/merge visible.
Effects/ plugins/ Funhouse/ Radial mirror (see screenshot below)

Effects/ plugins/ Funhouse/ Ring tile (see screenshot below)

2. Copy and then paste your tube onto your working image as a new layer.
Position to your liking, see screenshot below for mine. 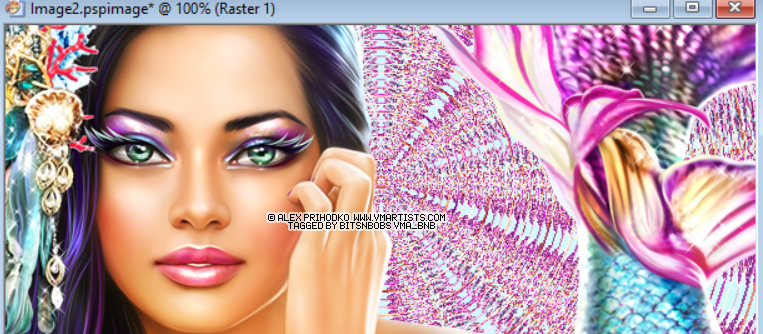
Add a drop shadow.
I am using...
V 3 - H 3 - O 80 - B 7 - Colour #000000 (see screenshot below)

Effects/ plugins/ DSB Flux/ Bubbles
10, 73, 21, 79 (see screenshot below)

Change your layers blend mode to hard light.
3. Copy and then paste your tube onto your working image as a new layer.
Image/ resize 35% all layers untabbed.
Position to your liking, mine is on the left.
Add a drop shadow using the same settings.
4. Copy and then paste your tube onto your working image as a new layer.
Position to your liking, mine is on the right.
You want her face taking up the right side of the tag.
Add a drop shadow using the same settings.
Change the layer blend mode to hard light and the layer opacity to 70%
5. Layers/ new raster layer.
Flood fill with a colour from your tube.
I am using #4cd8ef
Selections/select all, Selections/float, Selections/ defloat, Selections/ modify/ contract by 3,
flood fill with white #FFFFFF
Selections/ modify/ contract by 2, flood fill with the colour you selected mine is #4cd8ef
Selections/ modify/ contract by 1, hit delete on your keyboard.
Selections/ invert/ add your dropshadow.
6. Layers/ new raster layer.
Add your copyright info and name
export and save in your chosen format.
I use a transparent png.
7. For your avatar open a new image,
180 x 180 at 72 dpi.
Copy your tag, paste as a new layer.
Position to your liking.
Layers/ merge/ merge visible.
Add your copyright info, initial and then save.
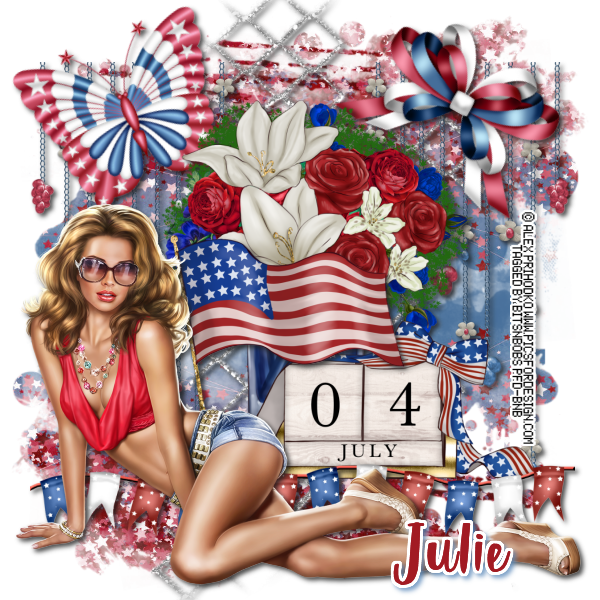

Celebrate July
Tutorial written by and © to Bits N Bobs 15th June 2021.
Results are for personal use only.
No monetry gain allowed and that includes placing them behind a paid or donation based membership area.
You are not allowed to share/forward or translate any of my tutorials or place them on any blog, website, DVD or anywhere else without my permission.
These tutorials are written from my own ideas and any similarities to any other tutorial is purely coincidental.
All tutorials are for those with a working knowledge of paintshop pro.
I reserve the right to amend these terms at any time.
Supplies needed.
Font of choice for your name.
I am using Sun Sea Sand from Dafont
Tube of choice.
I am using Summer is coming by Alex Prihodko
Tube is not to be used without the correct licence.
Scrap kit Celebrate July by Bits N Bobs
Items I have used are...
Elements 2, 3, 4, 8, 13, 38, 55, 69,
Paper 76
Mask of choice
I am using mask0186 from Scrappybitoffun
Note
This tutorial was written in PSP 9.
Double click on your font and minimize.
Open all other supplies in paintshop.
Open a new image 600 wide X 600 high at 72 dpi
1. Selections/ select all.
Open your paper,
Copy, paste into selection, select none.
Close paper.
Layers/ new mask layer/ from image and select your mask.
Layers/ merge/merge group/ merge visible

2. Copy E69, paste as a new layer.
Position to your liking, I left mine as is.
Add a drop shadow.
I am using...
V 3 - H 3 - O 80 - B 7 - Colour #000000
and
V -3 - H -3 - O 80 - B 7 - Colour #000000
Copy E55 paste as a new layer.
Image/ resize 45% position towards the right hand side.
Layers/ duplicate, Image/ mirroy, Layers/ merge/ merge down
Add the same drop shadow as before.

3. Now to add some elements.
Copy E8, paste as a new layer.
Image/ resize 45% same settings
Using your raster deform tool rotate and position to your liking.
Mine is in the top left corner.
Add your drop shadow.
Copy E13, paste as a new layer.
Image/ resize 45% same settings
Using your raster deform tool rotate and position to your liking.
Mine is in the top right corner.
Add your drop shadow.
4. Copy and paste E4 and resize to 57%
Position in the middle and slightly to the right.
Add your dropshadow.
Copy and paste E2 and resize to 57%
Position in the middle to the bottom of the flower pot.
Add your dropshadow.
5. Copy and paste E3 and resize to 47%
Position in the middle so it will be slighty behind your tube in the next step.
Add your dropshadow.
Copy and paste E38 and resize to 66%
Positon to the bottom of the date block.
Add your dropshadow.
6. Now copy and paste your tube.
If using the same as me resize it 41%.
Position to your liking.
Mine is at the bottom towards the left.
Add your dropshadow.
7. Layers/ new raster layer.
Add your copyright info and name
export and save in your chosen format.
I use a transparent png.
8. For your avatar open a new image,
180 x 180 at 72 dpi.
Copy your tag, paste as a new layer.
Position to your liking.
Layers/ merge/ merge visible.
Add your copyright info, initial and then save.


Tutorial written by and © to Bits N Bobs 19th March 2015.
Results are for personal use only.
No monetry gain allowed and that includes placing them behind a paid or donation based membership area.
You are not allowed to share/forward or translate any of my tutorials or place them on any blog, website, DVD or anywhere else without my permission.
These tutorials are written from my own ideas and any similarities to any other tutorial is purely coincidental.
All tutorials are for those with a working knowledge of paintshop pro.
I reserve the right to amend these terms at any time.
Supplies needed.
Font of choice for your name.
I am using Roundy
Tube of choice.
You will need one that contains a background
and one floral.
I am using two by Italia Ruotolo
Mine are Pink on pink and Pink study.
Both are available at MyTubedArt
These tubes are not to be used without the correct licence.
Animation of choice.
I am using SimoneAni125 available at Scrappybitoffun
Plugins needed.
I.C.NET FiltersUnlimited 2
Note
This tutorial was written in PSP 9.
Double click on your font and minimize.
Install your plugin.
Open a new image, 600 w x 250 h at 72 dpi.
1. Flood fill with a colour from your tube.
I have used #c16492
Copy the background layer of the tube.
Paste as a new layer.
Effects/ plugins/ ICNet software/ filters unlimited 2/
Distortion filters/ warp jump.
Intensity 200.
Image/ rotate/ free rotate / right, 90, rotate single layer tabbed.
Position to your liking.
I have mine so what's left of her face is at the top.
2. Layers/ merge down.
Edit/ copy.
Now we move over to animation shop.
Edit/ paste as a new animation.
Edit/ paste after current frame.
Repeat until you have 5 frames.
Edit/ select all.
Open your animation.
Edit/ select all, Edit/copy
Activate your tag,
Edit/ paste into selected frames.
Before you press anything move your animation to the right hand side.
If you don't like where it landed just undo and paste again
3. Go back over to paint shop.
Close the merged layer.
Copy your tube.
Paste as a new layer.
Position to the left.
Add a drop shadow of choice.
I have used...
O3, H3, O100, B13, Colour #000000

4. Copy your rose tube.
Paste as a new layer.
Image/ re-size to 420 pixels wide.
Image/ mirror, position to the right bottom corner.
Add a drop shadow of choice.
Layers/ arrange/ move down.
Activate top layer.
Layers/ new raster layer.
Add your text and copyright info.
Edit/ copy merged
Head back over to animation shop.
5. Edit/ paste as a new animation.
Edit/ paste after current frame.
Repeat until you have 5 frames.
Edit/ select all/ edit copy.
Activate your merged tag frames you animated earlier.
Edit/ select all.
Scroll in a little so you can see where you are going to paste.
Edit/ paste into selected frames.
Before you press anything move your image so it lines up correctly.
If you don't like where it landed just undo and paste again
File, Save as.
6. For your avatar crop your animation down to as close to 180 x 180 as you can.
Create your Initial in paintshop as normal, copy the file
and paste as a new animation into animation shop.
Copy the Initial in animation shop, activate your AV,
Edit/ select all, edit/ paste into selected frame and then file/save as.

Tutorial written by and © to Bits N Bobs 18th March 2015
Results are for personal use only.
No monetry gain allowed and that includes placing them behind a paid or donation based membership area.
You are not allowed to share/forward or translate any of my tutorials or place them on any blog, website,
DVD or anywhere else without my permission.
You are welcome though to add a link to my tutorial page.
These tutorials are written from my own ideas and any similarities to any other tutorial is purely coincidental.
All tutorials are for those with a working knowledge of paintshop pro.
I reserve the right to amend these terms at any time.
IM Stat - IM Tut
Supplies needed.
Font of choice for your name.
I am using Grinched.
Tube of choice.
I am using items from the kit
Mask of choice.
I am using Vix_Mask363 available here
Kit used is a FTU called Mad as a hatter by Kittz
Items I have used are....
Paper 4 and 7
Elements 8, 14, 15, 31, 38, 49, 52,
Plugins
None required
Note
This tutorial was written in PSP 9.
Double click on your font and minimize.
Open all other supplies in paintshop.
1. Open a new image, 600 w x 600 h at 72 dpi.
Selections/ select all.
Copy your paper 4, paste into selection.
Layers/ new mask layer/ from image.
Look for your mask, source luminance checked
all else unchecked.
Click ok.
Selections/ none.
Layers/ merge/ merge group

2. Copy your frame , element 15
paste as a new layer.
Image/re-size to 350 pixels wide,
all layers un-tabbed.
Select the center of the frame.
Selections/ modify/ expand by 3.
Layers/ new raster layer,
flood fill with white #ffffff.
Layers/ arrange/ move down.
Layers/ new raster layer.
Copy paper 4 and paste into selection.
Lower layer opacity to 40.
Copy whichever image or tube you want in the frame.
I have chosen element 49.
Paste as a new layer.
Selections/ invert, hit delete on your keyboard.
Selections/ select none.
Add a drop shadow of choice.
Activate your frame layer and add the same drop shadow.
For this tutorial I am using...
V3, H3, O80, B7, C#000000

3. Copy element 52
paste as a new layer.
Image/ re-size to 350 pixels wide,
all layers un-tabbed.
Layers/ arrange/ move down
Add a drop shadow of choice.
4. Copy element 8,
activate your top layer, paste as a new layer.
Image/ re-size to 350 pixels wide,
all layers un-tabbed.
Position to your liking.
Mine is positioned so the krazey lines up with the top center
of the frame.
Selections/ select all, Selections/ float,
Selections/modify, Selections/ expand by 2.
Layers/ new raster layer, flood fill with white, #ffffff
Layers/ arrange/ move down.
Selections/ select none.
Add a drop shadow of choice.
5. Copy element 14, paste as a new layer.
Image/ re-size to 250 pixels wide,
all layers un-tabbed.
Position to your liking.
Mine is bottom left corner.
Add a drop shadow of choice.
Copy element 31, paste as a new layer.
Image/ re-size to 300 pixels wide,
all layers un-tabbed.
Position to your liking.
Mine is at the bottom of the cup (element 14).
Add a drop shadow of choice.
6. Copy element 38, paste as a new layer.
Image/ re-size to 300 pixels wide,
all layers un-tabbed.
Position to your liking.
Mine is bottom right corner.
Add a drop shadow of choice.
7. Add any text you want.
Add your copy right info and name.
File/ export/ save as a png transparent bg or jpg if you want a white background.
8. For a forum set arrange the elements to your liking.
Edit/ copy merged.
Open a new image 600w x 250h
Edit/ paste as a new layer.
Position to your liking.
Add your copyright info, Name and then save.
9. For your avatar open a new image,
180 x 180 at 72 dpi.
Re-arrange your elements on your tag to your liking.
Edit/Copy merged , paste as a new layer.
Add your copyright info, initial and then save.

Tutorial written by and © to Bits N Bobs 15th March 2015
Results are for personal use only.
No monetry gain allowed and that includes placing them behind a paid or donation based membership area.
You are not allowed to share/forward or translate any of my tutorials or place them on any blog, website,
DVD or anywhere else without my permission.
You are welcome though to add a link to my tutorial page.
These tutorials are written from my own ideas and any similarities to any other tutorial is purely coincidental.
All tutorials are for those with a working knowledge of paintshop pro.
I reserve the right to amend these terms at any time.
Supplies needed.
Font of choice for your name.
I am using Daddys Girl
Tube of choice.
I am using the tube Bunnella by Bits N Bobs
Tube is not to be used without the correct licence.
Easter Treats Add On freebie by Bits N Bobs
Mask of choice.
I am using Vix_Mask431 available here
Items I have used are....
Paper 2
Elements 2, 3, 4, 8, 9, 13, 15,
Plugins
None required
Note
This tutorial was written in PSP 9.
Double click on your font and minimize.
Open all other supplies in paintshop.
1. Open a new image, 600 w x 600 h at 72 dpi.
Selections/ select all.
Copy your paper, paste into selection.
Layers/ new mask layer/ from image.
Look for your mask, source luminance checked
all else unchecked.
Click ok.
Selections/ none.
Layers/ merge/ merge group

2. Copy your frame , element 15
paste as a new layer.
Image/re-size to 350 pixels wide.
3. Copy element 10
paste as a new layer.
Image/ re-size to 300 pixels wide,
all layers un-tabbed.
Position to your liking.
Mine is bottom middle.
Layers/ arrange/ move down
Erase any part showing on the inside of your frame.
Add a drop shadow of choice.
For this tutorial I am using...
V3, H3, O50, B7, C#000000

4. Copy element 13,
paste as a new layer.
Image/ re-size to 300 pixels wide,
all layers un-tabbed.
Position to your liking.
Mine is bottom right.
Add a drop shadow of choice.
5. Copy element 3,
activate your bottom layer, paste as a new layer.
Image/ re-size to 400 pixels wide,
all layers un-tabbed.
Image/ flip
Position to your liking.
Mine is top right corner.
Layers/ duplicate, image/ mirror, image/ flip
Layers/ merge/ merge down
Add a drop shadow of choice.
Erase any part showing on the inside of your frame.
Adjust/ Colour Balance/ Manual colour correction,
Manual target colour tabbed,
Target: #80c6d8 Source: #c87a90

6. Copy element 4, paste as a new layer.
Image/ re-size to 400 pixels wide,
all layers un-tabbed.
Position to your liking.
Mine is top right corner.
Layers/ duplicate, image/ mirror, image/ flip
Layers/ merge/ merge down
Add a drop shadow of choice.
Erase any part showing on the inside of your frame.
7. Activate your top layer.
Copy element 8, paste as a new layer.
Image/ re-size to 200 pixels wide,
all layers un-tabbed.
Image/ mirror
Position to your liking.
Mine is bottom right corner.
Add a drop shadow of choice.
8. Copy element 9, paste as a new layer.
Image/ re-size to 200 pixels wide,
all layers un-tabbed.
Image/ mirror
Position to your liking.
Mine is bottom right corner.
Add a drop shadow of choice.
9. Copy your full body tube, paste as a new layer.
Image/ re-size to 350 pixels wide,
(this will be different if you use a different tube)
all layers un-tabbed.
Position to your liking.
Mine is on the left.
Add a drop shadow of choice.
10. Copy element 20, paste as a new layer.
Image/ re-size to 100 pixels wide,
all layers un-tabbed.
Position to your liking.
Mine is bottom left corner.
Add a dropshadow of choice.
11. Copy your tube close up.
Activate top layer.
Paste as a new layer.
Image/ mirror.
Image/ re-size to 400 pixels wide,
(this will be different if you use a different tube)
Add a drop shadow of choice.
Position to your liking.
Erase anything outside of the frame.
12. Add any text you want.
Add your copy right info and name.
File/ export/ save as a png transparent bg or jpg if you want a white background.
13. For a forum set arrange the elements to your liking.
Edit/ copy merged.
Open a new image 600w x 250h
Edit/ paste as a new layer.
Position to your liking.
Add your copyright info, Name and then save.
14. For your avatar open a new image,
180 x 180 at 72 dpi.
Re-arrange your elements on your tag to your liking.
Edit/Copy merged , paste as a new layer.
Add your copyright info, initial and then save.

Tutorial written by and © to Bits N Bobs 14th March 2015
Results are for personal use only.
No monetry gain allowed and that includes placing them behind a paid or donation based membership area.
You are not allowed to share/forward or translate any of my tutorials or place them on any blog, website,
DVD or anywhere else without my permission.
You are welcome though to add a link to my tutorial page.
These tutorials are written from my own ideas and any similarities to any other tutorial is purely coincidental.
All tutorials are for those with a working knowledge of paintshop pro.
I reserve the right to amend these terms at any time.
Supplies needed.
Font of choice for your name.
I am using PWComics.
Tube of choice.
I am using the tube Kiss Me by BitsNBobs
Tube is not to be used without the correct licence.
Mask of choice.
I am using Vix_Mask431 available here
Kit used is Lucky Charm add on freebie by Bits N Bobs
Items I have used are....
Paper 1
Elements 2, 11, 12, 16, 21, 26, 32,
Plugins
None required
Note
This tutorial was written in PSP 9.
Double click on your font and minimize.
Open all other supplies in paintshop.
1. Open a new image, 600 w x 600 h at 72 dpi.
Selections/ select all.
Copy your paper, paste into selection.
Layers/ new mask layer/ from image.
Look for your mask, source luminance checked
all else unchecked.
Click ok.
Selections/ none.
Layers/ merge/ merge group
2. Activate your frame
Image/re-size to 600 pixels wide.
Copy and paste as a new layer.
3. Copy element 2,
paste as a new layer.
Image/ re-size to 300 pixels wide,
all layers un-tabbed.
Position to your liking.
Mine is top right.
Using your lassoo selection erase any
part the is showing inside of the frame.
Add a dropshadow of choice.
For this tutorial I am using...
V3, H3, O70, B7, C#000000
4. Copy element 26,
paste as a new layer.
Image/ re-size to 300 pixels wide,
all layers un-tabbed.
Position to your liking.
Mine is top right over the leaves.
Layers/ duplicate, image/ mirror, image/ flip
Layers/ merge/ merge down
Add a dropshadow of choice.
5. Activate top layer.
Copy element 11,
paste as a new layer.
Image/ re-size to 300 pixels wide,
all layers un-tabbed.
Image/ mirror
Position to your liking.
Mine is bottom left corner.
Add a dropshadow of choice.
6. Copy element 16,
paste as a new layer.
Image/ re-size to 300 pixels wide,
all layers un-tabbed.
Position to your liking.
Mine is bottom right corner.
Add a dropshadow of choice.
7. Copy element 12,
paste as a new layer.
Image/ re-size to 185 pixels wide,
all layers un-tabbed.
Position to your liking.
Mine is bottom right corner.
Add a dropshadow of choice.
8. Copy element 21,
paste as a new layer.
Image/ re-size to 185 pixels wide,
all layers un-tabbed.
Position to your liking.
Mine is sitting on the top of the frame.
Add a dropshadow of choice.
9. Copy your full body tube.
Image/ re-size to 250 pixels wide,
all layers un-tabbed.
Position to your liking.
Mine is on the left hand side.
Add a dropshadow of choice.
10. On your original full body tube,
using your rectangle selection tool
select her butt section with the writing.
INSERT SS2
Copy and paste as a new layer onto your working tag.
Layers/ arrange layers/ move down,
Continue moving down until it is below the frame layer.
Position so the writing is in the diamond part of the frame.
Add a dropshadow of choice.
Erase an part outside of the diamond frame section.
11. On your original full body tube,
using your rectangle selection tool
select her head and shoulders.
INSERT SS3
Copy and paste as a new layer onto your working tag.
Image/ mirror.
Position so her face is in the square part of the frame.
Add a dropshadow of choice.
Erase an part outside of the square frame section.
12. Add any text you want.
Add your copy right info and name.
File/ export/ save as a png transparent bg or jpg if you want a white background.
13. For a forum set arrange the elements to your liking.
Edit/ copy merged.
Open a new image 600w x 250h
Edit/ paste as a new layer.
Position to your liking.
Add your copyright info, Name and then save.
14. For your avatar open a new image,
180 x 180 at 72 dpi.
Re-arrange your elements on your tag to your liking.
Edit/Copy merged , paste as a new layer.
Add your copyright info, initial and then save.


Angel of Bling
Tutorial written by and © to Bits N Bobs 17th March 2013.
Results are for personal use only.
No monetry gain allowed and that includes placing them behind a paid or donation based membership area.
You are not allowed to share/forward or translate any of my tutorials or place them on any blog, website, DVD or anywhere else without my permission.
These tutorials are written from my own ideas and any similarities to any other tutorial is purely coincidental.
All tutorials are for those with a working knowledge of paintshop pro.
I reserve the right to amend these terms at any time.
Supplies needed.
Font of choice for your name.
I am using Lapoints Road.
Tube of choice.
I am using HL0019 Angel by Henning Ludvigsen available at UpYourArt
Tube is not to be used without the correct licence.
Mask of choice.
I am using 327 by Vix available in my supplies below.
My Supplies here
My supplies are to be used for this tutorial only please.
Note
This tutorial was written in PSP 9.
Double click on your font and minimize.
Install your mask into your mask folder.
Open all other supplies in paintshop.
Open a new image 600 wide X 600 high at 72 dpi
1. Copy the main image from your tube (not the tube itself)
Paste as a new layer.
Layers/ Load-save mask/ From Disk and find your mask.
Tab Source luminance, Fit to canvas and Hide all mask.
If you use a different mask to me you may need to tab
Invert transparency.

Layers/ merge/ merge group.
Layers/ Dupicate, Layers/ merge/ merge down.
Layers/ Dupicate, Layers/ merge/ merge down.
Add a drop shadow of choice.
I have used....
V-3, H-3, O-40, B-1, Colour-#000000
2. With your selection tool set the selection type to circle.
Starting in the middle drag your circle to just inside
the third row of stars.
See screenshot below.
Selections/ Modify/ Feather by 9

3. Add a new raster layer.
Flood fill with #ffffff (white)
Layers/ arrange/ move down.
Add a new raster layer.
Copy the main image from your tube again (not the tube itself)
Paste into selection, layers/ properties, blend mode change to Luminance
Selections/ Select none.
4. Copy your shine file, paste as a new layer.
No need to move it.
Copy your shine file, paste as a new layer.
No need to move it.
5. Activate your top layer.
Copy your tube, paste as a new layer.
Image/ re-size to 90% all layers un-tabbed.
Add a drop shadow of choice.
I have used....
V-3, H-3, O-60, B-5, Colour-#000000
6. For a matching AV open a 180 x 180 new file.
Copy your tag image, paste as a new layer.
Position to your liking.
Layers/ add a new raster layer.
Add your copy right info and initial.
Layers/ merge / merge visible and save.
Stores


BNB Blinkie