

Friday 13 December 2013

Tutorial written by and © to Bits N Bobs 13th December 2013.
Results are for personal use only.
No monetry gain allowed and that includes placing them behind a paid or
donation based membership area.
You may add a link for this tutorial on your forum etc.
You are not allowed to share/forward or translate any of my tutorials or
place them on any blog, website, DVD or anywhere else without my
permission.
These tutorials are written from my own ideas and any similarities to any
other tutorial is purely coincidental.
All tutorials are for those with a working knowledge of paintshop pro.
I reserve the right to amend these terms at any time.
Supplies needed.
Font of choice for your name.
I am using Sweetly Broken
Tube of choice.
I am using Christy by VeryMany available at PFD
Tube is not to be used without the correct licence.
Masks - Monday Mask 2 and Mask-440 by Vix available here
Scrap kit Christmas Mayhem by Bits N Bobs
I am using Paper 6 and 7, Elements 10, 35, 36, 68, 71,
Note
This tutorial was written in PSP 9.
Double click on your font and minimize.
Install your plugins.
Open a new image, 600 w x 600 h at 72 dpi.
1. Copy paper 6.
Paste as a new layer onto your working image.
Image re-size to 390 pixels wide.
Layers/ new mask layer/ from image.
Look for your mask.
Source luminance tabbed all else un-tabbed.
Ok that.
Layers/ Merge/ merge group.

2. Copy paper 7.
Paste as a new layer onto your working image.
Image re-size to 390 pixels wide.
Layers/ new mask layer/ from image.
Look for your mask.
Source luminance tabbed all else un-tabbed.
Ok that.
Layers/ Merge/ merge group.
Layers/ merge/ merge down.
3. Copy element 66, paste as a new layer.
Position towards the bottom slightly.
Using your magic wand select the center of the frames.
Selections/ modify/ expand by 1.
Layers/ new raster layer.
Copy paper 7 again, paste into selection.
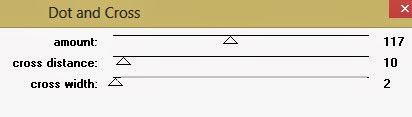
Effects/ plugins/ penta.com/ dots and cross
72 - 10 - 2
Layers/ properties/ blend mode to saturation legacy.
Layers/ arrange/ move down.
4. Copy element 71, paste as a new layer.
Image re-size to 350 pixels wide.
All layers un-tabbed.
Position to the top slightly.
Layers arrange/ move down.
Add a drop shadow of choice.
I have used...
V 2, H 2, O 50, B 5, Colour #000000
Activate the frame centers layer,
selections/ select all,
selections/ float, selections/ defloat.
Activate the ivy layer.
Hit delete on your keyboard.
5. Activate your top layer.
Copy element 10, paste as a new layer.
Image re-size to 400 pixels high.
All layers un-tabbed.
Position to hang on the corner of the right frame.
Add a drop shadow of choice.
6. Copy element 35,
Paste as a new layer.
Image re-size to 400 pixels high.
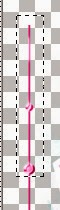
Using your rectangle selection tool
erase the top 3rd of the element as in the
screenshot below.
Position over the left frame corner.
Add a dropshadow of choice.
7. Copy element 36,
Paste as a new layer.
Image re-size to 350 pixels high.
Using your rectangle selection tool
erase the top 3rd of the element as before
Position over the left frame corner,
slightly to the right of the pink one.
Add a drop shadow of choice.
8. Activate your frames inners layer.
Activate your tube.
I am using the blue version.
Using your rectangle selection tool select
the face of your tube.
Paste as a new layer onto your working image.
Position in the center of the left frame.
Activate the frame centers layer,
selections/ select all,
selections/ float, selections/ defloat.
Selections/ invert.
Activate the face layer.
Hit delete on your keyboard.
Selections/ select none.
Use your eraser to rub out any overlap
that is in the middle frame.
Layers/ properties/ blend mode to hard light.
9. Activate your frames inners layer.
Activate your tube.
Using your rectangle selection tool again select
the top (or left) half of your tube.
Paste as a new layer onto your working image.
Position in the center of the right frame.
Image/ mirror, Image/ re-size to 350 high.
All layers un-tabbed.
Activate the frame centers layer,
selections/ select all,
selections/ float, selections/ defloat.
Selections/ invert.
Activate the top half layer.
Hit delete on your keyboard.
Selections/ select none.
Use your eraser to rub out any overlap
that is in the middle frame.
Lower the layer opacity to 80%
10. Copy your tube.
Paste as a new layer.
Image re-size to 250 pixels wide.
All layers un-tabbed.
Position towards the bottom.
Add a drop shadow of choice.
I have used...
V3, H3, O100, B7, Colour #000000
11. Copy element 68,
Paste as a new layer.
Image re-size to 350 pixels wide.
Position so the bottom green balls hang
below your tube.
Add a drop shadow of choice.
Layers/ arrange/ send to bottom.
12. Activate your top layer and add text of your choice.
Don't forget to add your copyright info before saving.
Export as a transparent png file and save.
Subscribe to:
Post Comments
(Atom)
Stores


BNB Blinkie


0 comments:
Post a Comment