Search This Blog
Followers
Tut writers
If you are using any of my kits in your tutorials please email me your blinkie and link so we can add you here.
scrappingbits AT googlemail.com
Thank you
scrappingbits AT googlemail.com
Thank you
TUT TOU
You are welcome to link to my tuts :O) All tutorials are written by and © to Bits N Bobs Results are for personal use only. No monetry gain allowed and that includes placing them behind a paid or donation based membership area. Supplies are to be used for the tutorial they are supplied with and NOT to be shared. You are not allowed to share/forward or translate any of my tutorials or place them on any blog, website, CD, DVD or anywhere else without my permission. These tutorials are written from my own ideas and any similarities to any other tutorial is purely coincidental. All tutorials are for those with a working knowledge of paintshop pro. I reserve the right to amend these terms at any time.
Sunday 5 January 2014
Rebel
Tutorial written by and © to Bits N Bobs 5th January 2014.
Results are for personal use only.
No monetry gain allowed and that includes placing them behind a paid or
donation based membership area.
You may add a link for this tutorial on your forum etc.
You are not allowed to share/forward or translate any of my tutorials or
place them on any blog, website, DVD or anywhere else without my
permission.
These tutorials are written from my own ideas and any similarities to any
other tutorial is purely coincidental.
All tutorials are for those with a working knowledge of paintshop pro.
I reserve the right to amend these terms at any time.
Supplies needed.
Font of choice for your name.
I am using MV Boli
Tube of choice.
I am using Rebellicious by Bits N Bobs
available here at MTA
Tube is not to be used without the correct licence.
Rebel wordart available here
I have used rebel without a cause circle by Melissas Creationz
and rebel worart 5 by Alisha
Masks of choice.
I am using Vix_Mask363 by Vix
and Sg_double-stencilled eclipse1 by Essex Girl
both available here
Scrap kit of choice.
I have used Rock Princess by Bits N Bobs
I am using Papers 4, 10 and Elements 1, 13, 33, 34, 45, 52, 65,
Note
This tutorial was written in PSP 9.
Double click on your font and minimize.
Install your masks.
Open a new image, 600 w x 600 h at 72 dpi.
1. Copy paper 4.
Activate your working image.
Selections/ select all, paste into selction.
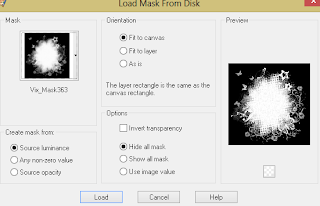
Layers/ Load/Save mask, Load mask from Disk,
scroll through and select your mask.
Tab Source Luminance, Fit to canvas, Invert transparency.

Layers/ merge/ merge group.
Selections/ select none.
2. Copy paper 10.
Activate your working image.
Selections/ select all, Layers/ new raster layer,
paste into selction.
Layers/ Load/Save mask, Load mask from Disk,
scroll through and select your mask.
Tab Source Luminance, Fit to canvas.

Layers/ merge/ merge group.
Selections/ select none.
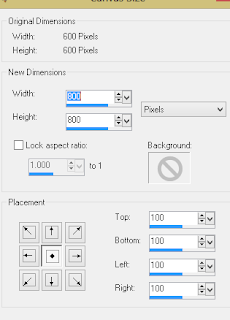
Image/ Canvas size/ Width 800, height 800,
center placement.

3. Copy element 33.
Paste as a new layer.
Position to the left hand side and up slightly.
Layers/ Duplicate layer.
Image/ mirror, image/ flip.
Layers/ merge/ merge down.
Layers/ arrange/ send to bottom.
4. Activate your top layer.
Copy element 34.
Paste as a new layer.
Position to the right hand side and up slightly.
Layers/ Duplicate layer.
Image/ mirror, image/ flip.
Layers/ merge/ merge down.
Layers/ arrange/ send to bottom.
5. Activate your top layer.
Copy element 52.
Paste as a new layer.
Image/ re-size to 600 pixels wide,
all layers un-tabbed.
Position to the right hand side.
Layers/ Duplicate layer.
Image/ mirror, move up slightly.
Layers/ merge/ merge down.
Layers/ arrange/ move down.
6. Activate your top layer.
Copy element 13.
Paste as a new layer.
Image/ re-size to 600 pixels wide,
all layers un-tabbed.
Position to the right hand side,
move up slightly.
7. Copy element 65.
Paste as a new layer.
Using your raster deform tool turn
the element to a slight angle upwards.
Position towards the bottom center.
Layers/ Duplicate layer.
Image/ flip
8. Activate the bottom ric rac.
Copy element 1,
paste as a new layer.
Position towards the bottom
in the middle of the two black ric racs.
9. Copy element 45,
paste as a new layer.
Position so the skull is on top of the
white skull in the top left corner.
10. Activate the layer with the ribbon.
Copy your tube, paste as a new layer.
Erase your tubes legs from mid thigh down.
Position to the right so her thighs are
just below the ric racs but not hanging
out from the bottom.
Erase more from her legs if needed.
11. Copy your rebel without a cause circle word art.
Activate the circle mask layer.
Paste as a new selection and position over the top
of the top left corner circle.
Selections/ select none.
Copy the same word art again.
Paste as a new selection and position over the top
of the top left corner circle.
Selections/ select none.
12. Activate the top layer.
Copy the rebel worart 5,
paste as a new layer.
Using your magic wand select all of the
black rebel word.
Copy your paper 10, paste into selection.
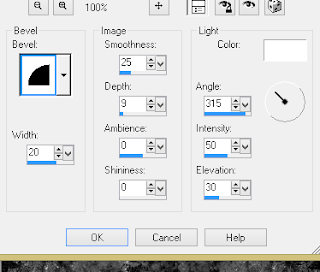
Effects/ 3D effects/ inner bevel.
Bevel 2, Width 20, Smoothness 25, Depth 9,
Ambience 0, Shininess 0, Colour #ffffff, angle 315,
Intensity 50, elevation 30.
Selections/ select none.

13. Image/ re-size to 600 pixels wide,
all layers un-tabbed.
Position to the bottom in the center.
Selections/ select all, Selections/ float,
Selections/ defloat.
Selections/ modify/ expand by 3.
Layers/ new raster layer.
Flood fill with white #ffffff
Layers/ arrange/ move down.
Activate the rebel word art layer.
Layers/ merge/ merge down.
Selections/ select none.
14. Add a drop shadow to any layer you require.
I have used ...
O 3, V 3, O 100, B 7, Colour #000000
on all but the mask layers.
15. Layers/ merge/ merge visible.
Image/ re-size to 600 pixels high.
All layers tabbed.
Adjust/ sharpness/ sharpen.
Add all copyright info.
Export and save as a transparent png.
Matching AV
16. For a matching AV open a new image
180 x 180 and 72 dpi.
Copy your tag and paste as a new layer.
Position to your liking.
Mine has the top left corner showing.
Paste your tag again.
This time position so the skull of the dangly
is in the top left corner.
Layers/ arrange/ send to bottom.
Layers/ properties/ layer opacity to 50%.
Activate your top layer.
Copy your tube, paste as a new layer.
Image/ re-size to 130 pixels high.
All layers un-tabbed.
Adjust/ sharpness/ sharpen.
Add a dropshadow of choice.
I have used the same settings as before.
Layers/ merge/ merge flatten.
Add copyright info and name,
export as before and save.
Tutorial written by and © to Bits N Bobs 5th January 2014.
Results are for personal use only.
No monetry gain allowed and that includes placing them behind a paid or
donation based membership area.
You may add a link for this tutorial on your forum etc.
You are not allowed to share/forward or translate any of my tutorials or
place them on any blog, website, DVD or anywhere else without my
permission.
These tutorials are written from my own ideas and any similarities to any
other tutorial is purely coincidental.
All tutorials are for those with a working knowledge of paintshop pro.
I reserve the right to amend these terms at any time.
Supplies needed.
Font of choice for your name.
I am using MV Boli
Tube of choice.
I am using Rebellicious by Bits N Bobs
available here at MTA
Tube is not to be used without the correct licence.
Rebel wordart available here
I have used rebel without a cause circle by Melissas Creationz
and rebel worart 5 by Alisha
Masks of choice.
I am using Vix_Mask363 by Vix
and Sg_double-stencilled eclipse1 by Essex Girl
both available here
Scrap kit of choice.
I have used Rock Princess by Bits N Bobs
I am using Papers 4, 10 and Elements 1, 13, 33, 34, 45, 52, 65,
Note
This tutorial was written in PSP 9.
Double click on your font and minimize.
Install your masks.
Open a new image, 600 w x 600 h at 72 dpi.
1. Copy paper 4.
Activate your working image.
Selections/ select all, paste into selction.
Layers/ Load/Save mask, Load mask from Disk,
scroll through and select your mask.
Tab Source Luminance, Fit to canvas, Invert transparency.

Layers/ merge/ merge group.
Selections/ select none.
2. Copy paper 10.
Activate your working image.
Selections/ select all, Layers/ new raster layer,
paste into selction.
Layers/ Load/Save mask, Load mask from Disk,
scroll through and select your mask.
Tab Source Luminance, Fit to canvas.

Selections/ select none.
Image/ Canvas size/ Width 800, height 800,
center placement.

3. Copy element 33.
Paste as a new layer.
Position to the left hand side and up slightly.
Layers/ Duplicate layer.
Image/ mirror, image/ flip.
Layers/ merge/ merge down.
Layers/ arrange/ send to bottom.
4. Activate your top layer.
Copy element 34.
Paste as a new layer.
Position to the right hand side and up slightly.
Layers/ Duplicate layer.
Image/ mirror, image/ flip.
Layers/ merge/ merge down.
Layers/ arrange/ send to bottom.
5. Activate your top layer.
Copy element 52.
Paste as a new layer.
Image/ re-size to 600 pixels wide,
all layers un-tabbed.
Position to the right hand side.
Layers/ Duplicate layer.
Image/ mirror, move up slightly.
Layers/ merge/ merge down.
Layers/ arrange/ move down.
6. Activate your top layer.
Copy element 13.
Paste as a new layer.
Image/ re-size to 600 pixels wide,
all layers un-tabbed.
Position to the right hand side,
move up slightly.
7. Copy element 65.
Paste as a new layer.
Using your raster deform tool turn
the element to a slight angle upwards.
Position towards the bottom center.
Layers/ Duplicate layer.
Image/ flip
8. Activate the bottom ric rac.
Copy element 1,
paste as a new layer.
Position towards the bottom
in the middle of the two black ric racs.
9. Copy element 45,
paste as a new layer.
Position so the skull is on top of the
white skull in the top left corner.
10. Activate the layer with the ribbon.
Copy your tube, paste as a new layer.
Erase your tubes legs from mid thigh down.
Position to the right so her thighs are
just below the ric racs but not hanging
out from the bottom.
Erase more from her legs if needed.
11. Copy your rebel without a cause circle word art.
Activate the circle mask layer.
Paste as a new selection and position over the top
of the top left corner circle.
Selections/ select none.
Copy the same word art again.
Paste as a new selection and position over the top
of the top left corner circle.
Selections/ select none.
12. Activate the top layer.
Copy the rebel worart 5,
paste as a new layer.
Using your magic wand select all of the
black rebel word.
Copy your paper 10, paste into selection.
Effects/ 3D effects/ inner bevel.
Bevel 2, Width 20, Smoothness 25, Depth 9,
Ambience 0, Shininess 0, Colour #ffffff, angle 315,
Intensity 50, elevation 30.
Selections/ select none.

13. Image/ re-size to 600 pixels wide,
all layers un-tabbed.
Position to the bottom in the center.
Selections/ select all, Selections/ float,
Selections/ defloat.
Selections/ modify/ expand by 3.
Layers/ new raster layer.
Flood fill with white #ffffff
Layers/ arrange/ move down.
Activate the rebel word art layer.
Layers/ merge/ merge down.
Selections/ select none.
14. Add a drop shadow to any layer you require.
I have used ...
O 3, V 3, O 100, B 7, Colour #000000
on all but the mask layers.
15. Layers/ merge/ merge visible.
Image/ re-size to 600 pixels high.
All layers tabbed.
Adjust/ sharpness/ sharpen.
Add all copyright info.
Export and save as a transparent png.
Matching AV
16. For a matching AV open a new image
180 x 180 and 72 dpi.
Copy your tag and paste as a new layer.
Position to your liking.
Mine has the top left corner showing.
Paste your tag again.
This time position so the skull of the dangly
is in the top left corner.
Layers/ arrange/ send to bottom.
Layers/ properties/ layer opacity to 50%.
Activate your top layer.
Copy your tube, paste as a new layer.
Image/ re-size to 130 pixels high.
All layers un-tabbed.
Adjust/ sharpness/ sharpen.
Add a dropshadow of choice.
I have used the same settings as before.
Layers/ merge/ merge flatten.
Add copyright info and name,
export as before and save.
Labels:Bits N Bobs,Forum sets,MTA
Subscribe to:
Post Comments
(Atom)
BNB Blinkie

Tuts Of The Week
Labels
- ! missing kits
- Alex Prihodko
- Amberly Berendson
- AMI
- Angela Newman
- Animated
- Arthur Crowe
- Autumn
- Babe-a-licious
- Bits N Bobs
- C.I.L.M
- Camilla Drakenborg
- CDO
- Christmas
- Competitions
- Cris Ortega
- Danielle Pioli
- Double Impact
- Easter
- Elegance Fly
- Elias Chatzoudis
- Elizabeth Austin
- Enamorte
- Exquisite Scraps
- Fantasia
- Forum sets
- Free Fonts
- FTU Tubes
- FTU Tutorials
- Gorjuss
- Gothic
- Incredimal Stationary
- Ismael Rac
- Italia Ruotolo
- James Jacks
- Jamie Kidd
- Jose Cano
- Karen Middleton
- KatNKDA
- KennyK
- Masks
- Maxine Gadd
- MPT
- MTA
- Mystical Scraps
- New Year
- Nice N Easy
- Nicholas Garton
- No scraps
- Orkus Art
- PFD
- PMTWS
- PTE
- PTU Tutorials
- Rachael Anderson
- Rachael Huntington
- Rachel Tallamy
- SATC
- Selena Fenech
- Shawn Palek
- Spring
- St.Patricks
- Steampunk
- Susan Mckirvergan
- Tag templates
- Thanksgiving
- UpYourArt
- Valentines
- Very Many
- Wilma4Ever
- ZlataM


0 comments:
Post a Comment