Search This Blog
Followers
Tut writers
If you are using any of my kits in your tutorials please email me your blinkie and link so we can add you here.
scrappingbits AT googlemail.com
Thank you
scrappingbits AT googlemail.com
Thank you
TUT TOU
You are welcome to link to my tuts :O) All tutorials are written by and © to Bits N Bobs Results are for personal use only. No monetry gain allowed and that includes placing them behind a paid or donation based membership area. Supplies are to be used for the tutorial they are supplied with and NOT to be shared. You are not allowed to share/forward or translate any of my tutorials or place them on any blog, website, CD, DVD or anywhere else without my permission. These tutorials are written from my own ideas and any similarities to any other tutorial is purely coincidental. All tutorials are for those with a working knowledge of paintshop pro. I reserve the right to amend these terms at any time.
Sunday, 6 September 2009

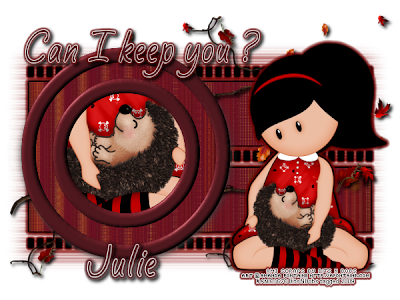
Can I keep you ?
Tutorial written by and © to Bits N Bobs 6th September 2009.
Results are for personal use only.
No monetry gain allowed and that includes placing them behind a paid or donation based membership area.
You are not allowed to share/forward or translate any of my tutorials or place them on any blog, website, DVD or anywhere else without my permission.
These tutorials are written from my own ideas and any similarities to any other tutorial is purely coincidental.
All tutorials are for those with a working knowledge of paintshop pro.
I reserve the right to amend these terms at any time.
Supplies needed.
Font of choice for your name and text.
I am using Silver Script
Tube of choice.
I am using tube AF145 Can I keep you by Amanda Fontaine
Tubes are not to be used without an AMI license
Scrap kit 'Feels like Autumn by Bits N Bobs
Scraps I am using from this kit are element 3 and paper 7
Template I recycle boys from butterfly flutterby Creations
This tutorial was written in PSP 9
Note
Open all the supplies in paintshop except the font.
Double click on your font and minimize.
1. Open template and close off the following layers.
BflyFly Copy Right, Boy Wordart, Boy outline, Boy fill, I Recycle boys wordart and background.
Activate mask layer, Adjust/ colour balance/ manual colour correction/ manual target colour H 2, S 255, L 67
2. Activate top rectangle, layers/ merge/ merge down, selections/ select all, selection/ float, selections/ defloat, layers/ new raster layer, re-size paper 7 to 600 pixels wide, copy, paste into selection.
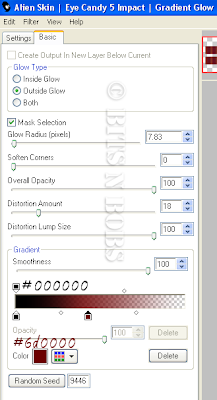
Add a gradient glow effect via your plug ins as per the settings below. Selections/ select none.

3. Activate circle fill, selections/ select all, selection/ float, selections/ defloat, layers/ new raster layer, copy paper, paste into selection, selections/ select none.
4. Re-size element 3 to 400 pixels high, copy, paste as a new layer, image/ mirror, position, layers/ arrange/ move down, duplicate layer, image/ flip, position, layers/ merge/ merge down
5. Re-size your tube to 350 pixels high, copy, paste as a new layer, apply gradient glow , setting are the same so hit ok.
6. Un do the re-size on your original tube, copy, paste as a new layer, image/ mirror, position so the hedgehog is in the middle of the circle frame.
Activate Back circle layer, selections/ select all, selections/ float, selections/ de float, selections/ modify/ contract by 9, selections/ invert. Activate your big tube layer and hit delete on your keyboard. Selections/ select none.
7. Copy element 3, paste as a new layer, image/ mirror, image/ flip, position, layers/ arrange/ move down, add a dropshadow, settings will remain the same.
V 3, H 3, O 100, B 7.00, C #000000
Activate your other leaf layer and move it down below the circle fill layer and add a drop shadow.
8. Activate circle frame, selections/ select all, selections/ float, selections/ de float, selections/ modify/ expand by 3.
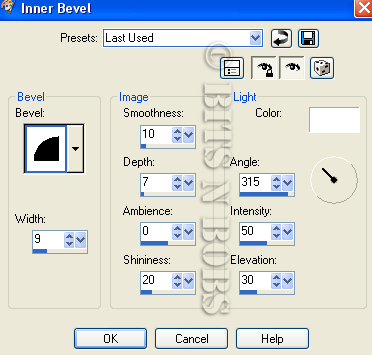
Flood fill with #4f181e, effects/ 3D effects/ inner bevel with the settings below.
 9. Activate small rectangle lines, add a gradient glow, same settings as before.
10. Add a new raster layer, layers/ arrange/ bring to the top, add any text your require.
Add the same gradient glow as before but swapping the black #000000 for white # ffffff then add a drop shadow if required.
11. Add your copyright info, name and export as a png or jpg and save.
Labels:AMI,Bits N Bobs,PTU Tutorials
Subscribe to:
Post Comments
(Atom)
BNB Blinkie

Tuts Of The Week
Labels
- ! missing kits
- Alex Prihodko
- Amberly Berendson
- AMI
- Angela Newman
- Animated
- Arthur Crowe
- Autumn
- Babe-a-licious
- Bits N Bobs
- C.I.L.M
- Camilla Drakenborg
- CDO
- Christmas
- Competitions
- Cris Ortega
- Danielle Pioli
- Double Impact
- Easter
- Elegance Fly
- Elias Chatzoudis
- Elizabeth Austin
- Enamorte
- Exquisite Scraps
- Fantasia
- Forum sets
- Free Fonts
- FTU Tubes
- FTU Tutorials
- Gorjuss
- Gothic
- Incredimal Stationary
- Ismael Rac
- Italia Ruotolo
- James Jacks
- Jamie Kidd
- Jose Cano
- Karen Middleton
- KatNKDA
- KennyK
- Masks
- Maxine Gadd
- MPT
- MTA
- Mystical Scraps
- New Year
- Nice N Easy
- Nicholas Garton
- No scraps
- Orkus Art
- PFD
- PMTWS
- PTE
- PTU Tutorials
- Rachael Anderson
- Rachael Huntington
- Rachel Tallamy
- SATC
- Selena Fenech
- Shawn Palek
- Spring
- St.Patricks
- Steampunk
- Susan Mckirvergan
- Tag templates
- Thanksgiving
- UpYourArt
- Valentines
- Very Many
- Wilma4Ever
- ZlataM


0 comments:
Post a Comment