Search This Blog
Followers
Tut writers
If you are using any of my kits in your tutorials please email me your blinkie and link so we can add you here.
scrappingbits AT googlemail.com
Thank you
scrappingbits AT googlemail.com
Thank you
TUT TOU
You are welcome to link to my tuts :O) All tutorials are written by and © to Bits N Bobs Results are for personal use only. No monetry gain allowed and that includes placing them behind a paid or donation based membership area. Supplies are to be used for the tutorial they are supplied with and NOT to be shared. You are not allowed to share/forward or translate any of my tutorials or place them on any blog, website, CD, DVD or anywhere else without my permission. These tutorials are written from my own ideas and any similarities to any other tutorial is purely coincidental. All tutorials are for those with a working knowledge of paintshop pro. I reserve the right to amend these terms at any time.
Monday, 26 October 2009
Click tag to view the animation
8.
On your 2nd image, effects/ eye candy 5 nature/ Fire
Same settings as before but click the random seed button
Selections/ invert, delete, sleections/ select none, layers/ mere/ merge visible.
File/ save as, save as image 2 to your desktop.
10.
On your 3rd image, effects/ eye candy 5 nature/ Fire
Same settings as before but click the random seed button
Selections/ invert, delete, sleections/ select none, layers/ mere/ merge visible.
File/ save as, save as image 3 to your desktop.
11.
Open animation shop.
File/ animation wizard then follow the screen shots clicking next after each one.
On the add image part browse to where you saved your files and add them all, click next then finish.
View/ animation then file/save as.
Felling horny
Tutorial written by and © to Bits N Bobs 26th October 2009
You are not allowed to share/forward or translate this tutorial or place it on any blog or website.
This tutorial is written from my own ideas and any similarities to any other tutorial is purely coincidental.
Tutorial is for those with a working knowledge of paintshop pro.
Supplies needed.
Font of choice for your name.
I am using Nightmare hero http://ooo-n3o-ooo.deviantart.com/gallery/#fonts
Tube of choice , I am using Sexy Devil by Jamie kidd http://www.jamiekiddart.com/
Artwork is not to be used with a C.I.L.M license http://www.cilm.com/
Template 6 by Tori http://toristidbits.blogspot.com/2009/04/template-6.html
Alien skin eye candy 5 Nature - Fire Download trial http://www.alienskin.com/downloads/
Note
For the animation you will need animation shop.
This tutorial was written in PSP 9
Open all the supplies in paintshop except the font.
Double click on your font and minimize.
1.
Open template 6, press shift + D to duplicate and close the original.
Close off the Oval frame layer, activate background layer.
Copy your Sexy Devil jpg image file, paste as a new layer and position to your liking.
Erase any part of the image showing outside of the frame.
2.
Activate your circles and using your colour replacer tool select #740605 in the foreground,
#c0c0c0 in the background and double left click on your cirlces to turn them red.
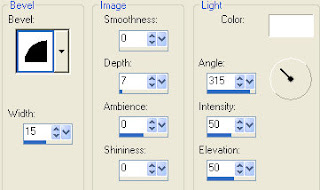
Effects/ 3D effects/ inner bevel with the settings below.
3.
Activate dotted lines layer and using your colour replacer tool select #000000 in the foreground,
#404040 in the background double left click on the dotted lines to turn them black.
4.
Activate gray frame layer and using your colour replacer tool select #ab0807 in the foreground,
#808080 in the background double left click on the gray frame to turn it red.
5.
Close off the background layer, activate your top layer, layers/ new raster layer and add all copyright info.
If you don't wish to animate you can also add your name here and save it as it is.
ANIMATION
6.
Activate your scalloped frame layer.
Selections/ select all, float, defloat.
Shift + D twice to create a total of 3 images.
7.
On your first image, effects/ eye candy 5 nature/ Fire
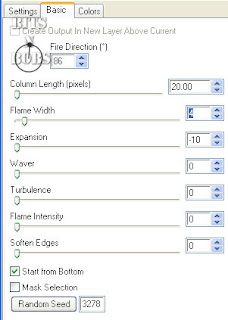
Settings Medium, weird color, Candy with the basic settings as in screenshot below.
Selections/ invert, delete, sleections/ select none, layers/ mere/ merge visible.
File/ save as, save as image 1 to your desktop.
Tutorial written by and © to Bits N Bobs 26th October 2009
You are not allowed to share/forward or translate this tutorial or place it on any blog or website.
This tutorial is written from my own ideas and any similarities to any other tutorial is purely coincidental.
Tutorial is for those with a working knowledge of paintshop pro.
Supplies needed.
Font of choice for your name.
I am using Nightmare hero http://ooo-n3o-ooo.deviantart.com/gallery/#fonts
Tube of choice , I am using Sexy Devil by Jamie kidd http://www.jamiekiddart.com/
Artwork is not to be used with a C.I.L.M license http://www.cilm.com/
Template 6 by Tori http://toristidbits.blogspot.com/2009/04/template-6.html
Alien skin eye candy 5 Nature - Fire Download trial http://www.alienskin.com/downloads/
Note
For the animation you will need animation shop.
This tutorial was written in PSP 9
Open all the supplies in paintshop except the font.
Double click on your font and minimize.
1.
Open template 6, press shift + D to duplicate and close the original.
Close off the Oval frame layer, activate background layer.
Copy your Sexy Devil jpg image file, paste as a new layer and position to your liking.
Erase any part of the image showing outside of the frame.
2.
Activate your circles and using your colour replacer tool select #740605 in the foreground,
#c0c0c0 in the background and double left click on your cirlces to turn them red.
Effects/ 3D effects/ inner bevel with the settings below.

3.
Activate dotted lines layer and using your colour replacer tool select #000000 in the foreground,
#404040 in the background double left click on the dotted lines to turn them black.
4.
Activate gray frame layer and using your colour replacer tool select #ab0807 in the foreground,
#808080 in the background double left click on the gray frame to turn it red.
5.
Close off the background layer, activate your top layer, layers/ new raster layer and add all copyright info.
If you don't wish to animate you can also add your name here and save it as it is.
ANIMATION
6.
Activate your scalloped frame layer.
Selections/ select all, float, defloat.
Shift + D twice to create a total of 3 images.
7.
On your first image, effects/ eye candy 5 nature/ Fire
Settings Medium, weird color, Candy with the basic settings as in screenshot below.
Selections/ invert, delete, sleections/ select none, layers/ mere/ merge visible.
File/ save as, save as image 1 to your desktop.

8.
On your 2nd image, effects/ eye candy 5 nature/ Fire
Same settings as before but click the random seed button
Selections/ invert, delete, sleections/ select none, layers/ mere/ merge visible.
File/ save as, save as image 2 to your desktop.
10.
On your 3rd image, effects/ eye candy 5 nature/ Fire
Same settings as before but click the random seed button
Selections/ invert, delete, sleections/ select none, layers/ mere/ merge visible.
File/ save as, save as image 3 to your desktop.
11.
Open animation shop.
File/ animation wizard then follow the screen shots clicking next after each one.
On the add image part browse to where you saved your files and add them all, click next then finish.
View/ animation then file/save as.
12.
Create your name in paintshop as normal, copy the file and paste as a new animation into animation shop.
Copy the name in animation shop, activate your animation, edit/ select all, edit/ paste into selected frame and then file/save as.
Create your name in paintshop as normal, copy the file and paste as a new animation into animation shop.
Copy the name in animation shop, activate your animation, edit/ select all, edit/ paste into selected frame and then file/save as.
Labels:Animated,C.I.L.M,FTU Tutorials,Jamie Kidd
Subscribe to:
Post Comments
(Atom)
BNB Blinkie

Tuts Of The Week
Labels
- ! missing kits
- Alex Prihodko
- Amberly Berendson
- AMI
- Angela Newman
- Animated
- Arthur Crowe
- Autumn
- Babe-a-licious
- Bits N Bobs
- C.I.L.M
- Camilla Drakenborg
- CDO
- Christmas
- Competitions
- Cris Ortega
- Danielle Pioli
- Double Impact
- Easter
- Elegance Fly
- Elias Chatzoudis
- Elizabeth Austin
- Enamorte
- Exquisite Scraps
- Fantasia
- Forum sets
- Free Fonts
- FTU Tubes
- FTU Tutorials
- Gorjuss
- Gothic
- Incredimal Stationary
- Ismael Rac
- Italia Ruotolo
- James Jacks
- Jamie Kidd
- Jose Cano
- Karen Middleton
- KatNKDA
- KennyK
- Masks
- Maxine Gadd
- MPT
- MTA
- Mystical Scraps
- New Year
- Nice N Easy
- Nicholas Garton
- No scraps
- Orkus Art
- PFD
- PMTWS
- PTE
- PTU Tutorials
- Rachael Anderson
- Rachael Huntington
- Rachel Tallamy
- SATC
- Selena Fenech
- Shawn Palek
- Spring
- St.Patricks
- Steampunk
- Susan Mckirvergan
- Tag templates
- Thanksgiving
- UpYourArt
- Valentines
- Very Many
- Wilma4Ever
- ZlataM


0 comments:
Post a Comment