

Monday 18 April 2011

Click tag to view animation
She's Got Legs
Tutorial written by and © to Bits N Bobs 18th April 2011.
Results are for personal use only.
No monetry gain allowed and that includes placing them behind a paid or donation based membership area.
You are not allowed to share/forward or translate any of my tutorials or place them on any blog, website, DVD or anywhere else without my permission.
These tutorials are written from my own ideas and any similarities to any other tutorial is purely coincidental.
All tutorials are for those with a working knowledge of paintshop pro.
I reserve the right to amend these terms at any time.
Supplies needed.
Font of choice for your name.
I am using Witched
Tube of choice.
I am using one by Shawn Wilken
Mine is SW0006 available at UpYourArt here
Tube is not to be used without the correct licence
Plugin for sparkle animation - Alienskin Xenofex2
AAA Frames - Photo frame
Note
This tutorial was written in PSP 9 and needs animation shop for the animation.
Open all supplies in paintshop except the font.
Double click on your font and minimize.
Open a new image, 550 w x 200 h at 72 dpi.
1.Copy your tube, paste as a new layer on your working image.
Rename this layer to 'Base'.
Image rotate/ free rotate/ left 90 degress, all layers un-tabbed.
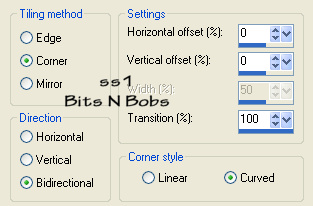
Effects/ Image effects/ seamless tiling settings as below.
Lower the layer opacity to 50%
Effects/ Image effects/ mosaic glass settings as below.

Layers/ merge all ( flatten )
It is a good idea to add your copyright info now.
2.Copy the legs layer from your tube, paste as a new layer.
Type text of choice, I chose 'She's Got Legs'
Rename this layer to 'Legs 1'
Position to the left of your image as in screenshot below.

Copy the legs layer again from your tube, paste as a new layer.
Type text of choice, I chose 'And She Knows How'
Rename this layer to 'Legs 2'
Position to the right of your image as in screenshot below.

Copy the legs layer again from your tube, paste as a new layer.
Type text of choice, I chose 'To Use Them'
Rename this layer to 'Legs 3'
Position to the center of your image as in screenshot below.

Add a drop shadow of choice to all leg layers.
I use V3, H3, O100, B9.00, C # 000000
3.Activate the Base layer.
Effects/ plugins / AAA Foto frame settings as in screenshot below.

4.Close legs 2 and 3, copy merged.
Open animation shop and paste as a new animation.
Go back to psp, close legs 1, open legs 2, copy merged.
Back in animations shop click edit and paste after current frame.
Activate the first frame by clicking on it.
Effects/ Insert image transition
Use the settings below so you end up with 15 frames.

Go back to psp, close legs 2, open legs 3, copy merged.
Back in animations shop click edit and paste after current frame.
Activate frame 15 by clicking on it.
Effects/ Insert image transition
Use the same settings as before.
Activate the last frame by clicking on it.
Go back to psp, close legs 3, open legs 1, copy merged.
Back in animations shop click edit and paste after current frame.
Click on frame 29,
Effects/ Insert image transition
Use the same settings as before.
You should now have a total of 43 frames.
5.In psp create your copyright info in one line.
Copy, return to animation shop.
Edit/ select all, paste as a new animation,
Edit and copy the copyright you just pasted,
Click on your legs animation, edit/ propogate paste, paste into selected frames
position at the bottom in the center.
6.In psp create your name and add it in animation shop the same way
you did for your copyright info above.
Subscribe to:
Posts
(Atom)
Stores


BNB Blinkie


