

Monday, 21 December 2009
I am sorry for the lack of updates but I have a sick computer.
Won't be able to get things sorted untill after Christmas so I want to wish you all a very Merry Christmas and a Happy New Year just in case I can't get on until then.
Tuesday, 8 December 2009

Tutorial written by and © to Bits N Bobs 8th December 2009.
Results are for personal use only.
No monetry gain allowed and that includes placing them behind a paid or donation based membership area.
You are not allowed to share/forward or translate any of my tutorials or place them on any blog, website,
DVD or anywhere else without my permission.
These tutorials are written from my own ideas and any similarities to any other tutorial is purely coincidental.
All tutorials are for those with a working knowledge of paintshop pro.
I reserve the right to amend these terms at any time.
Supplies needed.
Font of choice for your name.
I am using Kingthings wrote
Tube of choice.
I am using XmasBigBox from Racs Pack 28
This tube is not to be used without an AMI license
Scrap kit by Black cat at AMI - Holly in Snow
Items used from this kit are.
Frame 4, Element 68, Element 14,
Alien skin xenofex2 (free demo available)
Note
This tutorial was written in PSP 9
Open all the supplies in paintshop except the font.
Double click on your font and minimize.
Open a new image 500 x 500 at 72 dpi
1. Re-size frame 4 to 400 pixels wide, copy, paste onto your new image as a new layer.
Add a drop shadow. Settings will remain the same through out.
I am using V3, H3, O100, B9.00, C #000000
2. Re-size element 68 to 400 pixels wide, copy, paste as a new layer.
Position your tube to the bottom left hand corner and add a drop shadow.
3. Re-size element 14 to 300 pixels high, copy, paste as a new layer.
Layers/ arrange/ move up. Place toward the top left corner.
Layers/ duplicate, image/ mirror, place toward the top right corner.
Layers/ merge/ merge down, layers/ duplicate, layers/merge/ merge down, add a drop shadow.
4. Add a new layer and add whatever text you like.
Layers/ merge/ merge visible.
Add your copyright info
5. Use your magic wand set at 0 tolerance, antialias on and select any spots you want to sparkle on your tube.
Press shift and D twice. You will now have 3 files.
On the first one effects/ plugins/ alien skin xenofex 2 , use settings as in screen shot.
Selections/ select none, file/ save as, image 1 to your desktop
On the second one effects/ plugins/ alien skin xenofex 2 , use settings as in screen shot above but hit random seed button.
Selections/ select none, file/ save as, image 2 to your desktop
On the second one effects/ plugins/ alien skin xenofex 2 , use settings as in screen shot above and hit random seed button .
Selections/ select none, file/ save as, image 3 to your desktop

6. Open animation shop.
File/ animation wizard then follow the screen shots clicking next after each one.
On the add image part browse to where you saved your files and add them all, click next then finish.
View/ animation then file/save as.


7. Create your name in paintshop as normal, copy the file and paste as a new animation into animation shop.
Copy the name in animation shop, activate your animation, edit/ select all, edit/ paste into selected frame and then file/save as.
Monday, 7 December 2009

Tutorial written by and © to Bits N Bobs 7th December 2009.
Results are for personal use only.
No monetry gain allowed and that includes placing them behind a paid or donation based membership area.
You are not allowed to share/forward or translate any of my tutorials or place them on any blog,
website, DVD or anywhere else without my permission.
These tutorials are written from my own ideas and any similarities to any other tutorial is purely coincidental.
All tutorials are for those with a working knowledge of paintshop pro.
I reserve the right to amend these terms at any time.
Supplies needed.
Font of choice for your name.
I am using Kingthings Wrote
Tube of choice.
I am using one by KatNKDA called Angel Dust and have chosen the one with the cloud.
Not to be used without an AMI license
White Christmas kit by Bits N Bobs at AMI
I have used the following items from the above kit...
Element 1, Element 6, Element 15, Element 20,
Alien skin xenofex2 (free demo available).
This tutorial was written in PSP 9
Note
Open all the supplies in paintshop except the font.
Double click on your font and minimize.
Open a new transparent image 500x500 at 72 dpi
1. Copy element 1, paste as a new layer onto your new image.
2. Re-size your tube to 250 pixels high.
Copy and paste as a new layer.
3. Copy element 15 and paste as a new layer.
4. Re-size element 20 to 380 pixels high, copy.
Activate layer 2 ( the one below your tube ), paste as a new layer.
5. Re-size element 15 to 300 pixels high, copy, paste as a new layer.
Layers/ arrange/ move down.
6. Add a drop shadow to each layer using the settings below.
V 2, H 2, O 35, Blur 5.00
Colour black, OK.
7. Activate your top layer.
Add a new raster layer and add all copyright info.
Note:
For animation move straight onto step 8.
If you don't wish to animate then layers/ merge visible, export as transparent png and save.
8. Activate your sparkle layer ( Mine is layer 5 )
Press shift and D twice. You will now have 3 files.
On the first one effects/ plugins/ alien skin xenofex 2 , use settings as in screen shot.
On the second one effects/ plugins/ alien skin xenofex 2 , use settings as in screen shot above but hit random seed button .
On the second one effects/ plugins/ alien skin xenofex 2 , use settings as in screen shot above and hit random seed button .

9. Activate your tube layer.
Use your magic wand set at 0 tolerance, antialias off and select any spots you want to sparkle on your tube.
( I have chosen to sparkle her feather halo )
Effects/ plugins/ alien skin xenofex 2 , use settings as in screen shot.
Selections/ none, Layers/ merge/ merge all ( flatten ).
File/ save as, image 1 to your desktop
Repeat this step on your other 2 images saving them as image 2 and image 3.

File/ animation wizard then follow the screen shots clicking next after each one.
On the add image part browse to where you saved your files and add them all, click next then finish.
View/ animation then file/save as.


11. Create your name in paintshop as normal, copy the file and paste as a new animation into animation shop.
Copy the name in animation shop, activate your animation, edit/ select all, edit/ paste into selected frame and then file/save as.
Tuesday, 1 December 2009

Santa baby
Tutorial written by and © to Bits N Bobs 1st December 2009.
Results are for personal use only.
No monetry gain allowed and that includes placing them behind a paid or donation based membership area.
You are not allowed to share/forward or translate any of my tutorials or place them on any blog, website,
DVD or anywhere else without my permission.
These tutorials are written from my own ideas and any similarities to any other tutorial is purely coincidental.
All tutorials are for those with a working knowledge of paintshop pro.
I reserve the right to amend these terms at any time.
Supplies needed.
Font of choice for your name.
I am using Impact
Tube of choice.
I am using XmasPack03 from Racs Tube Pack 28
This tube is not to be used without an AMI license
Scrap kit by Black cat at AMI - Holly in Snow
Items used from this kit are.
Frame 4, Element 14, Element 37,
Note
This tutorial was written in PSP 9
Open all the supplies in paintshop except the font.
Double click on your font and minimize.
Open a new image 500 x 500 at 72 dpi
1. Re-size frame 4 to 450 pixels wide, copy, paste onto your new image as a new layer.
Add a drop shadow. Settings will remain the same through out.
I am using V3, H3, O100, B9.00, C #000000
Re-size element 14 to 200 pixels wide.
Copy, paste as a new layer, position in top left corner of your frame.
Layers/ duplicate, image/ mirror, layers/ merge/ merge down.
Layers/ duplicate, image/ flip, layers/ merge/ merge down.
Add a drop shadow.
2. Re-size element 37 to 500 pixels high.
Copy, paste as a new layer, layers/ arrange/ send to bottom.
Erase any part of the paper outside of your frame.
Add a new layer if you wish to add any text your paper.
Copy, paste as a new layer, layers/ arrange/ send to bottom.
Erase any part of the paper outside of your frame.
Add a new layer if you wish to add any text your paper.
3. Re-size your tube to 450 pixels high
Activate the frame layer, copy your tube, paste as a new layer, add a drop shadow if you wish.
Using your selection tool or eraser cut away the top and right hand side of your tube so that she looks like she is hanging out of your frame.
4. Add your copyright info and name and export as jpg for a white background or png for transparent .
Monday, 30 November 2009

Christmas is coming
Results are for personal use only.
No monetry gain allowed and that includes placing them behind a paid or donation based membership area.
You are not allowed to share/forward or translate any of my tutorials or place them on any blog, website, DVD or anywhere else without my permission.
These tutorials are written from my own ideas and any similarities to any other tutorial is purely coincidental.
All tutorials are for those with a working knowledge of paintshop pro.
I reserve the right to amend these terms at any time.
I am using Christmas Card
Scrap kit Vintage Christmas by Mystic Creations
Poser tube is from the scrap kit.
Scraps I am using from this kit are
MCVCDoiley1, MCVCTree1, MCVCCuteElf, MCVCGift04, MCVCGift05, MCVCGift09, MCVCPaper1, MCVCPaper3Mask of choice.
I am using
Mask - gabeemask33-vi.jpg
This tutorial was written in PSP 9
Open all the supplies in paintshop except the font.
Double click on your font and minimize.
Re-size element MCVCDoiley1 to 400 pixels high, copy, paste as a new layer on your new image.
Using your Raster deform tool push the top centre down so it is just under half the original size.
Position slighty to the right hand side. This will now be our rug.
Add drop shadow, settings will remain the same throughout.
V 3, H 3, O 100, B 9.00, Colour # 000000
position to the left of the rug, add drop shadow.
Repeat this step for MCVCGift05, and MCVCGift09
Layers/ arrange/ send to bottom.
Layers/ merge/ merge group layers, add a dopr shadow.
Layers/ arrange/ send to bottom.
Lower layer opacity to 60%
Layers/ merge/ merge all ( flatten )
Sunday, 22 November 2009

Tutorial written by and © to Bits N Bobs 22nd November.
Results are for personal use only.
No monetry gain allowed and that includes placing them behind a paid or donation based membership area.
You are not allowed to share/forward or translate any of my tutorials or place them on any blog, website, DVD or anywhere else without my permission.
These tutorials are written from my own ideas and any similarities to any other tutorial is purely coincidental.
All tutorials are for those with a working knowledge of paintshop pro.
I reserve the right to amend these terms at any time.
Supplies needed.
Font of choice for your name.
I am using Kingthings wrote
Tube of choice.
I am using Mary Christmas by Ismael Rac
This tube is not to be used without an AMI
Scrap kit Christmas Wishes by Dites Haven
Items used from this kit are....
Star wire 4, Wreath frame 3,
Note
This tutorial was written in PSP 9
Open all the supplies in paintshop except the font.
Double click on your font and minimize.
1. Open a new image 500x500 at 72 dpi.
Re-size star wire 4 to 450 pixels high, copy, paste as a new layer.
Add a drop shadow, settings will remain the same.
V2, H2, O100, B9.00, Colour #000000
2. Re-size wreath frame 3 to 350 pixels high, copy, paste as a new layer.
Position in the center of the star.
3. Activate the wreath frame layer, copy your larger tube, paste as a new layer.
Selections/ select all, selections/ float/ defloat.
Activate the wreath frame layer and erase the top part so your tubes head pops out.
Selections/ select none.
Activate tube layer and erase the bottom part hanging from the bottom of the frame.
Add a drop shadow.
4. Add your copyright info and name and export png for a transparent fiile or as jpg for a white background .

Tutorial written by and © to Bits N Bobs 22nd November.
Results are for personal use only.
No monetry gain allowed and that includes placing them behind a paid or donation based membership area.
You are not allowed to share/forward or translate any of my tutorials or place them on any blog, website, DVD or anywhere else without my permission.
These tutorials are written from my own ideas and any similarities to any other tutorial is purely coincidental.
All tutorials are for those with a working knowledge of paintshop pro.
I reserve the right to amend these terms at any time.
Supplies needed.
Font of choice for your name.
I am using Kingthings wrote
Tube of choice.
I am using Bed Time by Ismael Rac
This tube is not to be used without an AMI license
Scrap kit by Bits N Bobs at AMI - Christmas is coming
Items used from this kit are.
Paper 3, Element 14, Element 3,
Note
This tutorial was written in PSP 9
Open all the supplies in paintshop except the font.
Double click on your font and minimize.
1. Re-size paper 3 to 500 pixels wide.
Re-size element 14 to 450 pixels high.
Copy, paste as a new layer at the top of the paper.
Duplicate layer twice and position each one to your liking.
2. Activate the paper layer, copy element 3, paste as a new layer.
3. Activate the top layer, copy your larger tube, paste as a new layer add a drop shadow.
I am using V4, H4, O100, B9.00, C #000000
Image re-size ( all layers tabbed ) to 450 pixels wide.
4. Image/ add border ( if you get a pop up asking to merge to a flattened image click yes ) / Top 3, Symmetric tabbed, Colour #800000
Image/ add border/ Top 5, Symmetric tabbed, Colour #efe8de
Image/ add border/ Top 3, Symmetric tabbed, Colour #800000
Image/ add border/ Top 9, Symmetric tabbed, Colour #e1d5c5
Image/ add border/ Top 5, Symmetric tabbed, Colour #800000
5. Add your copyright info and name and export as jpg for a white background .
Monday, 9 November 2009

Wrapped for Christmas
Results are for personal use only.
No monetry gain allowed and that includes placing them behind a paid or donation based membership area.
You are not allowed to share/forward or translate any of my tutorials or place them on any blog, website, DVD or anywhere else without my permission.
These tutorials are written from my own ideas and any similarities to any other tutorial is purely coincidental.
All tutorials are for those with a working knowledge of paintshop pro.
I reserve the right to amend these terms at any time.
Font of choice for your name.
I am using Santas big secret
Tube of choice.
I am using sexy gift by Ismael Rac
This tube is not to be used without an AMI license
Scrap kit Christmas is coming by Bits N Bobs at AMI,
not to be used without an AMI licenseItems I am using from this kit are ....
Frame 1, Paper 1, Note
This tutorial was written in PSP 9
Open all the supplies in paintshop except the font.
Double click on your font and minimize.
1. Re-size frame 1 to 400 pixels wide, copy and paste as a new layer onto your new image.
2. Re-size paper 1 to 330 pixels wide, copy, paste as a new layer, layers/ arrange, move down.
3. Re-size your tube to 400 pixels high, copy, paste as a new layer.
Selections/ select all, Selections/ float, Selections/ defloat.Activate your frame layer and erase the parts over your tubes head and extended leg so it pops out of the frame.
Selections/ select none.
Activate tube layer and erase any part hanging out the bottom of the frame.
4. Re-size element 22 to 420 pixels wide, copy, paste as a new layer.
Add a drop shadow of your choice.I use V 2, H 3, O 100, B 5.00, Colour #000000
5. Activate tube layer and add drop shadow.
I use V 2, H 3, O 100, B 5.00, Colour #000000Activate frame layer and add drop shadow.
I use V 2, H 3, O 100, B 5.00, Colour #000000
6. Layers/ merge/ merge visible.
Add your copyright info and name and export as a png for transparent background or jpg for a white background .
Monday, 26 October 2009


Click tag to view the animation
8.
On your 2nd image, effects/ eye candy 5 nature/ Fire
Same settings as before but click the random seed button
Selections/ invert, delete, sleections/ select none, layers/ mere/ merge visible.
File/ save as, save as image 2 to your desktop.
10.
On your 3rd image, effects/ eye candy 5 nature/ Fire
Same settings as before but click the random seed button
Selections/ invert, delete, sleections/ select none, layers/ mere/ merge visible.
File/ save as, save as image 3 to your desktop.
11.
Open animation shop.
File/ animation wizard then follow the screen shots clicking next after each one.
On the add image part browse to where you saved your files and add them all, click next then finish.
View/ animation then file/save as.


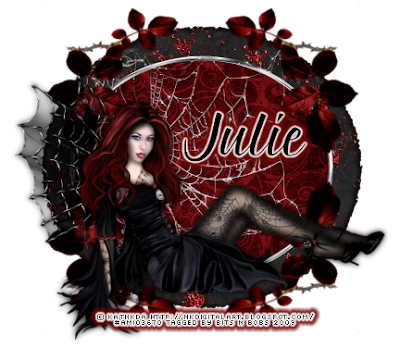
Felling horny
Tutorial written by and © to Bits N Bobs 26th October 2009
You are not allowed to share/forward or translate this tutorial or place it on any blog or website.
This tutorial is written from my own ideas and any similarities to any other tutorial is purely coincidental.
Tutorial is for those with a working knowledge of paintshop pro.
Supplies needed.
Font of choice for your name.
I am using Nightmare hero http://ooo-n3o-ooo.deviantart.com/gallery/#fonts
Tube of choice , I am using Sexy Devil by Jamie kidd http://www.jamiekiddart.com/
Artwork is not to be used with a C.I.L.M license http://www.cilm.com/
Template 6 by Tori http://toristidbits.blogspot.com/2009/04/template-6.html
Alien skin eye candy 5 Nature - Fire Download trial http://www.alienskin.com/downloads/
Note
For the animation you will need animation shop.
This tutorial was written in PSP 9
Open all the supplies in paintshop except the font.
Double click on your font and minimize.
1.
Open template 6, press shift + D to duplicate and close the original.
Close off the Oval frame layer, activate background layer.
Copy your Sexy Devil jpg image file, paste as a new layer and position to your liking.
Erase any part of the image showing outside of the frame.
2.
Activate your circles and using your colour replacer tool select #740605 in the foreground,
#c0c0c0 in the background and double left click on your cirlces to turn them red.
Effects/ 3D effects/ inner bevel with the settings below.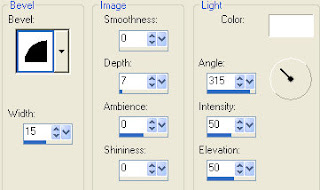
3.
Activate dotted lines layer and using your colour replacer tool select #000000 in the foreground,
#404040 in the background double left click on the dotted lines to turn them black.
4.
Activate gray frame layer and using your colour replacer tool select #ab0807 in the foreground,
#808080 in the background double left click on the gray frame to turn it red.
5.
Close off the background layer, activate your top layer, layers/ new raster layer and add all copyright info.
If you don't wish to animate you can also add your name here and save it as it is.
ANIMATION
6.
Activate your scalloped frame layer.
Selections/ select all, float, defloat.
Shift + D twice to create a total of 3 images.
7.
On your first image, effects/ eye candy 5 nature/ Fire
Settings Medium, weird color, Candy with the basic settings as in screenshot below.
Selections/ invert, delete, sleections/ select none, layers/ mere/ merge visible.
File/ save as, save as image 1 to your desktop.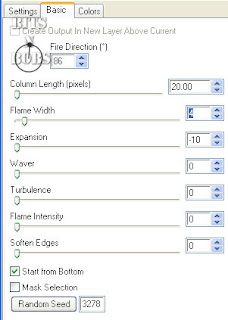
Tutorial written by and © to Bits N Bobs 26th October 2009
You are not allowed to share/forward or translate this tutorial or place it on any blog or website.
This tutorial is written from my own ideas and any similarities to any other tutorial is purely coincidental.
Tutorial is for those with a working knowledge of paintshop pro.
Supplies needed.
Font of choice for your name.
I am using Nightmare hero http://ooo-n3o-ooo.deviantart.com/gallery/#fonts
Tube of choice , I am using Sexy Devil by Jamie kidd http://www.jamiekiddart.com/
Artwork is not to be used with a C.I.L.M license http://www.cilm.com/
Template 6 by Tori http://toristidbits.blogspot.com/2009/04/template-6.html
Alien skin eye candy 5 Nature - Fire Download trial http://www.alienskin.com/downloads/
Note
For the animation you will need animation shop.
This tutorial was written in PSP 9
Open all the supplies in paintshop except the font.
Double click on your font and minimize.
1.
Open template 6, press shift + D to duplicate and close the original.
Close off the Oval frame layer, activate background layer.
Copy your Sexy Devil jpg image file, paste as a new layer and position to your liking.
Erase any part of the image showing outside of the frame.
2.
Activate your circles and using your colour replacer tool select #740605 in the foreground,
#c0c0c0 in the background and double left click on your cirlces to turn them red.
Effects/ 3D effects/ inner bevel with the settings below.

3.
Activate dotted lines layer and using your colour replacer tool select #000000 in the foreground,
#404040 in the background double left click on the dotted lines to turn them black.
4.
Activate gray frame layer and using your colour replacer tool select #ab0807 in the foreground,
#808080 in the background double left click on the gray frame to turn it red.
5.
Close off the background layer, activate your top layer, layers/ new raster layer and add all copyright info.
If you don't wish to animate you can also add your name here and save it as it is.
ANIMATION
6.
Activate your scalloped frame layer.
Selections/ select all, float, defloat.
Shift + D twice to create a total of 3 images.
7.
On your first image, effects/ eye candy 5 nature/ Fire
Settings Medium, weird color, Candy with the basic settings as in screenshot below.
Selections/ invert, delete, sleections/ select none, layers/ mere/ merge visible.
File/ save as, save as image 1 to your desktop.

8.
On your 2nd image, effects/ eye candy 5 nature/ Fire
Same settings as before but click the random seed button
Selections/ invert, delete, sleections/ select none, layers/ mere/ merge visible.
File/ save as, save as image 2 to your desktop.
10.
On your 3rd image, effects/ eye candy 5 nature/ Fire
Same settings as before but click the random seed button
Selections/ invert, delete, sleections/ select none, layers/ mere/ merge visible.
File/ save as, save as image 3 to your desktop.
11.
Open animation shop.
File/ animation wizard then follow the screen shots clicking next after each one.
On the add image part browse to where you saved your files and add them all, click next then finish.
View/ animation then file/save as.

12.
Create your name in paintshop as normal, copy the file and paste as a new animation into animation shop.
Copy the name in animation shop, activate your animation, edit/ select all, edit/ paste into selected frame and then file/save as.
Create your name in paintshop as normal, copy the file and paste as a new animation into animation shop.
Copy the name in animation shop, activate your animation, edit/ select all, edit/ paste into selected frame and then file/save as.
If you like and/or save these templates please click here as a thank you :O)
Very much appreciated and won't cost you a penny

Both PSD and PSP layered files included
Would love to see the result if anyone uses it :O)
Saturday, 24 October 2009
If you like and/or save these templates please click here as a thank you :O)
Very much appreciated and won't cost you a penny

Both PSD and PSP layered files included
Would love to see the result if anyone uses it :O)
Ever wondered what the font is on Ismael Racs stalker tubes ?
Well wonder no more.
Ok so the hard core stalkers already know :P
For convenience I am placing it here so feel free to grab it :O)
Below are the terms contained in the zip file.

Font terms
Whoa!
by Johan Waldenström 2008
This is a freeware graffiti-inspired decorative font.
If you want to use this font commercially, please contact me by e-mail; johanw82@gmail.com
I prefer a high point-size when using this font (72 points or higher).
The font only has lower case characters, so make sure capslock isn´t on when using it.
Feel free to distribute this font, or any other one of my fonts. Do not sell them though.
For the latest versions of my fonts, see www.11-D.net
---
How to install:
Unzip the font into the fonts directory, located at c:\windows\fonts\
---
Have fun!
11-D productions | www.11-D.net
Friday, 23 October 2009

Wednesday, 21 October 2009

Tuesday, 20 October 2009


Tuesday, 6 October 2009
Black widow
Tutorial written by and © to Bits N Bobs 6th October 2009.
Results are for personal use only.
No monetry gain allowed and that includes placing them behind a paid or donation based membership area.
You are not allowed to share/forward or translate any of my tutorials or place them on any blog, website, DVD or anywhere else without my permission.
These tutorials are written from my own ideas and any similarities to any other tutorial is purely coincidental.
All tutorials are for those with a working knowledge of paintshop pro.
I reserve the right to amend these terms at any time.
Supplies needed.
Font of choice for your name.
I am using Stone hinge
Tube of choice.
I am using the one from the kit.
Scrap kit Black widow by Kat NKDA
This tube and scrap kit are not to be used without the correct licence
Items I am using from the scrap kit are
Black widow tube, paper 9, element 1, element 3, element 6,
Alien skin xenofex2 (free demo available). http://www.alienskin.com/xenofex/index.aspx
This tutorial was written in PSP 9
Note
Open all the supplies in paintshop except the font.
Double click on your font and minimize.
1. Open a new image 500 x 500 at 72 dpi, re-size frame to 400 pixels high, image rotate/ rotate clockwise 90, copy, paste as a new layer.
Select the center of the frame, selections/ modify/ expand by 5, layers/ new raster layer, copy paper 9, paste into selection, selections/ select none.
Layers/ arrange/ send to bottom
2. Re-size element 6 to 320 pixels wide, copy, activate frame layer, paste as a new layer.
3. Re-size tube to 400 pixels wide, copy, paste as a new layer.
4. Activate paper layer, copy element 37, paste as a new layer, position to the left, layers/ duplicate, position at the top but in the middle, layers/ duplicate, position to the right.
Layers/ merge/ merge down, layers/ merge/ merge down.
5. Copy your tube, paste as a new layer, add a drop shadow if required.
6. Re-size element 3 to 150 pixels wide, image/ mirror, copy, activate frame layer, paste as a new layer .
Layers/ duplicate, image/ flip, layers/ arrange/ merge/ merge down.
Layers/ duplicate, image/ mirror, layers/ arrange/ merge/ merge down.
7. Crop if required, layers/ merge/ merge visible. Add copyright info and name, file export and save.
Monday, 5 October 2009


Sunday, 4 October 2009

Sunday, 20 September 2009

Wednesday, 16 September 2009
 Scarlett nights
Tutorial written by and © to Bits N Bobs 16th September 2009.
Results are for personal use only.
No monetry gain allowed and that includes placing them behind a paid or donation based membership area.
You are not allowed to share/forward or translate any of my tutorials or place them on any blog, website, DVD or anywhere else without my permission.
These tutorials are written from my own ideas and any similarities to any other tutorial is purely coincidental.
All tutorials are for those with a working knowledge of paintshop pro.
I reserve the right to amend these terms at any time.
Supplies needed.
Font of choice for your name.
I am using Silver script
Tube or artwork of choice.
I am using my own artwork.
If you wish to use it you can get it here but it is to be used for this tutorial only.
Please use the following copyright info on this artwork © fairyj aka Bits N Bobs
Scrap kit Opposites attract from Bits N Bobs at AMI
This kit is not to be used without an AMI license
I am using .......
Frame 7, paper 3, Sprinkles 3, Wire 2, Flower 3, Flower 4, Branch 1, Feather 1
This tutorial was written in PSP 9
Note:
Open all the supplies in paintshop except the font.
Double click on your font and minimize.
1. Open a new image, 600 x 600 at 72 dpi, re-size frame 7 to 400 pixels high, copy, paste as a new layer.
Select the center of each frame part, selections/ modify/ expand by 4, layers/ new raster layer.
Note:
If using a paper and tube do step 2 but skip step 3.
If using my artwork move onto step 3.
2. Copy paper 3 , paste as a new layer, selections/ invert, delete, selections/ none, layers/ arrange/ send to bottom.
Re-size tube to desired size, copy, paste as a new layer, delete anything outside of the paper.
3. Re-size my artwork to 500 pixels high, copy, paste as a new layer, selections/ invert, hit delete on your keyboard, selections/ none, layers/ arrange/ send to bottom.
4. Copy sprinkles 3, paste as a new layer, layers/ arrange/ send to bottom.
Re-size wire 2 to 500 pixels wide, copy, paste as a new layer, duplicate, image/ rotate/ free rotate left, 90 ( all layers un tabbed )
5. Activate frame layer, re-size flower 2 150 pixels wide, copy, paste as a new layer, position to top right corner of the frame.
Add a drop shadow. Drop shadow will be the same throughout.
V 3, H 3, O 100, B, 9.00, C #000000
6. Activate frame layer gain, re-size tag 1 to 300 pixels high, copy, paste as a new layer, position under the flower, add a drop shadow.
7. Re-size branch 1 to 350 pixels high, copy, paste as a new layer, image/ rotate/ free rotate left, 90 ( all layers un tabbed ), duplicate, image/ mirror, position to your liking.
8. Activate frame layer, re-size feather 1 to 330 pixels wide, copy, paste as a new layer, image/ rotate/ free rotate right, 45 ( all layers un tabbed ), position.
Layers/ arrange/ send to bottom, duplicate layer, image/ mirror, image/ rotate/ free rotate right, 60 ( all layers un tabbed ), position.
9. Layers/ merge/ merge visible, Add a new raster layer, add your copyright info and name and export as a png for transparent background or jpg for a white background .
Sunday, 6 September 2009

Can I keep you ?
Tutorial written by and © to Bits N Bobs 6th September 2009.
Results are for personal use only.
No monetry gain allowed and that includes placing them behind a paid or donation based membership area.
You are not allowed to share/forward or translate any of my tutorials or place them on any blog, website, DVD or anywhere else without my permission.
These tutorials are written from my own ideas and any similarities to any other tutorial is purely coincidental.
All tutorials are for those with a working knowledge of paintshop pro.
I reserve the right to amend these terms at any time.
Supplies needed.
Font of choice for your name and text.
I am using Silver Script
Tube of choice.
I am using tube AF145 Can I keep you by Amanda Fontaine
Tubes are not to be used without an AMI license
Scrap kit 'Feels like Autumn by Bits N Bobs
Scraps I am using from this kit are element 3 and paper 7
Template I recycle boys from butterfly flutterby Creations
This tutorial was written in PSP 9
Note
Open all the supplies in paintshop except the font.
Double click on your font and minimize.
1. Open template and close off the following layers.
BflyFly Copy Right, Boy Wordart, Boy outline, Boy fill, I Recycle boys wordart and background.
Activate mask layer, Adjust/ colour balance/ manual colour correction/ manual target colour H 2, S 255, L 67
2. Activate top rectangle, layers/ merge/ merge down, selections/ select all, selection/ float, selections/ defloat, layers/ new raster layer, re-size paper 7 to 600 pixels wide, copy, paste into selection.
Add a gradient glow effect via your plug ins as per the settings below. Selections/ select none.

3. Activate circle fill, selections/ select all, selection/ float, selections/ defloat, layers/ new raster layer, copy paper, paste into selection, selections/ select none.
4. Re-size element 3 to 400 pixels high, copy, paste as a new layer, image/ mirror, position, layers/ arrange/ move down, duplicate layer, image/ flip, position, layers/ merge/ merge down
5. Re-size your tube to 350 pixels high, copy, paste as a new layer, apply gradient glow , setting are the same so hit ok.
6. Un do the re-size on your original tube, copy, paste as a new layer, image/ mirror, position so the hedgehog is in the middle of the circle frame.
Activate Back circle layer, selections/ select all, selections/ float, selections/ de float, selections/ modify/ contract by 9, selections/ invert. Activate your big tube layer and hit delete on your keyboard. Selections/ select none.
7. Copy element 3, paste as a new layer, image/ mirror, image/ flip, position, layers/ arrange/ move down, add a dropshadow, settings will remain the same.
V 3, H 3, O 100, B 7.00, C #000000
Activate your other leaf layer and move it down below the circle fill layer and add a drop shadow.
8. Activate circle frame, selections/ select all, selections/ float, selections/ de float, selections/ modify/ expand by 3.
Flood fill with #4f181e, effects/ 3D effects/ inner bevel with the settings below.
 9. Activate small rectangle lines, add a gradient glow, same settings as before.
10. Add a new raster layer, layers/ arrange/ bring to the top, add any text your require.
Add the same gradient glow as before but swapping the black #000000 for white # ffffff then add a drop shadow if required.
11. Add your copyright info, name and export as a png or jpg and save.

Web mistress
Tutorial written by and © to Bits N Bobs 6th September 2009.
Results are for personal use only.
No monetry gain allowed and that includes placing them behind a paid or donation based membership area.
You are not allowed to share/forward or translate any of my tutorials or place them on any blog, website, DVD or anywhere else without my permission.
These tutorials are written from my own ideas and any similarities to any other tutorial is purely coincidental.
All tutorials are for those with a working knowledge of paintshop pro.
I reserve the right to amend these terms at any time.
Supplies needed.
Font of choice for your name and text.
I am using Silver Script
Tube of choice.
I am using my own and you can download it here. It is also available on my blog.
Please use © Bits N Bobs http://scrappingbits.blogspot.com/ on your tag
Scrap kit Halloween Mash by Black cat scraps
This kit is not to be used without an AMI license
Scraps I am using from this kit are wrapped paper 21, round frame 1, tagz ( hocus pocus ), Calla lilies, Spider web
This tutorial was written in PSP 9
Note
Open all the supplies in paintshop except the font.
Double click on your font and minimize.
1. Open a new image 600 x 600 at 72 dpi, re-size frame to to 420 pixels wide, copy, paste as a new layer on your new image.
2. Select the center of the frame, selections/ modify/ expand by 3, add a new raster layer, copy your paper and paste into selection, selections/ select none.
Activate frame layer, layers/ arrange/ brint to top and add a drop shadow. Drop shadow settings will remain the same throughout.
V 2, H 2, O 100, B 7.00, C #000000
3. Re-size your tube to 420 pixels high, copy, paste as a new layer and add drop shadow. ( If using the same tube as me don't forget to erase the text )
4. Re-size the tagz wordart you selected to 350 pixels wide, copy, paste as a new layer, add drop shadow
5. Re-size calla lilies to 350 pixels high, copy, paste as a new layer, position, layers/ arrange/ move down, duplicate layer, imag/ mirror, layers/ merge/ merge down, add a drop shadow.
6. Re-size spider web to 150 pixels high, image/ mirror, adjust/ colour balance/ manual correction, target #000000, ok. Copy, activate paper, paste as a new layer, position to your liking being sure to erase anything outside of the frame. Add a drop shadow.
7. Crop to size, layers/ merge visible, add copyright info and name. Export as a transparent png file or jpg for a white background.
Thursday, 3 September 2009
 Peaceful presence
Tutorial written by and © to Bits N Bobs 3rd September 2009.
Results are for personal use only.
No monetry gain allowed and that includes placing them behind a paid or donation based membership area.
You are not allowed to share/forward or translate any of my tutorials or place them on any blog, website, DVD or anywhere else without my permission.
These tutorials are written from my own ideas and any similarities to any other tutorial is purely coincidental.
All tutorials are for those with a working knowledge of paintshop pro.
I reserve the right to amend these terms at any time.
Supplies needed.
Font of choice for your name.
I am using Sweetheart script limited
Tube of choice
I am using Peaceful presence by Russ Docken
Not to be used without an MPT license
Scrap kit Jacob by Coras creations
I am using the following items from this kit ....
Moon, Mushroom, Paw print, Frame 5, Glitter gel, PP 9.
This tutorial was written in PSP 9
Note
Open all the supplies in paintshop except the font.
Double click on your font and minimize.
1. Create a new image 650 x 650 at 72 dpi.
Open frame 05, Image/ rotate/ clockwise 90, re-size frame to 450 pixels high, copy paste as a new layer on your new image.
Select center of the frame, selections/ modify/ expand by 5, layers/ new raster layer, copy pp 09, paste into selection, layers/ arrange/ move down, selections/ select none.
Activate frame layer, add a drop shadow, settings will be the same throughout.
V 3, H 3, O 100, B 11.00, C #000000.
2. Re-size your tube to 395 pixels high, copy, paste as a new layer, add a drop shadow.
3. Re-size glitter gel to 400 pixels high, copy, paste as a new layer, layers/ arrange/ send to bottom, duplicate layer, image/ mirror, duplicate layer, image/ flip, layers/ merge/ merge down, layers/ merge/ merge down, add a drop shadow.
4. Re-size paw print to 65 pixel high, copy, activate paper, paste as a new layer, add a drop shadow.
5. Re-size mushroom to 100 pixels high, copy, activate tube layer, paste as a new layer, add a drop shadow.
6. Re-size moon to 300 pixels high, copy, activate paper, paste as a new layer, erase any part outside of the frame, lower layer opacity to 50%
7. Layers/ merge/ merge visible, add your copyright info and name, export as a png for transparent background or jpg for a white background .
Peaceful presence
Tutorial written by and © to Bits N Bobs 3rd September 2009.
Results are for personal use only.
No monetry gain allowed and that includes placing them behind a paid or donation based membership area.
You are not allowed to share/forward or translate any of my tutorials or place them on any blog, website, DVD or anywhere else without my permission.
These tutorials are written from my own ideas and any similarities to any other tutorial is purely coincidental.
All tutorials are for those with a working knowledge of paintshop pro.
I reserve the right to amend these terms at any time.
Supplies needed.
Font of choice for your name.
I am using Sweetheart script limited
Tube of choice
I am using Peaceful presence by Russ Docken
Not to be used without an MPT license
Scrap kit Jacob by Coras creations
I am using the following items from this kit ....
Moon, Mushroom, Paw print, Frame 5, Glitter gel, PP 9.
This tutorial was written in PSP 9
Note
Open all the supplies in paintshop except the font.
Double click on your font and minimize.
1. Create a new image 650 x 650 at 72 dpi.
Open frame 05, Image/ rotate/ clockwise 90, re-size frame to 450 pixels high, copy paste as a new layer on your new image.
Select center of the frame, selections/ modify/ expand by 5, layers/ new raster layer, copy pp 09, paste into selection, layers/ arrange/ move down, selections/ select none.
Activate frame layer, add a drop shadow, settings will be the same throughout.
V 3, H 3, O 100, B 11.00, C #000000.
2. Re-size your tube to 395 pixels high, copy, paste as a new layer, add a drop shadow.
3. Re-size glitter gel to 400 pixels high, copy, paste as a new layer, layers/ arrange/ send to bottom, duplicate layer, image/ mirror, duplicate layer, image/ flip, layers/ merge/ merge down, layers/ merge/ merge down, add a drop shadow.
4. Re-size paw print to 65 pixel high, copy, activate paper, paste as a new layer, add a drop shadow.
5. Re-size mushroom to 100 pixels high, copy, activate tube layer, paste as a new layer, add a drop shadow.
6. Re-size moon to 300 pixels high, copy, activate paper, paste as a new layer, erase any part outside of the frame, lower layer opacity to 50%
7. Layers/ merge/ merge visible, add your copyright info and name, export as a png for transparent background or jpg for a white background .
Sunday, 30 August 2009

Don't hate me
Tutorial written by and © to Bits N Bobs 30th August 2009.
Results are for personal use only.
No monetry gain allowed and that includes placing them behind a paid or donation based membership area.
You are not allowed to share/forward or translate any of my tutorials or place them on any blog, website, DVD or anywhere else without my permission.
These tutorials are written from my own ideas and any similarities to any other tutorial is purely coincidental.
All tutorials are for those with a working knowledge of paintshop pro.
I reserve the right to amend these terms at any time.
Supplies needed.
Font of choice for your name.
I am using Sweetheart script limited
Tube of choice.
I am using XeracxGirl by Ismael Rac
This tube is not to be used without an AMI license
Template 11 by Sapphire
Xero - Fritillary in Xero filter set 4
Eye candy 5 Impact - Gradient glow
This tutorial was written in PSP 9
Note
Open all the supplies in paintshop except the font.
Double click on your font and minimize.
1. Open the template, close off the Background, Misfit, I'm a and CR layers.
Activate top circle layer, using your colour replacer tool select a darkish colour from your tube in your foreground and #808080 in the baground, double left click on the top circle, effects/ plugins/ xero fritillary, I used the settings below.

2. Activate bottom circle layer, using your colour replacer tool select a darkish colour from your tube in your foreground and #808080 in the baground, double left click on the bottom circle, effects/ plugins/ xero fritillary, same settings as before.
3. Activate the middle rectangle layer, using your colour replacer tool select a contrasting colour from your tube in your foreground and #000000 in the baground, double left click on the rectangle, effects/ plugins/ xero fritillary, same settings as before.
4. Activate the left thin rectangle layer, using your colour replacer tool select a darker version of your contrasting colour from your tube in your foreground and #000000 in the baground, double left click on the left thin rectangle, effects/ plugins/ xero fritillary, same settings as before.
Activate the right thin rectangle layer, double left click, effects/ plugins/ xero fritillary, same settings as before.
5. Activate middle rectangle layer, copy your tube, paste as a new layer, re-size tube if needed, ( all layers un tabbed ) add a drop shadow.
V 0, H 3 , O100, B 9.00, C #000000.
Activate each layer and add the same dropshadow but NOT on the 'hate me' or 'Don't hate me' layers.
6. Activate bottom circle, add a new raster layer, add your text of choice, effects/ plugins/ alien skin eye candy 5 gradient glow, I used the settings below

7. Activate the Don't hate me layer, effects/ plugins/ alien skin eye candy 5 gradient glow, I used the settings below, repeat the same effect on the hate me layer.
 8. Layers/ merge/ merge visible, effects/ plugins/ alien skin eye candy 5 gradient glow, I used the settings below.
 9. Add your copyright info and name and export as a png for transparent background or jpg for a white background .
Subscribe to:
Comments
(Atom)
Stores


BNB Blinkie


