Search This Blog
Followers
Tut writers
If you are using any of my kits in your tutorials please email me your blinkie and link so we can add you here.
scrappingbits AT googlemail.com
Thank you
scrappingbits AT googlemail.com
Thank you
TUT TOU
You are welcome to link to my tuts :O) All tutorials are written by and © to Bits N Bobs Results are for personal use only. No monetry gain allowed and that includes placing them behind a paid or donation based membership area. Supplies are to be used for the tutorial they are supplied with and NOT to be shared. You are not allowed to share/forward or translate any of my tutorials or place them on any blog, website, CD, DVD or anywhere else without my permission. These tutorials are written from my own ideas and any similarities to any other tutorial is purely coincidental. All tutorials are for those with a working knowledge of paintshop pro. I reserve the right to amend these terms at any time.
Wednesday, 19 August 2009
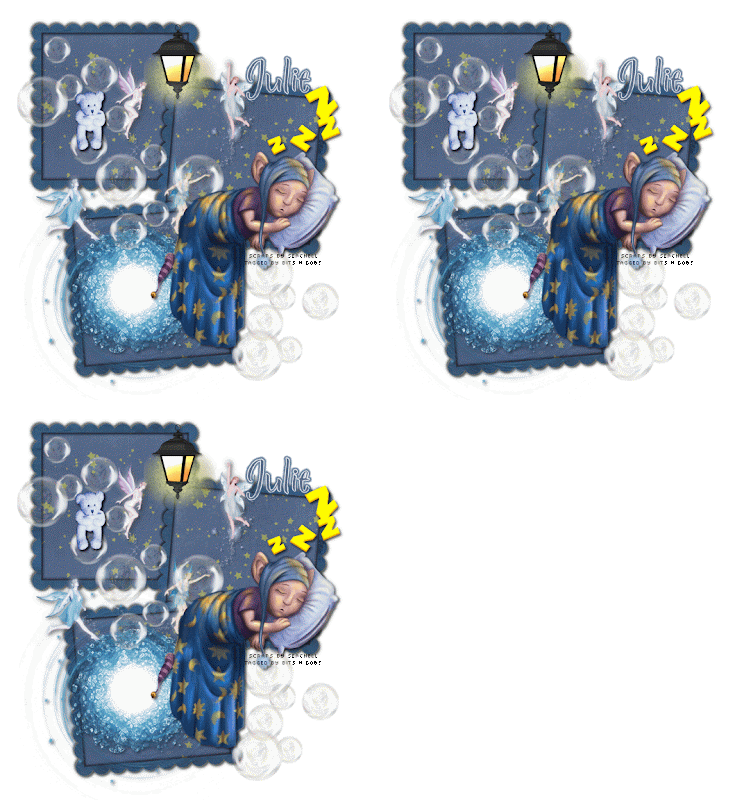
Click tag to view animation.
 Sleep tight
Tutorial written by and © to Bits N Bobs 19th August 2009.
Results are for personal use only.
No monetry gain allowed and that includes placing them behind a paid or donation based membership area.
You are not allowed to share/forward or translate any of my tutorials or place them on any blog, website, DVD or anywhere else without my permission.
These tutorials are written from my own ideas and any similarities to any other tutorial is purely coincidental.
All tutorials are for those with a working knowledge of paintshop pro.
I reserve the right to amend these terms at any time.
Supplies needed.
Font of choice for your name.
I am using Persimmon
Scrap kit 'Sleep tight' by Seachell scraps
Scraps I am using from this kit are
Element 6, Element 36, Element 46, Element 49, Element 57, Element 59, Element 72, paper 1,
This tutorial was written in PSP 9
Note
Open all the supplies in paint shop except the font.
Double click on your font and minimize.
1. Open a new image 600 x 600 at 72 dpi, re size element 36 to 550 pixels high, copy, paste as a new layer on your new image.
Select center of the frame with your magic wand, selections/ modify/ expand by 3, layers/ new raster layer, flood fill with white ( #FFFFFF ), layers/ arrange/ send to bottom, copy paper 1, paste as a new layer, selections/ invert, delete, selections/ none, lower opacity to 75%.
Activate frame layer, add drop shadow :~ V-2, H-2, O-70, B-5.00, Colour # 000000 repeat drop shadow changing V and H to -2
2. Re size element 57 to 300 pixels high, copy paste as a new layer, position, add drop shadow :~ V-2, H-2, O-70, B-5.00, Colour # 000000
3. Re size element 59 to 500 pixels high, copy, activate frame layer, paste as a new layer, position, add drop shadow :~ V-2, H-2, O-70, B-5.00, Colour # 000000
4. Re size element 72 to 100 pixels high, copy, paste as a new layer, position, add drop shadow :~ V-2, H-2, O-70, B-5.00, Colour # 000000
5. Re size element 49 to 500 pixels high, copy, paste as a new layer, position, add drop shadow :~ V-2, H-2, O-70, B-5.00, Colour # 000000
6. Re size element 46 to 100 pixels high, copy, paste as a new layer, position, add drop shadow :~ V-2, H-2, O-70, B-5.00, Colour # 000000
7. Re size element 6 to 130 pixels high, copy, paste as a new layer, position, add drop shadow :~ V-2, H-2, O-70, B-5.00, Colour # 000000
PLEASE NOTE: If you want to continue to the animation skip step 8 and move onto step 9.
8. Layers/ merge/ merge visible, crop to size, add your copyright info, name and export as a png for transparent background or jpg for a white background.
Animation steps.
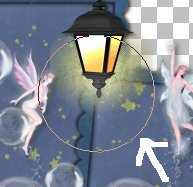
9. Layers merge, use your dodge tool with settings in screen shot 1 below to lighten the lamp area slightly ( click twice should do it )as shown in screen shot 2.

 Shift + D to duplicate your image and using your dodge tool click twice in the same place on the duplicated image.
Shift + D to duplicate your second image and using your dodge tool click three times in the same place on the 3rd duplicated image.
10. Save each image as 1, 2, 3 ready for animation shop.
11. Open animation shop.
File/ animation wizard then follow the screen shots clicking next after each one.
On the add image part browse to where you saved your files and add them all, click next then finish.
View/ animation then file/save as.
Labels:Animated,PTU Tutorials
Subscribe to:
Post Comments
(Atom)
BNB Blinkie

Tuts Of The Week
Labels
- ! missing kits
- Alex Prihodko
- Amberly Berendson
- AMI
- Angela Newman
- Animated
- Arthur Crowe
- Autumn
- Babe-a-licious
- Bits N Bobs
- C.I.L.M
- Camilla Drakenborg
- CDO
- Christmas
- Competitions
- Cris Ortega
- Danielle Pioli
- Double Impact
- Easter
- Elegance Fly
- Elias Chatzoudis
- Elizabeth Austin
- Enamorte
- Exquisite Scraps
- Fantasia
- Forum sets
- Free Fonts
- FTU Tubes
- FTU Tutorials
- Gorjuss
- Gothic
- Incredimal Stationary
- Ismael Rac
- Italia Ruotolo
- James Jacks
- Jamie Kidd
- Jose Cano
- Karen Middleton
- KatNKDA
- KennyK
- Masks
- Maxine Gadd
- MPT
- MTA
- Mystical Scraps
- New Year
- Nice N Easy
- Nicholas Garton
- No scraps
- Orkus Art
- PFD
- PMTWS
- PTE
- PTU Tutorials
- Rachael Anderson
- Rachael Huntington
- Rachel Tallamy
- SATC
- Selena Fenech
- Shawn Palek
- Spring
- St.Patricks
- Steampunk
- Susan Mckirvergan
- Tag templates
- Thanksgiving
- UpYourArt
- Valentines
- Very Many
- Wilma4Ever
- ZlataM


0 comments:
Post a Comment