

Thursday, 17 November 2011

Tutorial written by and © to Bits N Bobs 17th November 2011.
Results are for personal use only.
No monetry gain allowed and that includes placing them behind a paid or donation based membership area.
You are not allowed to share/forward or translate any of my tutorials or place them on any blog, website, DVD or anywhere else without my permission.
These tutorials are written from my own ideas and any similarities to any other tutorial is purely coincidental.
All tutorials are for those with a working knowledge of paintshop pro.
I reserve the right to amend these terms at any time.
Supplies needed.
Font of choice for your name.
I am using Bickley Script Plain
Tube of choice.
I am using one by Carlos Diez
Mine is GA0001 - Audio Slave and available at UpYourArt
Tube is not to be used without the correct licence.
Template Bitch 1 from Addictive Addicts
FTU Scrap kit Gothic Halloween by Kittz Kreationz
From this kit I am using Paper 5 and Hanging heart
Plugins needed.
Xero Fritilliary under freeware you want the full 40 plugin pack.
Note
This tutorial was written in PSP 9 and needs animation shop for the animation.
Open all supplies in paintshop except the font.
Double click on your font and minimize.
1.Activate the template. Re-size to 600 x 600 and 72dpi. All layers tabbed.
Hit shift and D together on your keyboard to duplicate the image,
and close the original layer, no you do not want to save it.
2.Close the background and copyright layers.
Activate the white circle layer and copy your paper.
Selections/ select all, selections/ float, selections/defloat, paste into selection.
Re-name this layer frit 1,
Layers/ duplicate layer, Re - name this layer to frit 2
Layers/ duplicate layer, Re - name this layer to frit 3
Activate frit 1. Effects/ plugins/ xero/ fritilliary
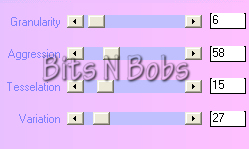
Activate frit 2 Effects/ plugins/ xero/ fritilliary same settings but
this time change the variation to 28.
Activate frit 3 Effects/ plugins/ xero/ fritilliary same settings but
this time change the variation to 29.
3.Activate the sm white circle layer and copy your paper again.
Selections/ select all, selections/ float, selections/defloat, paste into selection.
Adjust/ brightness and contrast/ brightness-contrast,
Brightness 33 - Contrast 9
Effects/ plugins/ xero/ fritilliary, same settings so just hit ok
4.Activate pink rect,
Adjust/ colour balance/ manual colour correction.
My settings are below but you are free to use your own.

Activate the pink star layer.
Adjust/ colour balance/ manual colour correction same settings.
Activate the pink txt border layer.
Adjust/ colour balance/ manual colour correction same settings.
Activate the grey rect; layer.
Adjust/ colour balance/ manual colour correction.

5.Add the fritilliary effect to any layer you require.
I have added it to all layers except .....
Red rectangle and the text layers.
To do so remember to activate each layer and
effects/ plugins/ xero/ fritilliary, same settings so just hit ok each time.
6.Activate the pink star layer
Add a drop shadow of choice.
I am using H0, V0, O100, B11, colour #000000
Move around any layers you want to at this point.
I have moved down the text, red rect: and white rect: layers.
Activate the pink star layer again.
Copy your tube and paste as a new layer.
Add a drop shadow of choice and position to your liking.
Re-size if needed.
Using your rectangular selection tool cut away the part of
your tubes right leg so it looks like it is behind the rectangle layer.

Copy the hanging heart, paste as a new layer,
re-size 49% all layers un tabbed.
Position hanging from your tubes left hand.
Layers/ merge/ merge down.
7.Activate the pink star layer again.
From your tube image copy the bonus close up.
Paste as a new layer and position to your liking.
Activate the pink star layer again.
Selections/ select all, selections/ float,
selections/ defloat, Selections/ invert.
Activate your close up tube layer and erase any
part you don't want outside the star.
Lower the layer opacity of the close up tube to 78%
NOTE:
If you do not want to animate then add your copyright info, text, name and save.
Animation steps.
8.Close the following layers.
Black Circle, frit 1, frit 2 and frit 3
Activate any open layer and layers/ merge/ merge visible.
Open black circle and activate frit 1.
Edit/ copy merged. Open animation shop.
Edit/ Paste as a new animation Back to painstshop.
Close frit 1. Open and activate frit 2. Edit/ copy merged.
In animation shop edit/ paste/ paste after current frame. Back to painstshop.
Close frit 2. Open and activate frit 3. Edit/ copy merged.
In animation shop edit/ paste/ paste after current frame.
Back to painstshop. Close all layers, open and activate the merged layer.
Edit/ copy and go back to animation shop. Edit/ paste as a new animation.
Edit/ copy and minimise. Activate the 3 frame image. Edit/ Select all,
Edit/ propogate paste, Edit/ paste/ paste into selected frame.
9.In paintshop add a new raster layer.
Create your name, text and add your copyright info.
Edit/ copy and go back to animation shop. Edit/ paste as a new animation.
Edit/ copy and minimise. Activate the 3 frame image. Edit/ Select all,
Edit/ propogate paste, edit/ paste/ paste into selected frame.
View/ Animation if you like it save it.


Subscribe to:
Post Comments
(Atom)
Stores


BNB Blinkie


0 comments:
Post a Comment