

Tuesday 27 December 2011


Tutorial written by and © to Bits N Bobs 27th December 2011.
Results are for personal use only.
No monetry gain allowed and that includes placing them behind a paid or donation based membership area.
You are not allowed to share/forward or translate any of my tutorials or place them on any blog, website, DVD or anywhere else without my permission.
These tutorials are written from my own ideas and any similarities to any other tutorial is purely coincidental.
All tutorials are for those with a working knowledge of paintshop pro.
I reserve the right to amend these terms at any time.
Supplies needed.
Font of choice for your name.
I am using Charlemagne Std
Tube of choice.
I am using one by Marc Lambrette
Mine is MA0037 - The White Witch and available at UpYourArt
Tube is not to be used without the correct licence.
Scrap kit Crime Scene by Bits N Bobs
Items I have used from this kit are...
Paper2, CS7, CS11, CS55,
Plugin AAA frames foto frame
Note
This tutorial was written in PSP 9.
Open all supplies in paintshop except the font
Double click on your font and minimize.
Open a new image 600x250 at 72 pixels per inch.
1.Open paper 2,
Re-size to 40% all layers tabbed.
Activate your working image,
flood fill with your paper 2.
2.Copy CS55, paste as a new layer.
Image/ re-size, 70 all layers un-tabbed.
Layers/ duplicate, Layers/ merge/ merge down.
Layers/ duplicate, Layers/ merge/ merge down.
Position towards the bottom.
Layers/ duplicate, image/ flip.
Layers/ merge/ merge down.
3.Copy CS7, paste as a new layer.
Position on the left hand side.
Activate CS11, re-size to 40% all layers tabbed.
Copy, paste as a new layer.
Position on the left hand side.
Add a drop shadow of choice.
I am using I use V3, H3, O100, B7.00, colour black.
4.Activate your tube.
If using the same as me for a smoother look I have added noise reduction as follows.
Adjust/ photo fix/ Digital camera noise removal, settings as below.

5.Copy your tube, paste as a new layer.
Position to your liking.
Effects/ texture effects/ mosaic antique, settings below in screenshot.

Layers/ properties, adjust the blend mode to Luminance (Legacy)
6.Layers/ merge/ merge visible
Effects/ plugins/ AAA Frames/ Foto frame

7.Copy your tube, paste as a new layer.
Position to your liking.
Add same drop shadow as before.
Layers/ new raster layer.
8.Open a new image 150 x 150 for your avatar.
Copy your merged signature.
Paste as a new layer onto your avatar image.
Position to your liking,
Layers/ merge/ merge visible.
Effects/ plugins/ AAA Frames/ Foto frame
Same settings as before but change the width
from 10 to 5.
9.Add all of your copyright info to both,
add your name and save.

Tutorial written by and © to Bits N Bobs 27th December 2011.
Results are for personal use only.
No monetry gain allowed and that includes placing them behind a paid or donation based membership area.
You are not allowed to share/forward or translate any of my tutorials or place them on any blog, website, DVD or anywhere else without my permission.
These tutorials are written from my own ideas and any similarities to any other tutorial is purely coincidental.
All tutorials are for those with a working knowledge of paintshop pro.
I reserve the right to amend these terms at any time.
Supplies needed.
Font of choice for your name.
I am using Charlemagne Std
Tube of choice.
I am using one by Guy Powers
Mine is GP0059 - Tina Handcuffed and available at UpYourArt
Tube is not to be used without the correct licence.
Scrap kit Crime Scene by Bits N Bobs
Items I have used from this kit are...
Paper 5, CS56, CS14, CS11
Mask of choice. I am using mask 50 by Gabee
Note
This tutorial was written in PSP 9.
Open all supplies in paintshop except the font and Mask.
Double click on your font and minimize.
Install your mask and plugins.
Open a new image 550x550 at 72 pixels per inch.
1.Re-size paper 5 to 530 pixels,
copy and paste as a new layer onto your working image.
Layer/ Load-save mask/ load from disk,
Look for your mask image and with the settings below click load.
Layers/ merge / merge group.

2.Image/ Canvas size/ 600 x 600 in the center.
Copy CS56, paste as a new layer.
Re-size 90 all layers un-tabbed.
Layers/ arrange/ send to bottom.
Layers/ duplicate, Image/ mirror.
Layers/ merge/ merge down.
3.Copy CS14 and paste as a new layer.
Re-size 105 all layers un-tabbed.
Activate your top layer.
4.Copy your tube and past as a new layer.
Image re-size, 90 all layers un-tabbed.
Positon to your liking.
Add a drop shadow of choice.
I use V3, H3, O100, B7.00, colour black.
5.Copy CS11, paste as a new layer.
Image/ re-size 25 all layers un-tabbed
position to your liking.
Mine is in the bottom right corner.
Add a drop shadow of choice.
I use V3, H3, O100, B7.00, colour black.
Layers/ duplicate, Image/ mirror, Image/ flip.
Re-size 50 all layers un-tabbed.
Position to your liking.
I have put mine on her butt.
Layers/ merge/ merge visible.
6.Add a new raster layer.
Add all copyright info, your name and save.
Friday 23 December 2011


New Year Masquerade
Tutorial written by and © to Bits N Bobs 23rd December 2011.
Results are for personal use only.
No monetry gain allowed and that includes placing them behind a paid or donation based membership area.
You are not allowed to share/forward or translate any of my tutorials or place them on any blog, website, DVD or anywhere else without my permission.
These tutorials are written from my own ideas and any similarities to any other tutorial is purely coincidental.
All tutorials are for those with a working knowledge of paintshop pro.
I reserve the right to amend these terms at any time.
Supplies needed.
Font of choice for your name.
I am using Angelica
Tube of choice.
I am using one by Alena Lazareva
Mine is AL0028 available at UpYourArt
Tube is not to be used without the correct licence.
Plugins required
Plugin - Penta.com dot and cross ( Garbage collection )
Note
This tutorial was written in PSP 9.
Open all supplies in paintshop except the font
Double click on your font and minimize.
Open a new transparent image 600 x 250 at 72 pixels per Inch
1.Copy the image from your tube and paste as a new layer on your working image.
Image/ rotate/ free rotate, 90 right all layers un tabbed.
Adjust/ Blur/ Guassian blur 15.00
Effects/ plugins/ penta.com/ dot and cross
2.Copy the curtain, paste as a new layer.
Position to your liking.
Layers/ duplicate layer,
Image/ mirror.
Layers/ merge/ merge down.
Add a drop shadow.
I have used V0, H0, O80, B9.0, Colour black.
3.Copy your bonus close up tube.
Paste as a new layer.
Position to your liking.
Layers/ move/ move down.
Add a drop shadow.
I have used V3, H3, O80, B9.0, Colour black.
4.Activate your top layer.
Layers/ new raster layer.
Add your copyright, text and name.
Export as jpg and save.
5.Open a new image 150 x 150 for your avatar.
Copy your merged signature.
Paste as a new layer onto your avatar image.
Position to your liking,
Add your copyright info and save.
Thursday 22 December 2011


Tutorial written by and © to Bits N Bobs 22nd December 2011.
Results are for personal use only.
No monetry gain allowed and that includes placing them behind a paid or donation based membership area.
You are not allowed to share/forward or translate any of my tutorials or place them on any blog, website, DVD or anywhere else without my permission.
These tutorials are written from my own ideas and any similarities to any other tutorial is purely coincidental.
All tutorials are for those with a working knowledge of paintshop pro.
I reserve the right to amend these terms at any time.
Supplies needed.
Font of choice for your name.
I am using Bickley Script Plain and Angelica
Tube of choice.
I am using one by Susan Justice
Mine is SU0084 available at UpYourArt
Tube is not to be used without the correct licence.
Snow animation here.
Thank you to Bev at Horseplaypastures for her permission to us this.
Please do not share or include this snow animation in any other tutorials
with first obtaining Bev's permission.
Plugins required
Plugin - Penta.com dot and cross ( Garbage collection)
Alien Skin Xenofex2
Note
This tutorial was written in PSP 9.
Open all supplies in paintshop except the font
Double click on your font and minimize.
Open a new transparent image 600 x 250 at 72 pixels per Inch
1.Copy the image from your tube and paste as a new layer on your working image.
Layers/ Duplicate layer.
Image/ mirror. Position both layers so they line up.
You will now have a woman on both sides.
Layers/ merge/ merge visible

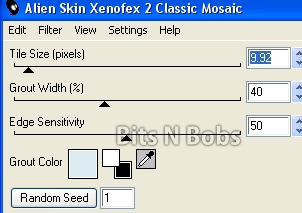
2.Effects/ plugins/ Alienskin Xenofex2/ Classic Mosaic
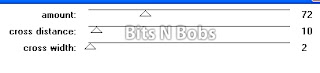
Effects/ Distortion effects/ Curlicues settings
as in the screen shot below.
Re-name this layer to BG LAYER

3.Copy your bonus close up tube,
paste as a new layer.
Position to the right and add a drop shadow.
I have used V3, H3, O50, B9.0, Colour black.
Add a new layer and add the text of your choice.
I have added a gradient glow to mine with Eye Candy 6
but you don't have to.
Add your copyright info.
NOTE
If you do not wish to animate add your name and save.
4.Activate the BG Layer.
We will now begin adding the snow.
On the snow image copy frame 1,
paste as a new layer on your working image.
Rename the layer to snow 1.
Repeat until you have 10 snow layers.
5.Close all snow layers except snow layer 1.
Activate snow layer 1.
Edit/ Copy merged.
Open animation shop.
Paste as a new animation.
Return to paintshop.
Close snow layer 1.
Un hide and activate snow layer 2.
Back to animation shop and paste after current layer.
Keep repeating these steps until you have activated snow layer 10.
Edit/ Copy merged.
Back to animation shop and paste after current layer.
View/ Animation if you like it save it.
6.In animation shop open a new transparent image 150x150
Activate your signature.
Edit/ Select all, Crop your signature animation so it looks
roughly the same size as the new image.
Animation/ re-size settings in Screenshot below.

You can now close the blank new image.
Create your copy right in paintshop.
Copy and back in animation shop paste as a new animtaion.
Edit/ copy.
Activate you smaller signature image,
this is now your avatar.
Edit/ select all, Edit/ propogate paste, Edit/ paste into selected frame.
Save as your avatar.

Tutorial written by and © to Bits N Bobs 22nd December 2011.
Results are for personal use only.
No monetry gain allowed and that includes placing them behind a paid or donation based membership area.
You are not allowed to share/forward or translate any of my tutorials or place them on any blog, website, DVD or anywhere else without my permission.
These tutorials are written from my own ideas and any similarities to any other tutorial is purely coincidental.
All tutorials are for those with a working knowledge of paintshop pro.
I reserve the right to amend these terms at any time.
Supplies needed.
Font of choice for your name.
I am using Bickley Script Plain
Tube of choice.
I am using one by Laura Macy
Mine is Mist and Moonlight - available at MyTubedArt
Tube is not to be used without the correct license.
Scrap kit Loneliness by Bits N Bobs
From this kit I am using Paper 3, Raindrops 1, Bead string 1, Leaves 2, Label 2, Raven
Mask of choice.
I am using mask 13 here
Plugins needed.
Plugin - Penta.com dot and cross ( Garbage collection )
Note
This tutorial was written in PSP 9 and needs animation shop for the animation.
Open all supplies in paintshop except the font.
Double click on your font and minimize.
Open a new image 500 x 500 at 72 pixels per inch
1.Copy the background image from your tube.
Paste as a new layer on your working image.
Layers/ merge/ merge visible.
Position the tube layer in the center of your image.
Layers/ load save mask/ Load mask from disk,
Find your mask and using the setting below click load.
Layers/ merge/ merge group.

Effects/ plugins/ Penta.com/ Dots and Cross

2.Copy your paper, paste as a new layer.
Layers/ arrange/ send to bottom.
Layers/ merge/ merge visible.
Layers/ load save mask/ Load mask from disk,
Settings are the same as before so just click load.
Layers/ merge/ merge group.
3.Copy your raindrops, paste as a new layer.
Image/ re-size, re-size to 50.
With your lasoo tool or eraser cut away the
2 outside rows of tear drops.
4.Copy your bead string, paste as a new layer.
Image/ re-size, re-size to 60
Position on the right to your liking.
Layers/ duplicate/ duplicate layer.
Image/ mirror.
Layers/ merge/ merge down.
Add a drop shadow of choice.
I am using H3, V3, O100, B9, colour #000000
5.Copy your leaves, paste as a new layer.
Image/ re-size, re-size 25.
Position on the right to your liking.
Layers/ duplicate/ duplicate layer.
Image/ mirror.
Layers/ merge/ merge down.
Add a drop shadow of choice.
I used the same settings as before.
Layers/ arrange/ move down.
Layers/ duplicate layer, Image/ flip.
6.Copy your tube, paste as a new layer.
Image/ re-size/ re-size 70,
Position to your liking.
Add a drop shadow of choice.
I used the same settings as before.
Layers/ arrange/ move your layer down
to beneath your leaves.
7.Copy your label,
paste as a new layer
Position to your liking.
Add a drop shadow of choice.
I used the same settings as before.
8.Copy your Raven.
Paste as a new layer,
Image/ re-size/ re-size to 25,
Image/ mirror, position to your liking.
Add a drop shadow of choice.
I used the same settings as before.
9.Add a new raster layer,
add all your copyright info and your name.
Export and save as a transparent png file.
Wednesday 21 December 2011


Fabulous
Tutorial written by and © to Bits N Bobs 20th December 2011.
Results are for personal use only.
No monetry gain allowed and that includes placing them behind a paid or donation based membership area.
You are not allowed to share/forward or translate any of my tutorials or place them on any blog, website, DVD or anywhere else without my permission.
These tutorials are written from my own ideas and any similarities to any other tutorial is purely coincidental.
All tutorials are for those with a working knowledge of paintshop pro.
I reserve the right to amend these terms at any time.
Supplies needed.
Font of choice for your name.
I am using Impact and Girls are weird
Tube of choice.
I am using one by Susan Justice
Mine is SU0038 - Panacea and available at UpYourArt
Tube is not to be used without the correct license.
Plugin - Penta.com dot and cross ( Garbage collection )
Note
This tutorial was written in PSP 9.
Open all supplies in paintshop except the font
Double click on your font and minimize.
Open a new transparent image 600 x 250 at 72 pixels per Inch
1.Copy and past the image from your tube onto your working image..
Image/ rotate/ free rotate, 90 left all layers un tabbed.
Effects/ Distortion/ Twirl, 720 degrees.
Effects/ plugins/ Penta.com/ Dots and Cross

2.Copy your tube,
paste as a new layer.
Position to the right and add a drop shadow.
I have used V3, H3, O100, B9.0, Colour black.
Layers/ Properties, change blend mode to Screen
3.Copy your tube,
paste as a new layer.
Image/ Mirror,
position to the left,
re-size 75 percent all layers un-tabbed and add a drop shadow.
I have used V3, H3, O100, B9.0, Colour black.
4.Add a new raster layer,
Add text of your choice.
Layers/ properties, blend mode to Burn.
5.Open a new image 150 x 150 for your avatar.
Copy your merged signature.
Paste as a new layer onto your avatar image.
Position to your liking, Image/ mirror.
Layers/ merge/ merge visible.
6.Add your copyright info and name to both and save.
Monday 19 December 2011


Tutorial written by and © to Bits N Bobs 19th December 2011.
Results are for personal use only.
No monetry gain allowed and that includes placing them behind a paid or donation based membership area.
You are not allowed to share/forward or translate any of my tutorials or place them on any blog, website, DVD or anywhere else without my permission.
These tutorials are written from my own ideas and any similarities to any other tutorial is purely coincidental.
All tutorials are for those with a working knowledge of paintshop pro.
I reserve the right to amend these terms at any time.
Supplies needed.
Font of choice for your name.
I am using Bickley Script Plain
Tube of choice.
I am using one by Steve Baier
Mine is SB0025 Better To Give and available at UpYourArt
Tube is not to be used without the correct licence.
Plugins needed.
Alien Skin Xenofex2
AAA frames fotoframe
Note
This tutorial was written in PSP 9 and needs animation shop for the animation.
Open all supplies in paintshop except the font.
Double click on your font and minimize.
Open a new image, 600 w x 250 h at 72 dpi.
1.Copy the image from your tube and paste as a new layer on your working image.
Layers/ Duplicate layer.
Image/ mirror. Position both layers so they line up.
You will now have a woman on both sides.

2. Layers/ duplicate layer,
Activate bottom layer
Effects/ plugins/ AAA frames/ foto frame

3.Activate top layer.
Effects, Alien Skin Xenofex 2/ Shatter

Layers/ properties change blend mode to Overlay
Effects, Alien Skin Xenofex 2/ Constellation

4.Copy your tube, paste as a new layer.
Position to your liking and add a drop shadow.
I am using H3, V3, O100, B7, colour #000000
5.Open a new image 180 x 180 for your avatar.
Copy your merged signature.
Paste as a new layer onto your avatar image.
Position to your liking, Image/ mirror.
Layers/ merge/ merge visible.
Effects/ Plugins/ AAA frames/ foto frame.

6.Add your copyright info and name to both and save.

Tutorial written by and © to Bits N Bobs 7th December 2011.
Results are for personal use only.
No monetry gain allowed and that includes placing them behind a paid or donation based membership area.
You are not allowed to share/forward or translate any of my tutorials or place them on any blog, website, DVD or anywhere else without my permission.
These tutorials are written from my own ideas and any similarities to any other tutorial is purely coincidental.
All tutorials are for those with a working knowledge of paintshop pro.
I reserve the right to amend these terms at any time.
Supplies needed.
Font of choice for your name.
I am using Janda Swirlygirl
Tube of choice.
I am using Candy Pixies by Amberly Berendson
Tube is not to be used without an MTA license
Template here
Plugin required.
Xero Fritilliary under freeware you want the full 40 plugin pack.
Note
This tutorial was written in PSP 9
Open all supplies in paintshop except the font.
Double click on your font and minimize.
1.Open the template, close the copyright layer
Activate text 2 layer.
Adjust/ Colour balance/ Manual colour correction.

Effects/ plugins/ Xero/ Fritillary

Activate text 1 layer.
Add a drop shadow of choice.
I am using V1 - H1 - O100 - B5.00 - C #d31400
2.Activate text 2 layer.
Copy thePixie2 tube, paste as a new layer.
Position to your liking.
Add a drop shadow of choice.
I am using V1 - H1 - O100 - B7.00 - C #000000
3.Activate your large circle 1 layer.
Selections/ select all , Selections/ float, Selections/ defloat.
Selections/ invert.
Copy from your tube the main image,
paste as a new layer, position to your liking
and hit delete on your keyboard.
Layers/ merge/ merge down.
Activate your large circle 1b layer.
Add a drop shadow of choice.
I am using V0 - H0 - O100 - B9.00 - C #d31400
4.Activate circle 1 layer.
Copy pixie 3n4 tube layer.
Paste as a new layer,
Image/ mirror, position to your liking.
Add a drop shadow of choice.
I am using V3 - H3 - O100 - B9.00 - C #000000
5.Activate circle 1 layer.
Copy from your tube pixie 1,
paste as a new layer, position to your liking
Add a drop shadow of choice.
I am using V3 - H3 - O100 - B9.00 - C #000000
6.Activate rect 1 layer.
Effects/ plugins/ Xero/ Fritillary

7.Activate circle 1 layer.
Effects/ plugins/ Xero/ Fritillary
Same settings as before.
You can of course use your own settings.
8.Layers/ new raster layer,
Add copyright info.
Export as png with a transparent background and save.
Thursday 8 December 2011


Tutorial written by and © to Bits N Bobs 8th December 2011.
Results are for personal use only.
No monetry gain allowed and that includes placing them behind a paid or donation based membership area.
You are not allowed to share/forward or translate any of my tutorials or place them on any blog, website, DVD or anywhere else without my permission.
These tutorials are written from my own ideas and any similarities to any other tutorial is purely coincidental.
All tutorials are for those with a working knowledge of paintshop pro.
I reserve the right to amend these terms at any time.
Supplies needed.
Font of choice for your name.
I am using Bickley Script Plain
Tube of choice.
I am using one by Kirsche at http://picsfordesign.com
Mine is Rosa and available at PicsForDesign http://picsfordesign.com
Tube is not to be used without the correct licence.
Plugins needed.
Xero Fritilliary under freeware you want the full 40 plugin pack. http://www.xero-graphics.co.uk/downloads.htm
Note
This tutorial was written in PSP 9 and needs animation shop for the animation.
Open all supplies in paintshop except the font.
Double click on your font and minimize.
Open a new image, 600 w x 250 h at 72 dpi.
1.Copy the background image from your tube and paste as a
new layer on your working image.
Copy your tube, paste as a new layer,
Image/ mirror, position to your liking.
Edit/ copy, Effects/ Distortion effects,
From left to right, wind strength 100.
Paste as a new layer, position in the same place as before.
Layers/ properties, adjust blend mode to Luminance(legacy)
Lower the layer opacity to 60%
Layers/ merge/ merge down.
2.Copy your tube and paste as a new layer on your working image.
Image re-size, all layers un-tabbed, re-size 65, position to your liking.
Add a drop shadow.
I am using H3, V3, O100, B9, colour #000000
Layers/ new raster layer.
Add all your copyright info.
3.Activate the background layer,
re-name to bg1.
Layers/ duplicate re-name to bg 2
Layers/ duplicate re-name to bg 3
Layers/ duplicate re-name to bg 4
Layers/ properties, adjust blend mode to screen
Activate the bg1.
Effects/ plugins/ Xero/ Fritillary

Activate the bg2.
Effects/ plugins/ Xero/ Fritillary
Same settings but change the Variation to 42
Activate the bg3.
Effects/ plugins/ Xero/ Fritillary
Same settings but change the Variation to 41
4.Activate bg4, close b3 and bg2.
Edit/ copy merged. Open animation shop.
Edit/ Paste as a new animation. Go back to painstshop.
Close bg1. Open bg2. Edit/ copy merged.
In animation shop edit/ paste/ paste after current frame.
Go back to painstshop.
Close bg2. Open bg3. Edit/ copy merged.
In animation shop edit/ paste/ paste after current frame.
5.In paintshop add a new raster layer.
Create your name.
Edit/ copy and go back to animation shop.
Edit/ Select all, Edit/ propogate paste,
edit/ paste/ paste into selected frame.
View/ Animation if you like it save it.
6.In paintshop open a new image 150 x 150 for your avatar.
Edit/ Copy merged signature.
Paste as a new layer onto your avatar image.
Image/ re-size, all layers un-tabbed, re-size to 70
Position to your liking,
Layers/ merge/ merge visible.
Add your copyright info and Initial
Wednesday 7 December 2011


Fairy Happy Holidays
Tutorial written by and © to Bits N Bobs 7th December 2011.
Results are for personal use only.
No monetry gain allowed and that includes placing them behind a paid or donation based membership area.
You are not allowed to share/forward or translate any of my tutorials or place them on any blog, website, DVD or anywhere else without my permission.
These tutorials are written from my own ideas and any similarities to any other tutorial is purely coincidental.
All tutorials are for those with a working knowledge of paintshop pro.
I reserve the right to amend these terms at any time.
Supplies needed.
Font of choice for your name.
I am using Bickley Script Plain
Tube of choice.
I am using one by Abranda Icle
Mine is A10012 and available at UpYourArt
Tube is not to be used without the correct licence.
Holly tube here
Plugins needed.
Mura's Meister Copies
AAA frames fotoframe
Note
This tutorial was written in PSP 9 and needs animation shop for the animation.
Open all supplies in paintshop except the font.
Double click on your font and minimize.
Open a new image, 600 w x 250 h at 72 dpi.
1.Copy the image and paste as a new layer on your working image.
Image/ rotate/ free rotate/ 90 left all layers untabbed.
Move the image to the center.
Effects/ textured effects/ Mosaic glass.

2.Copy your tube and paste as a new layer on your working image.
Image/ mirror, Layers/ properties, change blend mode to Overlay.
Lower the layer opacity to 45.
3.Again copy your tube and paste as a new layer.
Position to your liking, Effects/ distortion effects/ wind
From left to right/ strength 100
Layers/ duplicate layer, close the duplicated layer.
Image/ mirror, Layers/arrange/ move down.
Again copy your tube and paste as a new layer.
Add a drop shadow.
I am using H3, V3, O100, B9, colour #000000
4.Layers/ merge/ merge visible.
Effects/ Plugins/ AAA frames/ foto frame

5.Layers/ new raster layer, Add your text if you want it.
Layers/ new raster layer, Selections/ select all,
Selections/ Modify/ contract/ contract by 19
Selections/invert, activate your text layer.
Effects/ plugins/ Muras meister/ copies
Selections/ none

6.Copy your holly leaf,
Activate top layer of your working image.
Paste as a new later.
Position in one corner.
Layers/ duplicate, Image/ mirror
Layers/ merge/ merge down.
Layers/ duplicate, Image/ flip
Layers/ merge/ merge down.
Add a drop shadow.
I am using H3, V3, O70, B5, colour #000000
Layers/ merge/ merge visible
7.Open a new image 150 x 150 for your avatar.
Copy your merged signature.
Paste as a new layer onto your avatar image.
Image/ re-size, all layers un-tabbed, re-size to 70
Position to your liking,
Layers/ merge/ merge visible.
8.Add your copyright info and name to both and save.
Tuesday 6 December 2011


Elven Princess
Tutorial written by and © to Bits N Bobs 6th December 2011.
Results are for personal use only.
No monetry gain allowed and that includes placing them behind a paid or donation based membership area.
You are not allowed to share/forward or translate any of my tutorials or place them on any blog, website, DVD or anywhere else without my permission.
These tutorials are written from my own ideas and any similarities to any other tutorial is purely coincidental.
All tutorials are for those with a working knowledge of paintshop pro.
I reserve the right to amend these terms at any time.
Supplies needed.
Font of choice for your name.
I am using Nueva Std Cond
Tube of choice.
I am using Elven Princess by Amberly Berendson
Tube is not to be used without an MTA license
AAA Frames - Photo frame
Note
This tutorial was written in PSP 9
Open all supplies in paintshop except the font.
Double click on your font and minimize.
Open a new image, 600 w x 250 h at 72 dpi.
1.Copy the image layer from your tube,
paste as a new image.
Effects/ image effects/ seamless tiling.
2.Activate your blank working image,
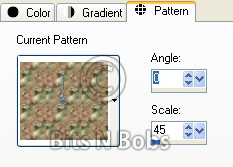
flood fill with patter using the seamless tile you just created
Angle 0, Scale 45
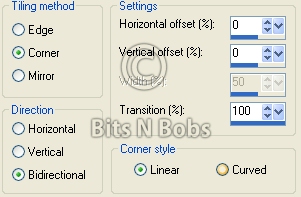
3.Effects/ plugins/ foto frame/ AAA frames/ Foto frame
Settings as in the screenshot below.

4.Copy your main tube,
paste as a new layer onto your working image,
image/ mirror, position to your liking.
Add a drop shadow of choice.
I am using V3 - H5 - O1000 - B7.00 - C #000000
5.Layers/ new raster layer,
Selections/ select all, Selections/ modify/ contract,
contract by 5, Selections/ invert.
Flood fill with a colour from your tube.
I have used #41512d
Selections/ select none.
6.Layers/ new raster layer, name it copyright.
Add all your copyright info.
Export as a jpg and save.
7.Re-size your tag 65% all layers tabbed.
Edit/ copy merged.
Open a new image 150 x 150 for your avatar.
Paste as a new layer , Image/ mirror,
position to your liking.
8.Layers/ new raster layer,
Selections/ select all, Selections/ modify/ contract,
contract by 5, Selections/ invert.
Flood fill with a colour from your tube.
I have used #41512d
Selections/ select none.
Add copyright info.
Export as a jpg and save.
Subscribe to:
Posts
(Atom)
Stores


BNB Blinkie


