

Sunday, 30 August 2009

Don't hate me
Tutorial written by and © to Bits N Bobs 30th August 2009.
Results are for personal use only.
No monetry gain allowed and that includes placing them behind a paid or donation based membership area.
You are not allowed to share/forward or translate any of my tutorials or place them on any blog, website, DVD or anywhere else without my permission.
These tutorials are written from my own ideas and any similarities to any other tutorial is purely coincidental.
All tutorials are for those with a working knowledge of paintshop pro.
I reserve the right to amend these terms at any time.
Supplies needed.
Font of choice for your name.
I am using Sweetheart script limited
Tube of choice.
I am using XeracxGirl by Ismael Rac
This tube is not to be used without an AMI license
Template 11 by Sapphire
Xero - Fritillary in Xero filter set 4
Eye candy 5 Impact - Gradient glow
This tutorial was written in PSP 9
Note
Open all the supplies in paintshop except the font.
Double click on your font and minimize.
1. Open the template, close off the Background, Misfit, I'm a and CR layers.
Activate top circle layer, using your colour replacer tool select a darkish colour from your tube in your foreground and #808080 in the baground, double left click on the top circle, effects/ plugins/ xero fritillary, I used the settings below.

2. Activate bottom circle layer, using your colour replacer tool select a darkish colour from your tube in your foreground and #808080 in the baground, double left click on the bottom circle, effects/ plugins/ xero fritillary, same settings as before.
3. Activate the middle rectangle layer, using your colour replacer tool select a contrasting colour from your tube in your foreground and #000000 in the baground, double left click on the rectangle, effects/ plugins/ xero fritillary, same settings as before.
4. Activate the left thin rectangle layer, using your colour replacer tool select a darker version of your contrasting colour from your tube in your foreground and #000000 in the baground, double left click on the left thin rectangle, effects/ plugins/ xero fritillary, same settings as before.
Activate the right thin rectangle layer, double left click, effects/ plugins/ xero fritillary, same settings as before.
5. Activate middle rectangle layer, copy your tube, paste as a new layer, re-size tube if needed, ( all layers un tabbed ) add a drop shadow.
V 0, H 3 , O100, B 9.00, C #000000.
Activate each layer and add the same dropshadow but NOT on the 'hate me' or 'Don't hate me' layers.
6. Activate bottom circle, add a new raster layer, add your text of choice, effects/ plugins/ alien skin eye candy 5 gradient glow, I used the settings below

7. Activate the Don't hate me layer, effects/ plugins/ alien skin eye candy 5 gradient glow, I used the settings below, repeat the same effect on the hate me layer.
 8. Layers/ merge/ merge visible, effects/ plugins/ alien skin eye candy 5 gradient glow, I used the settings below.
 9. Add your copyright info and name and export as a png for transparent background or jpg for a white background .
Sunday, 23 August 2009

Bashful bride
Tutorial written by and © to Bits N Bobs 23rd August 2009.
Results are for personal use only.
No monetry gain allowed and that includes placing them behind a paid or donation based membership area.
You are not allowed to share/forward or translate any of my tutorials or place them on any blog, website, DVD or anywhere else without my permission.
These tutorials are written from my own ideas and any similarities to any other tutorial is purely coincidental.
All tutorials are for those with a working knowledge of paintshop pro.
I reserve the right to amend these terms at any time.
Supplies needed.
Font of choice for your name and text.
I am using Silver script
Tube of choice.
I am using the bashful bride tube by Chrissy clark
Tubes are not to be used without an AMI license
Scrap kit I hart chibis by Amanda Fontaine
Kit is not to be used without an AMI license
I am using the following items from the above kit....
Frame2, Doodle2, Paper 8, Heart1, Flower1, Flower2, Flower3,
This tutorial was written in PSP 9
Note
Open all the supplies in paintshop except the font.
Double click on your font and minimize.
1. Open a new image 600x600 at 72 dpi
2. Re-size frame2 to 400 pixels high, copy, paste as a new layer, select the center of the frame making sure to get in between the swirls, selections/ modify/ expand by 10, layers/new raster layer, flood fill with #FFFFFF, layers/ arrange/ move down, layers/ new raster layer, copy paper8, paste into selection, selections/ select none, lower layer opacity to 75%.
3. Re-size doodle2 to 250 pixels high, copy, activate paper layer, paste as a new layer.
Re-size your tube to 400 pixels high, copy, paste as a new layer, layers/ merge/ merge down.
Selections/ select all, selections/ float, selections/ defloat, selections/ modify/ contract by 1, activate the frame layer and erase the top part so her hair is on top of the frame.
Add a drop shadow, settings will be the same throughout.
V 2, H 2, O 60, B 5.00, C #000000.
Activate the tube layer, add a drop shadow. Layers/ merge/ merge visible.
4. Re open your doodle2 at its original size.
Re-size doodle2 to 300 pixels high, copy, paste as a new layer, layers/ arrange/ move down, duplicate the layer, image/ mirror, /image/ flip, layers/ merge/ merge down.
Duplicate layer, image/ mirror, layers/ merge/ merge down, add a drop shadow. Layers/ merge/ merge visible.
5. Copy heart1, paste as a new layer, duplicate layer, image/ mirror, position partially covering the first heart, add a drop shadow to each heart.
6. Re-size flower1 to 80 pixels high, copy, paste as a new layer, position, re-size flower2 to 80 pixels high, copy, paste as a new layer, position, re-size flower3 to 80 pixels high, copy, paste as a new layer, position, layers/ merge/ merge down, layers/ merge/ merge down, duplicate layer, image mirror, layers/ merge/ merge down, add a dropshadow.
Add text if you require.
7. Layers/ merge/ merge visible, add your copyright info, license, name, export as a jpg for a white bg or png for transparent and save.
Friday, 21 August 2009

Dance
Tutorial written by and © to Bits N Bobs 21st August 2009.
Results are for personal use only.
No monetry gain allowed and that includes placing them behind a paid or donation based membership area.
You are not allowed to share/forward or translate any of my tutorials or place them on any blog, website, DVD or anywhere else without my permission.
These tutorials are written from my own ideas and any similarities to any other tutorial is purely coincidental.
All tutorials are for those with a working knowledge of paintshop pro.
I reserve the right to amend these terms at any time.
Supplies needed.
Font of choice for your name.
I am using Mirielle
Tube of choice.
I am using the poser from the kit. Poser created by me *grin*
Tube is not to be used without my © Bits N Bobs http://scrappingbits.blogspot.com/
Dancing queen kit by Knc Scrapz
I have used the following items from the above kit.
Paper 10, Dancer 2, Drapes, Glitter dangle, Piano, Brad 3,
This tutorial was written in PSP 9
Note
Open all the supplies in paintshop except the font.
Double click on your font and minimize.
1. Open a new image 500x500 at 72dpi.
2. Re-size drapes to 450 pixels high, copy/paste as a new layer and add a drop shadow. Settings will be the same throughout unless stated otherwise.
V 2, H 2, O 64, B 6.00, C #000000.
3. Re-size Brad 3 to 60 pixels wide, copy, paste as a new layer, duplicate layer, immage/ mirror, Layers/ merge/ merge down, add a drop shadow.
4. Re-size piano to 350 pixels wide, copy, paste as a new layer, add a drop shadow, layers/ arrange/ send to bottom. Activate the drape layer, lower opacity slightly so you can see the piano, using your freehand selection tool ( lassoo ) cut away part of the drape so the piano is in front. Remember to raise the opacity back to 100% when finished. Layers/ merge/ merge visible.

5. Select the center, selections/ modify/ expand by 9, add a new raster layer, copy paper 10, paste into selection, layers/ arrange/ send to bottom, selections/ select none.
6. Re-size glitter dangle to 400 pixels wide, copy/paste as a new layer, position to your liking, add a drop shadow, erase and part that is outside of the drapes.
7. Re-size dancer to 400 pixels high, copy, activate piano layer, paste as a new layer, position, add a drop shadow.
8. Add whatever text you would like, add your copyright info, watermark, name and export as either a png or jpg.
Thursday, 20 August 2009
 She dreams
Tutorial written by and © to Bits N Bobs 20th August 2009.
Results are for personal use only.
No monetry gain allowed and that includes placing them behind a paid or donation based membership area.
You are not allowed to share/forward or translate any of my tutorials or place them on any blog, website, DVD or anywhere else without my permission.
These tutorials are written from my own ideas and any similarities to any other tutorial is purely coincidental.
All tutorials are for those with a working knowledge of paintshop pro.
I reserve the right to amend these terms at any time.
Supplies needed.
Font of choice for your name.
I am using MA Sexy
Tube of choice.
I am using Blossom by Selina Fenech at C.I.L.M
Tube is not to be used without a C.I.L.M license
She dreams kit by Bits N Bobs
I have used the following items from the above kit.
Gem 5, Paper 10, Element 5, Splatter 3
Plugin required - muras meister - copies
This tutorial was written in PSP 9
Note
Open all the supplies in paintshop except the font.
Double click on your font and minimize.
1. Open a new image 600 x 600 at 72dpi.
Re size gem 5 to 100 pixels wide, copy, paste as a new layer.
Effects/ muras meister/ copies with settings as in screen shot below

With your magic wand select the center of the flower ring, selections/ modify/ expand by 11.
Layers/ new raster layer, copy paper 10, paste into selection, layers/ arrange/ move down, selections/ select none.
Activate flower ring, add drop shadow, settings will remain the same through out unless stated otherwise.
V 2, H 2, O 70, B 5.00, C #000000
2. Re size tube to 300 pixels high, copy, activate paper layer, paste as a new layer, add a drop shadow.
Erase any part of the tube outside of the flower ring.
3. Re size element 5 to 400 pixels wide, copy/paste as a new layer, layers/ arrange/ bring to top, position to your liking.
Activate flower ring. Selections/ select all, float, defloat. Activate element layer and erase any part you don't want. Selections/ select none.
Erase any part of the element over your tubes face. Duplicate layer, image/ mirror, image/ flip
4. Re size splatter 5 to 500 pixels wide, copy, paste as a new layer, layers/ arrange/ sent to bottom, duplicate layer, image/ mirror, layers/ merge/ merge down, layers/ duplicate, image/ flip, move down slightly, laers/ merge/ merge down, add a drop shadow V 2, H 2, O 20, B 5.00, C #000000.
5. Add license info, watermark and name, export as a png for tranparent file or jpg for white background.
Wednesday, 19 August 2009
 My Immortal Tutorial written by and © to Bits N Bobs 19th August 2009 You are not allowed to share/forward or translate this tutorial or place it on any blog or website. This tutorial is written from my own ideas and any similarities to any other tutorial is purely coincidental. Tutorial is for those with a working knowledge of paintshop pro. Supplies needed. Font of choice for your name. I am using Nightmare hero Tube of choice , I am using art by Jamie kidd Artwork is not to be used without a C.I.L.M license My Immortal kit by Cora I have used the following items from the above kit Frame 04, PP12, Glitter fence, Flower swirl, Ribbon 04, Moon, No outside filters needed. This tutorial was written in PSP 9 Note Open all the supplies in paintshop except the font. Double click on your font and minimize. 1. Open a new transparent file 600 x 600 @ 72 dpi, Re size frame 4 to 300 pixels high copy and paste as a new layer. Image/ rotate/ free rotate 20 left, all layers unchecked. Duplicate layer, image/ mirror, position. Layers/ merge/ merge visible. Using your lassoo tool cut away the bottom frame from inside the top frame as in screenshot below 1.
  2. Select the center of your frame with your magic wand, selections/ modify/ expand by 3. Re size paper 12 to 600 pixels high, copy, paste as a new layer, layers/ arrange/ move down, selections/ invert, delete. Activate frame layer, add drop shadow : H 2, V 2, O 70, B 5.00, C #000000 3. Copy tube, paste as a new layer, layers/ arrange/ send to bottom, position, add drop shadow : H 2, V 2, O 70, B 5.00, C #000000. 4. Re size glitter fence to 500 pixels wide, copy, paste as new layer, position, duplicate layer, image/ flip/ image/ mirror, layers/ arrange/ send to bottom. 5. Re size flower swirl to 250 pixels wide, copy, activate frame layer, paste as a new layer, add drop shadow : H 2, V 2, O 70, B 5.00, C #000000. 6. Copy your larger tube, activate paper layer, paste as a new layer, image/ mirror, position, add drop shadow : H 2, V 2, O 70, B 5.00, C #000000. Activate frame, select the center of the frames with your magic wand, modify/ expand/ expand by 5, selections/ invert, activate large tube layer, delete, selections/ select none. Lower large tube layer opacity to 50%, blend mode set to hard light. 7. Re size ribbon 04 to 500 pixels wide, copy, paste as a new layer, move into position, layers/ arrange/ move up, add drop shadow : H 2, V 2, O 70, B 5.00, C #000000. 8. Re size moon to 200 pixels wide, copy, activate paper layer, paste as a new layer, move into position, add drop shadow : H 2, V 2, O 70, B 5.00, lower moon layer opacity to 50%. 9. Add copyright info, watermark, name and export as a png file for transparent background or jpg for white background.
Click tag to view animation.
 Sleep tight
Tutorial written by and © to Bits N Bobs 19th August 2009.
Results are for personal use only.
No monetry gain allowed and that includes placing them behind a paid or donation based membership area.
You are not allowed to share/forward or translate any of my tutorials or place them on any blog, website, DVD or anywhere else without my permission.
These tutorials are written from my own ideas and any similarities to any other tutorial is purely coincidental.
All tutorials are for those with a working knowledge of paintshop pro.
I reserve the right to amend these terms at any time.
Supplies needed.
Font of choice for your name.
I am using Persimmon
Scrap kit 'Sleep tight' by Seachell scraps
Scraps I am using from this kit are
Element 6, Element 36, Element 46, Element 49, Element 57, Element 59, Element 72, paper 1,
This tutorial was written in PSP 9
Note
Open all the supplies in paint shop except the font.
Double click on your font and minimize.
1. Open a new image 600 x 600 at 72 dpi, re size element 36 to 550 pixels high, copy, paste as a new layer on your new image.
Select center of the frame with your magic wand, selections/ modify/ expand by 3, layers/ new raster layer, flood fill with white ( #FFFFFF ), layers/ arrange/ send to bottom, copy paper 1, paste as a new layer, selections/ invert, delete, selections/ none, lower opacity to 75%.
Activate frame layer, add drop shadow :~ V-2, H-2, O-70, B-5.00, Colour # 000000 repeat drop shadow changing V and H to -2
2. Re size element 57 to 300 pixels high, copy paste as a new layer, position, add drop shadow :~ V-2, H-2, O-70, B-5.00, Colour # 000000
3. Re size element 59 to 500 pixels high, copy, activate frame layer, paste as a new layer, position, add drop shadow :~ V-2, H-2, O-70, B-5.00, Colour # 000000
4. Re size element 72 to 100 pixels high, copy, paste as a new layer, position, add drop shadow :~ V-2, H-2, O-70, B-5.00, Colour # 000000
5. Re size element 49 to 500 pixels high, copy, paste as a new layer, position, add drop shadow :~ V-2, H-2, O-70, B-5.00, Colour # 000000
6. Re size element 46 to 100 pixels high, copy, paste as a new layer, position, add drop shadow :~ V-2, H-2, O-70, B-5.00, Colour # 000000
7. Re size element 6 to 130 pixels high, copy, paste as a new layer, position, add drop shadow :~ V-2, H-2, O-70, B-5.00, Colour # 000000
PLEASE NOTE: If you want to continue to the animation skip step 8 and move onto step 9.
8. Layers/ merge/ merge visible, crop to size, add your copyright info, name and export as a png for transparent background or jpg for a white background.
Animation steps.
9. Layers merge, use your dodge tool with settings in screen shot 1 below to lighten the lamp area slightly ( click twice should do it )as shown in screen shot 2.
Sleep tight
Tutorial written by and © to Bits N Bobs 19th August 2009.
Results are for personal use only.
No monetry gain allowed and that includes placing them behind a paid or donation based membership area.
You are not allowed to share/forward or translate any of my tutorials or place them on any blog, website, DVD or anywhere else without my permission.
These tutorials are written from my own ideas and any similarities to any other tutorial is purely coincidental.
All tutorials are for those with a working knowledge of paintshop pro.
I reserve the right to amend these terms at any time.
Supplies needed.
Font of choice for your name.
I am using Persimmon
Scrap kit 'Sleep tight' by Seachell scraps
Scraps I am using from this kit are
Element 6, Element 36, Element 46, Element 49, Element 57, Element 59, Element 72, paper 1,
This tutorial was written in PSP 9
Note
Open all the supplies in paint shop except the font.
Double click on your font and minimize.
1. Open a new image 600 x 600 at 72 dpi, re size element 36 to 550 pixels high, copy, paste as a new layer on your new image.
Select center of the frame with your magic wand, selections/ modify/ expand by 3, layers/ new raster layer, flood fill with white ( #FFFFFF ), layers/ arrange/ send to bottom, copy paper 1, paste as a new layer, selections/ invert, delete, selections/ none, lower opacity to 75%.
Activate frame layer, add drop shadow :~ V-2, H-2, O-70, B-5.00, Colour # 000000 repeat drop shadow changing V and H to -2
2. Re size element 57 to 300 pixels high, copy paste as a new layer, position, add drop shadow :~ V-2, H-2, O-70, B-5.00, Colour # 000000
3. Re size element 59 to 500 pixels high, copy, activate frame layer, paste as a new layer, position, add drop shadow :~ V-2, H-2, O-70, B-5.00, Colour # 000000
4. Re size element 72 to 100 pixels high, copy, paste as a new layer, position, add drop shadow :~ V-2, H-2, O-70, B-5.00, Colour # 000000
5. Re size element 49 to 500 pixels high, copy, paste as a new layer, position, add drop shadow :~ V-2, H-2, O-70, B-5.00, Colour # 000000
6. Re size element 46 to 100 pixels high, copy, paste as a new layer, position, add drop shadow :~ V-2, H-2, O-70, B-5.00, Colour # 000000
7. Re size element 6 to 130 pixels high, copy, paste as a new layer, position, add drop shadow :~ V-2, H-2, O-70, B-5.00, Colour # 000000
PLEASE NOTE: If you want to continue to the animation skip step 8 and move onto step 9.
8. Layers/ merge/ merge visible, crop to size, add your copyright info, name and export as a png for transparent background or jpg for a white background.
Animation steps.
9. Layers merge, use your dodge tool with settings in screen shot 1 below to lighten the lamp area slightly ( click twice should do it )as shown in screen shot 2.

 Shift + D to duplicate your image and using your dodge tool click twice in the same place on the duplicated image.
Shift + D to duplicate your second image and using your dodge tool click three times in the same place on the 3rd duplicated image.
10. Save each image as 1, 2, 3 ready for animation shop.
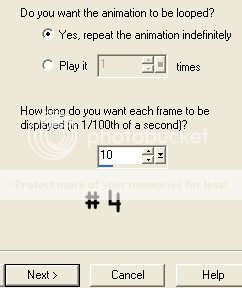
11. Open animation shop.
File/ animation wizard then follow the screen shots clicking next after each one.
On the add image part browse to where you saved your files and add them all, click next then finish.
View/ animation then file/save as.
Shift + D to duplicate your image and using your dodge tool click twice in the same place on the duplicated image.
Shift + D to duplicate your second image and using your dodge tool click three times in the same place on the 3rd duplicated image.
10. Save each image as 1, 2, 3 ready for animation shop.
11. Open animation shop.
File/ animation wizard then follow the screen shots clicking next after each one.
On the add image part browse to where you saved your files and add them all, click next then finish.
View/ animation then file/save as.


 12. Create your name in paintshop as normal, copy the file and paste as a new animation into animation shop.
Copy the name in animation shop, activate your animation, edit/ select all, edit/ paste into selected frame and then file/save as.
12. Create your name in paintshop as normal, copy the file and paste as a new animation into animation shop.
Copy the name in animation shop, activate your animation, edit/ select all, edit/ paste into selected frame and then file/save as.
Monday, 17 August 2009

Fantasia
Tutorial written by and © to Bits N Bobs 17th August 2009.
Results are for personal use only.
No monetry gain allowed and that includes placing them behind a paid or donation based membership area.
You are not allowed to share/forward or translate any of my tutorials or place them on any blog, website, DVD or anywhere else without my permission.
These tutorials are written from my own ideas and any similarities to any other tutorial is purely coincidental.
All tutorials are for those with a working knowledge of paintshop pro.
I reserve the right to amend these terms at any time.
Supplies needed.
Font of choice for your name.
I am using Silver script
Tube of choice.
I am using white bubble fairy by Ronne Barton
Not to be used without an MPT license
Fantasia tagger kit by Bits N Bobs
I have used the following items from the above kit
Frame 3, grass, paper 4, cloud 1, bubbles 1, Dove 2
No outside filters needed.
This tutorial was written in PSP 9
Note
Open all the supplies in paintshop except the font.
Double click on your font and minimize.
1. Open a new transparent image 500x500 at 72 dpi
2. Resize frame 3 to 300 pixels wide, copy and paste as a new layer on your new image, add a drop shadow.
Drop shadow settings will be the same through out this tutorial.
Effects/3Deffects/drop shadow
Vertical 2
Horizontal 2
Opactity 75
Blur 8.00
Colour black
3. Copy and paste your tube as a new layer, resize your tube to 350 pixels high, all layers unchecked, add a drop shadow.
4. Activate frame layer, copy your grass, paste as a new layer, duplicate, image/ mirror, layers/ merge/ merge down, add a drop shadow.
5. Resize paper 4 to 350 pixels wide, copy, paste as a new layer, layers/ arrange/ sent to bottom.
Activate frame layer, select center of the frame with your magic wand, selections/ modify/ expand by 10, selections/ invert, activate paper layer and hit delete, selections/ select none.
6. Copy cloud 1, paste as a new layer, layers/ arrange/ send to bottom.
7. Activate grass layer, resize bubbles 1 to 300 pixels high, copy, paste as a new layer, position to your liking, duplicate bubble layer, position again. (duplicate a 3rd time if you want more bubbles like mine ).
8. Resize dove 2 to 100 pixels high, image/ mirror, copy, paste as a new layer, position on one of your bubbles, add a drop shadow.
9. Layers/ merge/ merge visible, add your copyright info, watermark, name, crop and export as a transparent png or jpg for white background.
Tuesday, 11 August 2009

Turquoise fantasy
Tutorial written by and © to Bits N Bobs 11th August 2009.
Results are for personal use only.
No monetry gain allowed and that includes placing them behind a paid or donation based membership area.
You are not allowed to share/forward or translate any of my tutorials or place them on any blog, website, DVD or anywhere else without my permission.
These tutorials are written from my own ideas and any similarities to any other tutorial is purely coincidental.
All tutorials are for those with a working knowledge of paintshop pro.
I reserve the right to amend these terms at any time.
Supplies needed.
Font of choice for your name and text.
I am using Sweetheart script limited
Tube of choice.
I am using a tube by Ismael Rac
Tubes are not to be used without an AMI license
Eye candy 5 Impact - Gradient glow - Free trial here
Turqouise fantasy scrap kit by Bits N Bobs
Scraps I have used from the above kit are...
Doodle, Paper 4, Flower 5, Feathers,
This tutorial was written in PSP 9
Note
Open all the supplies in paintshop except the font.
Double click on your font and minimize.
1. Create a new transparent image 600x600 @ 72 dpi. Copy doodle, paste as a new layer.
2. Add a new raster layer, using your rectangle selection tool create a rectangle with floating ants ( see screenshot below )

Flood fill with #ffffff , add a new raster layer, select paper 4 as a pattern fill at 50% scale, flood fill, lower opacity to 50%, selections, select none, layers/ merge/ merge down.
Add eyecandy 5 impact/ gradient glow with the settings in the screen shot below

3. Re size tube to 400 pixels high, ( I have also colourised mine to match the kit ), copy, paste as a new layer, add eye candy 5 - gradient glow using the same settings as before.
Resize flower 5 to 250 pixels wide, copy, paste as a new layer, position over your tube, use your raster deform tool to rotate the flower slightly, add gradient glow with the same settings as before, layers/ arrange/ move down.
4. Resize feathers to 120 pixels wide, copy, paste as a new layer, add gradient glow with the same settings as before, duplicate layer twice and position.
5. Activate top layer, select your font colour and add your text.
Add eyecandy 5 impact/ gradient glow with the same settings as before.
6. Layers/ merge/ merge visible, add your copyright info, license, name, export as a jpg for a white bg or png for transparent and save.
Monday, 10 August 2009

Girlfriend
Tutorial written by and © to Bits N Bobs 10th August 2009.
Results are for personal use only.
No monetry gain allowed and that includes placing them behind a paid or donation based membership area.
You are not allowed to share/forward or translate any of my tutorials or place them on any blog, website, DVD or anywhere else without my permission.
These tutorials are written from my own ideas and any similarities to any other tutorial is purely coincidental.
All tutorials are for those with a working knowledge of paintshop pro.
I reserve the right to amend these terms at any time.
Supplies needed.
Font of choice for your name and text.
I am using Java Jive condensed
Tube of choice.
I am using a tube by Ismael Rac
Tubes are not to be used without an AMI license
Template MisfitsTemp005Cin.png in the 18th set down
Penta.com Dot and Cross available here - Garbage collection
Eye candy 5 Impact - Gradient glow - Free trial here
This tutorial was written in PSP 9
Note
Open all the supplies in paintshop except the font.
Double click on your font and minimize.
1. Open your template, image/ canvas size 600x600 placement center, close background, 2, 10, 11 and copyright layers.
Image/ rotate/ rotate counterclockwise 90.
Activate layer 02, image/ rotate/ free rotate/ right 90, all layers unchecked.
Activate layer 01, image/ rotate/ free rotate/ right 90, all layers unchecked.
2. Activate layer 09 pick a colour from your tube for your foreground colour ( I am using #fb49a1 ) , add #404040 as your background colour use your colour replacer tool and double right click .
Activate layer 08 and add eyecandy 5 impact/ gradient glow with the settings in the screen shot below then layers/ merge down.
Duplicate layer, image/ flip, layers/ merge/ merge down.

3. Activate layer 05, copy your tube, paste as a new layer, duplicate tube layer, image/ mirror, layers/ merge down, turn layer opacity down to 50%.
Activate layer 05, selections/ select all, selections/ float, selections/ defloat, selections/ invert, activate tube layer and hit delete. Selections/ select none.
4. Activate layer 06, pick a colour from your tube for your foreground colour ( I am using #fb49a1 ) , add #808080 as your background colour use your colour replacer tool and double right click .
Effects/ plugins/ penta.com/ dot and cross with the settings - 72, 10, 2
Add eyecandy 5 impact/ gradient glow with the same settings as before.
5. Activate layer 04 pick a colour from your tube for your foreground colour ( I am using #fb49a1 ) , add #c0c0c0 as your background colour use your colour replacer tool and double right click .
Effects/ plugins/ penta.com/ dot and cross with the settings - 72, 10, 2
Add eyecandy 5 impact/ gradient glow with the same settings as before.
Duplicate layer, image/ mirror, duplicate, layers/ arrange/ send to bottom.
6. Activate layer 01, Effects/ plugins/ penta.com/ dot and cross with the settings - 72, 10, 2
Add eyecandy 5 impact/ gradient glow with the same settings as before.
Duplicate layer, image/ mirror. Layers/ merge/ merge down, Duplicate layer, position at top, layers/ merge/ merge down.
7. Activate layer 05, select #000000 for your foreground, #FFFFFF as your background colour use your colour replacer tool and double right click .
Effects/ plugins/ penta.com/ dot and cross with the settings - 72, 10, 2
Add eyecandy 5 impact/ gradient glow with the same settings as before.
Close layer 07, layers/ merge/ merge visible.
8. Re-open layer 07 and activate it layers/ arrange/ bring to top.
Add eyecandy 5 impact/ gradient glow with the same settings as before.
Cross out girlfriend using your paintbrush at size 5 and a pink colour.
Use a thick font of your choice add a new raster layer and type Stalker.
Effects/ plugins/ penta.com/ dot and cross with the settings - 72, 10, 2
Add eyecandy 5 impact/ gradient glow with the same settings as before.
Layers/ arrange/ move down.
9. Copy your tube, paste as a new layer.
Add eyecandy 5 impact/ gradient glow with the same settings as before.
10. Layers/ merge/ merge visible, add your copyright info, license, name, export as a jpg for a white bg or png for transparent and save.
Saturday, 1 August 2009
 Gorjuss girl
Tutorial written by and © to Bits N Bobs August 1st 2009.
Results are for personal use only.
No monetry gain allowed and that includes placing them behind a paid or donation based membership area. You are not allowed to share/forward or translate any of my tutorials or place them on any blog, website, DVD or anywhere else without my permission. These tutorials are written from my own ideas and any similarities to any other tutorial is purely coincidental. All tutorials are for those with a working knowledge of paintshop pro. I reserve the right to amend these terms at any time.
Supplies needed.
Font of choice for your name. I am using Noodle script Tube of choice.
I am using an image by Suzanne Woolcott Gorjuss art is not to be used without the correct license
Scrap kit 'Americana' by Bits N Bobs
Scraps I am using from this kit are Frame 3, paper 5, element 4, flower spray 1, beads 3, heart 2.
This tutorial was written in PSP 9
Note
Open all the supplies in paintshop except the font.
Double click on your font and minimize.
1. Open a new image 550 x 550 at 72 dpi, copy frame 3, paste as a new layer, select center of frames with your magic wand, selections/ modify/ expand by 3, copy paper 5, paste as a new layer, selections/ invert, hit delete, layers/ arrange/ send to bottom. Selections/ invert, copy tube, paste as a new layer ( resizetube layer if needed ), selections/ invert, hit delete. Add dropshadow:~ V-2, H-2, O-100, B-7.00, Colour # 000000.
2. Resize element 4 to 400 pixels wide, copy, paste as a new layer, layers/ arrange/ send to bottom, layers/ duplicate, position below the other sparkles, layers/ merge down. Add dropshadow:~ V-1, H-1, O-50, B-7.00, Colour # 000000.
3. Resize flower spray 1 to 300 pixels wide, copy, paste as a new layer, image/ mirror. Add dropshadow:~ V-2, H-2, O-100, B-7.00, Colour # 000000.
4. Resize beads 3 to 50 pixels wide, copy, activate frame layer, paste as a new layer, add dropshadow:~ V-2, H-2, O-100, B-7.00, Colour # 000000. Resize heart 2 to 100 pixels wide, copy, paste as a new layer, add dropshadow:~ V-2, H-2, O-100, B-7.00, Colour # 000000
5. Copy the flower spray you resized earlier, paste as a new layer, layers/ arrange/ send to bottom, add dropshadow:~ V-2, H-2, O-100, B-7.00, Colour # 000000, layers/ arrange/ move up.
6. Layers/ merge/ merge visible, add your copyright info and name. Export as a png for transparent background or jpg for a white background .
Subscribe to:
Comments
(Atom)
Stores


BNB Blinkie


